Table of Contents
Advertisement
Quick Links
MODEL | MODELO
21209029
Serial number | Número de serie
See rating Label on grill for serial number.
El número de serie se encuentra en la etiqueta de
especificaciones de la parrilla.
Date purchased | Fecha de compra
The installation shall comply with AS/NZS 5601 and local gas authority.
La instalación debe cumplir con AS/NZS 5601 y la autoridad de gas local.
Tools Needed for Assembly:
2 Adjustable Wrenches
Phillips Screwdriver
10/27/2021 • 42804961
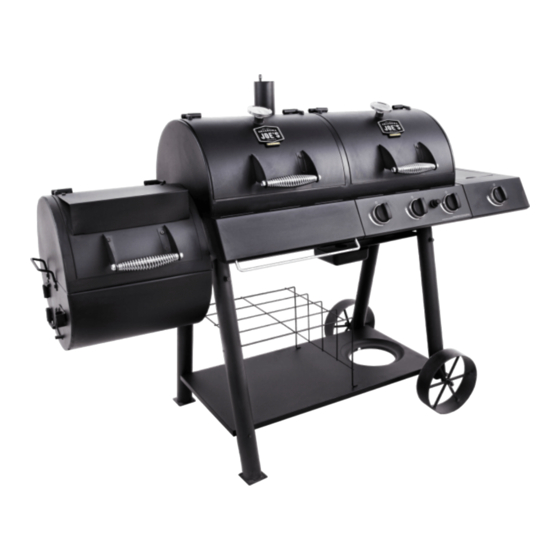
LONGHORN COMBO GRILL
CHARCOAL/GAS SMOKER AND GRILL
FUMADOR DE CARBÓN / GAS Y PARRILLA
PRODUCT GUIDE
GUÍA DEL PRODUCTO
• DO NOT INSTALL IN, OR CONNECT TO THE CONSUMER
PIPING OR GAS SUPPLY SYSTEM OF A BOAT OR CARAVAN.
• NO INSTALE O CONECTE AL SISTEMA DE TUBERÍAS DE
CONSUMO O DE SUMINISTRO DE GAS DE UN BARCO O
CARAVANA.
• NEVER OPERATE FOR MORE THAN 10 MINUTES WITH THE LID
CLOSED ON THE GAS SIDE OF THE BARBECUE.
• NUNCA OPERE POR MÁS DE 10 MINUTOS CON LA TAPA
CERRADA EN EL LADO DEL GAS DE LA BARBACOA.
Herramientas necesarias para el armado:
2 Llaves regulables
Destornillador Phillips
22
PAP
DO NOT REMOVE
ESS:1918020197
AGA 8837
Advertisement
Table of Contents

Subscribe to Our Youtube Channel
Related Manuals for oklahoma joes 21209029


Summary of Contents for oklahoma joes 21209029
- Page 1 FUMADOR DE CARBÓN / GAS Y PARRILLA PRODUCT GUIDE GUÍA DEL PRODUCTO MODEL | MODELO 21209029 • DO NOT INSTALL IN, OR CONNECT TO THE CONSUMER PIPING OR GAS SUPPLY SYSTEM OF A BOAT OR CARAVAN. Serial number | Número de serie •...
- Page 2 THIS APPLIANCE SHALL ONLY BE USED IN AN ABOVE GROUND OPEN AIR SITUATION WITH NATURAL VENTILATION, WITHOUT STAGNANT AREAS, WHERE GAS LEAKAGE AND PRODUCTS OF COMBUSTION ARE RAPIDLY DISPERSED BY WIND AND NATURAL CONVECTION. ANY ENCLOSURE IN WHICH THE APPLIANCE IS USED SHALL COMPLY WITH ONE OF THE FOLLOWING: •...
-
Page 3: For Your Safety
FOR YOUR SAFETY DANGER Safety Symbols The symbols and boxes shown below explain what each heading If you smell gas: means. Read and follow all of the messages found throughout the manual. 1. Shut off gas to the appliance, if possible. WARNING 2. -
Page 4: Gas Connection Requirements
Gas Installation Codes USE AND CARE The appliance is certified WARNING To AS 5263.0 and 5263.1.7 by AGA Barbecue must be used in accordance with the • Do not store spare gas cylinder/s in this compartment installation requirements of your local gas supply or near this appliance;... -
Page 5: Lp Gas Regulator
LP Gas Regulator Gas Cylinder • The gas cylinder used with your barbecue must meet the The LP Gas Regulator supplied with your barbecue is a following requirements: LCC27 Regulator. • Use gas cylinders only with these required measurements: LCC27 Connector - Supplied with your Barbecue 30.5 cm diameter x 45.7 cm tall with 9 kg. - Page 6 Connecting Regulator to the LP Cylinder WARNING 1.LP cylinder must be properly secured onto barbecue. (Refer to assembly section.) • Do not use barbecue until leak-tested. 2.Turn all control knobs to the OFF position. • If a leak is detected at any time, STOP! Turn off 3.Turn LP cylinder OFF by turning hand-wheel clockwise to a full gas at source and correct leak.
-
Page 7: Match-Lighting
Ignitor Lighting WARNING • Do not lean over grill while lighting. 1. Turn gas burner control valves to (off). 2. Open lid during lighting or re-lighting. For Safe Use of Your Grill and to Avoid Serious Injury: 3. Turn ON gas at LP cylinder. •... -
Page 8: Ignitor Check
Burner Flame Check • Remove cooking grates and heat tents. Light burners, rotate knobs from HIGH to LOW. You should see a smaller flame in LOW position than seen on HIGH. Perform burner flame check on side burner, also. Always check flame prior to each use. If only low flame is seen refer to "Sudden drop or low flame"... -
Page 9: Maintenance
MAINTENANCE CAUTION It is your responsibility to properly maintain your barbecue. The frequency of the maintenance will depend on the level SPIDER ALERT! you use the barbecue. Cooking grates and hot plates should be cleaned after or just prior to each use. At least once a year you need to clean the cooking chamber and inspect the burners for corrosion. -
Page 10: Cleaning The Burner Assembly
Cleaning the Burner Assembly Follow these instructions to clean and/or replace parts of burner (C) Wear eye protection: Use an air hose to force air into assembly or if you have trouble igniting barbecue. the burner tube and out the burner ports. Check each 1. -
Page 11: Cooking Tips
PREPARING TO USE YOUR SMOKER COOKING TIPS Before cooking with your smoker, the following steps should be Building Your Fire closely followed to both cure the finish and season the interior 1. Stack charcoal briquettes or wood into a pyramid-shaped pile on top of steel. -
Page 12: Food Safety
Food Safety SMOKING AND SLOW COOKING Food safety is a very important part of enjoying the outdoor Remove the cooking grill from the firebox and build your fire on cooking experience. To keep food safe from harmful bacteria, top of the fire grate in the firebox. Either charcoal or wood may follow these four basic steps: be used, but wood is the recommended fuel for it’s rate of burn and the flavor it imparts to the food being cooked. - Page 13 Símbolos de seguridad ESTA BARBACOA SOLO SE PUEDE USAR EN Los símbolos y las casillas ilustradas más adelante explican EXTERIORES. lo que significa cada encabezado. Lea y cumpla lo indicado en los mensajes que se encuentran en todo el manual. PELIGRO A LA PERSONA QUE INSTALE O ENSAMBLE ESTA BARBACOA:...
- Page 14 PELIGRO ADVERTENCIA ADVERTENCIA No cubra las rejillas con papel aluminio ni con ningún otro El uso de macetas de más de 5,6 litros de la capacidad material. Este bloqueará la ventilación del quemador y podría superar límite de peso de lado el quemador creará...
- Page 15 Requisitos de conexión de gas. Medidas de seguridad para la instalación Se debe utilizar el regulador suministrado con la barbacoa. Ÿ Utilice la barbacoa solo como se compró. Ÿ El regulador se suministra con un cilindro LCC27 Ÿ Para la conexión a un cilindro de gas de 9 kg. Ÿ...
- Page 16 5. Si aparecen burbujas que aumentan de tamaño, existe una ADVERTENCIA fuga. Cierre de inmediato la válvula del tanque de gas y vuelva a apretar las conexiones. Si no puede eliminar las fugas, no intente repararlas. Solicite una pieza de repuesto. No use la barbacoa sin antes haber verificado que no Ÿ...
- Page 17 Consejos de seguridad ADVERTENCIA Verifique que la tuerca de unión esté bien apretada antes de brir la Ÿ válvula del tanque de gas. Cuando no use la barbacoa, cierre todas las perillas de control y la Ÿ Para usar su barbacoa en forma segura y para evitar válvula del tanque de gas.
- Page 18 Nota: Es posible que su barbacoa NO venga equipada Cómo usar el encendedor No se incline sobre la barbacoa al encenderla. Ÿ con un quemador lateral. 1. Gire las válvulas de control de gas del quemador a Encendido con el encendedor del quemador lateral (apagado).
- Page 19 Control de la llama del quemador PELIGRO ADVERTENCIA Retire las barbacoas de cocción y los reguladores de llama. Ÿ Encienda los quemadores y gire las perillas, de la graduación ALTA a la graduación BAJA. Deberá ver una llama más ¡ALERTA CONTRA reducida en la graduación BAJA que en la graduación ALTA.
- Page 20 Cómo limpiar la unidad del quemador Retire los Cámara de Tornillos Combustion Siga estas instrucciones para limpiar o cambiar piezas de la unidad del quemador, o si tiene problemas para encender la barbacoa. Soporte del 1. Cierre el paso de gas en las perillas de control y desde el quemador de la cámara de tanque de gas.
-
Page 21: Consejos Para Cocinar
PREPARATIVOS PARA USAR SU AHUMADOR CONSEJOS PARA COCINAR Cómo encender el fuego Antes de cocinar con su ahumador, debe seguir al pie de la letra 1. Apile en forma de pirámide las briquetas de carbón o los trocitos os siguientes pasos para curar el acabado y el acero del interior. de madera sobre la rejilla o la bandeja colectora de cenizas. -
Page 22: Seguridad Con Los Alimentos
Seguridad con los alimentos AHUMAR Y COCINAR LENTO Si se utiliza el ahumador como un ahumado o olla de cocción La seguridad con los alimentos es una parte muy importante del lenta, quite la rejilla de la caja de fuego y construya el fuego en la disfrute de su parrillada al aire libre. - Page 23 PARTS DIAGRAM / DIAGRAMA DE PIEZAS...
-
Page 24: Parts List
PARTS LIST Qty Description Key Qty Description 1 Butterfly Damper Smoker Chamber Assembly 1 Charcoal Door Latch Cool Touch Handle 1 Warming Plate f/ Firebox 3" Professional Temperature Gauge 1 Side Handle Main Burner 1 Side Burner Shelf Electrode, Short Wire 1 Side Burner Lid Electrode, Long Wire 1 Side Burner Pan... -
Page 25: Lista De Piezas
LISTA DE PIEZAS Llv Cant Descripción Llv Cant Descripción Asamblea de cámara de fumador Pestillo de la puerta de carbón Cool Touch Handle Placa de calentamiento f / caja de fuego Medidor de temperatura profesional de 3 " Asa lateral Quemador Principal Estante de quemador lateral Electrodo, cable corto... - Page 26 PARTS LIST ASSEMBLY / MONTAJE On each short leg, slide (1) 12mm flat washer onto axle, followed by a wheel, then another 12mm flat washer. Slide a hitch pin clip into the hole at the end of the axle. En cada pierna corta, introduzca una (1) roldana plana de 12 mm sobre el eje, seguida de una rueda, y luego otra roldana plana de 12 mm. Introduzca una sujetador del pasador de enganche en el orificio en el extremo del eje.
- Page 27 With the aid of a helper, attach the bottom shelf to legs using (4) 1/4-20 x 3” screws and (4) 1/4-20 flange nuts. DO NOT FULLY TIGHTEN THE SCREWS AT THIS TIME! Con ayuda de una persona, fije el anaquel inferior a las piernas con cuatro (4) tornillos de 1/4-20 x 3" y cuatro (4) tuercas de reborde de 1/4-20. ¡NO APRIETE LOS TORNILLOS COMPLETAMENTE EN ESTE MOMENTO! 1/4-20 x 3”...
- Page 28 Make sure that leg bolts are tight enough so that legs won't slip off of posts. With the assistance of a helper, roll the unit over the handle brackets and stand it up onto its legs. Once standing, fully tighten the four leg bolts against leg post walls. Insert the tank exclusion right end into holes on the bottom shelf.
- Page 29 Connect firebox lid and firebox bottom using (4) 1/4-20 x 1/2” bolts and (4) 1/4-20 flange nuts. Una la tapa del fogón y la parte inferior del fogón con cuatro (4) pernos de 1/4-20 x 1/2” y cuatro (4) tuercas de reborde de 1/4-20. Firebox Bottom Parte inferior del fogón Firebox lid...
- Page 30 With the aid of a helper, connect firebox and smoker chamber using (8) 5/16-18 x 3/4” Bolts, 5/16” lock washers, 5/16” flat washers and 5/16-18 nuts. Tighten securely. Con ayuda de una persona, una el fogón y la cámara del ahumador con ocho (8) pernos de 5/16-18 x 3/4”, una roldana de seguridad de 5/16”, una roldana plana de 5/16”...
- Page 31 A. Attach the right side fascia to side shelf with (4) #10 x 3/8” self-tap screws. B. Pre-assemble (4) 1/4-20 x 1/2” bolts and (4) 1/4-20 flange nuts loosely to the right side panel of the smoker, then hang the side shelf onto the screws.
- Page 32 Insert side burner valve into fascia, place bezel on fascia, then install (2) #8-32 x 3/8” screws through bezel, fascia and into valve. B. Press control knob onto side burner valve stem as shown below. A. Inserte la válvula en la protección, coloque el montaje sobre la protección y luego coloque dos (2) tornillos de N° 8-32 x 3/8" a través del montaje y la protección hacia la válvula y apriete.
- Page 33 Place (3) heat tents onto the brackets in the firebox over the burners. Coloque tres (3) difusores en los soportes en el fogón sobre los quemadores. Heat Tents Difusores Place charcoal grate assembly into charcoal grill bottom and charcoal grate into firebox bottom. Coloque una montaje de bandeja para carbón en la parte inferior del asador de carbón y una parrilla para carbón en la parte inferior del fogón.
- Page 34 Place (2) smaller cooking grates into firebox. Then place (4) large cooking grates into smoker chamber. Coloque dos (2) parrillas para cocinar más pequeñas en el fogón. Luego coloque cuatro (4) parillas para cocinar grandes en la cámara del ahumador. Smoker Chamber Cooking Grates Parrillas para cocinar en la cámara del ahumador Firebox Cooking Grates...
- Page 35 Remove electronic ignition module cap, install battery positive out, reinstall cap. Retire módulo de encendido tapa, instale la batería con el positivo hacia fuera, vuelva a instalar la tapa.
- Page 36 LP CYLINDER IS SOLD SEPARATELY. Fill and leak check the cylinder before attaching to grill and regulator (see Use & Care section). Once cylinder has been filled and leak checked, place cylinder into hole in bottom shelf. Make sure cylinder valve is facing as shown. See Use &...
- Page 37 Install one (1) Temperature Gauge into the threaded bushing located on each lid. Ÿ Align each gauge and then secure with jamb nut. Ÿ Instale una (1) Medidor de temperatura en el buje roscado situado en cada tapa. Ÿ Alinee cada medidor y luego asegure con la tuerca de la jamba. Ÿ...
-
Page 38: Troubleshooting
EMERGENCIES: If a gas leak cannot be stopped, or a fire occurs due to gas leakage, call the fire department. Emergencies Possible Cause Prevention/Solution Gas leaking from • Damaged hose. •Turn off gas at LP cylinder or at source on natural gas systems. Discontinue use of cracked/cut/burned hose. - Page 39 Troubleshooting (continued) Problem Possible Cause Prevention/Solution Sudden drop in gas flow or • Check for gas in LP cylinder. • Out of gas. low flame. • Excess flow valve tripped. • Turn off knobs, wait 30 seconds and light grill. If flames are still low, turn off knobs and LP cylinder valve.
-
Page 40: Resolución De Problemas
CASOS DE EMERGENCIA: Si no se puede detener una fuga de gas, o si ocurre un incendio debido a una fuga de gas, llame a los bomberos. Emergencias Causas probables Medidas de prevención / solución Fugas de gas de mangueras •... - Page 41 Resolución de problemas continuación) Problema Causas probables Causas probables Medidas de prevención / solución Medidas de prevención / solución Caída repentina del flujo de • Se acabó el gas. • Verifique que el tanque de gas esté cargado. gas o llama reducida. •...
- Page 42 Authorized Distributors List If you have a question or need help during assembly, call: Australia New Zealand Chile Sitro Group Australia Pty. Ltd. Aber Holdings Representaciones JCE Ph: 1-300-174-876 Ext. 1 Servicio Técnico: 2414-2600 Customer Service Line: 080016116 Email: service.group@sitro.com.au Email: service@aber.co.nz Email:...
- Page 43 Mexico Costa Rica Honduras Comercializadora DESICO JyG Importaciones DIUNSA Ph: 818-398-8250 Ph: 2222-5444 Ph: 2553-2721 Ext. 1468 Email: mercadotecnia@desico.com.mx email: Centro_dellamadas@diunsa.hn Ave. 10, Calles 11 y 1E Edif. Ferretería Email: servicio.cliente@desico.com.mx Jiménez. San José, COSTA RICA Website: www.diunsa.hn Website: www.desico.com.mx Email: info@grupojyg.com Website:...
- Page 48 So, how did it go? Share your awesome cooking experience with everyone! We are live on all the social media sites! Join the community! Entonces, ¿cómo te fue?¡Comparte tu increíble experiencia culinaria con todos! ¡Estamos en vivo en las redes sociales! ¡Únete a la comunidad!
Need help?
Do you have a question about the 21209029 and is the answer not in the manual?
Questions and answers