Advertisement
- 1 Parts and Controls
- 2 Features and Technical Data
- 3 About Cigars/Terminology
- 4 Installation
- 5 Operation and Controls
- 6 Care and Maintenance
-
7
Troubleshooting
- 7.1 The appliance does not operate
- 7.2 The appliance is not reaching the desired temperature
- 7.3 Frost forming inside the appliance
- 7.4 The appliance turns itself on and off frequently
- 7.5 The appliance makes too much noise
- 7.6 The door does not close properly
- 7.7 Condensation builds up on the glass door
- 7.8 Frost forming inside the appliance
- 7.9 Hygrometer reading is off
- 8 Safety Precautions
- 9 Documents / Resources
Parts and Controls

- Lights (2)
- Internal Fans (4)
- Removable premium stainless steel trimmed scalloped shelves (7)
- Leveling Legs ( 2big, 2 small under door hinge)
- Hinge Covers (2)
- Door Seals (2)
- Glass Doors (2)
- Hygrometer
- Removable Spanish cedar drawers (3) and shelves (4)
- Air Filters(4)
- Drip Trays (2)
- Power Cord
- Control Panel
- Door Handles (2)
- Door Frame
- Temperature Display
- Up Button
- Down Button
- Light Switch
- Humidity Tray
Features and Technical Data
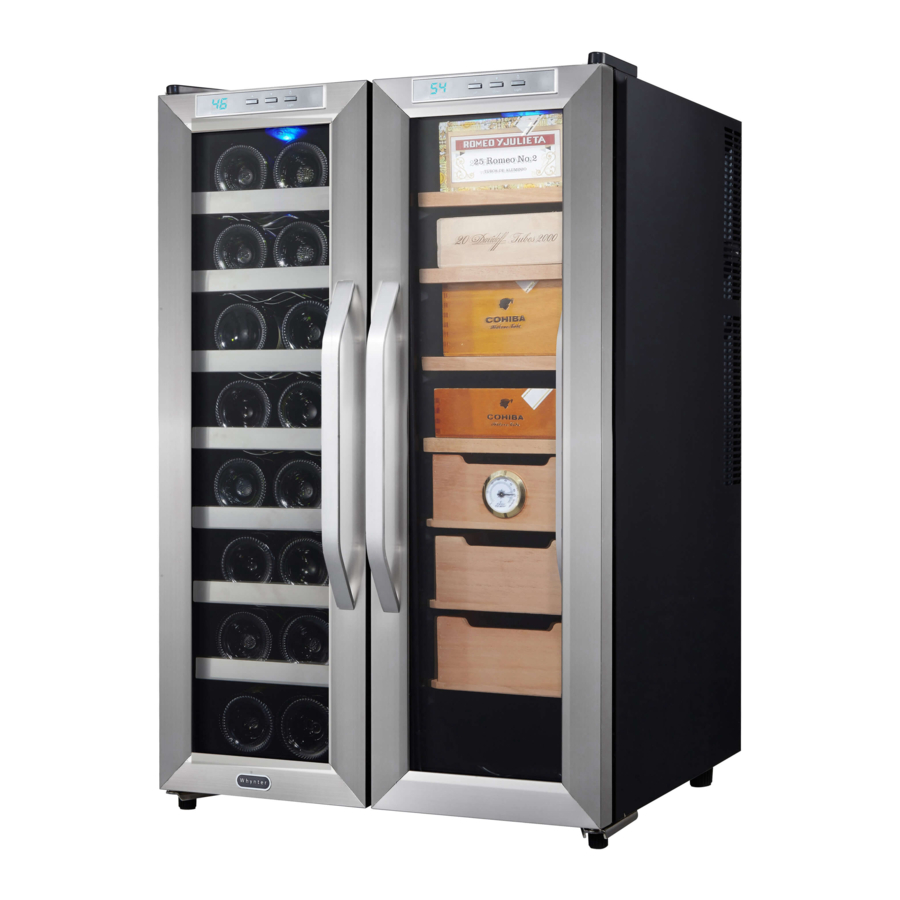
Store all your finest wine and cigar in one unit with the Whynter Freestanding 3.6 cu. ft. Wine Cooler and Cigar Humidor Center. Ideal for those with limited space, not only this multi-purpose cooler can hold an array of beverages from wine to water bottles, but also the perfect cigar storage system that can help preserve the flavor of your cigars and protect them from pests or other harmful conditions. Between two individual temperaturecontrolled compartments, up to 16 bottles of wine bottles and 350 cigars can be stored. Each zone features its own temperature control and digital display. The Whynter CWC-351DD has no moving parts and is CFC-free, which means that you get silent, long-lasting, and environmentally safe refrigeration for your collection.
- Capacity: 3.6 cu. ft.
- Freestanding setup
- Vibration-free thermoelectric cooling
- Stainless steel trimmed glass door with sleek black cabinet
- Professional quality towel bar handle
- 3 removable Spanish cedar drawers and 4 shelves
- 7 removable premium stainless steel trimmed scalloped shelves
- Adjustable thermostat with temperature range from 46ºF - 66ºF
- Enhanced LCD temperature display
- Soft interior LED lighting with on/off switch
- Solid state components for long life - the only moving parts are fans to circulate air for even temperature distribution
- Internal fan-forced circulation for even temperature distribution throughout the cabinet
- ETL Certified
TECHNICAL DATA
| MODEL: | CWC-351DD |
| Capacity | 3.6 cu.ft. |
| Wine bottle capacity: | 16 bottles |
| Cigar capacity: | Holds up to 350+ cigars |
| Voltage | 110V / 60Hz |
| Current | 3A |
| Input Power | 210W |
| Power Consumption | 1.5KWh/24h |
| Temperature Control Range | 46°F - 66°F |
| Net Weight | 69.5 lbs |
| Gross Weight | 75 lbs |
| Drawer Dimensions | 7.1" W x 12" D x 3" H |
| Flat Shelves Dimensions | 7.1" W x 12" D |
| Unit Dimensions | 21" W x 21" D x 33" H |
| Packaging Dimensions | 24" W x 24" D x 35" H |
About Cigars/Terminology
| Amatista | A glass jar containing 50 (or 25) cigars, sealed and sold "factory fresh". |
| Band | Ring of paper wrapped around the closed head of most cigars. |
| Binder | Portion of a tobacco leaf that holds the filler leaves together. |
| Blend | The mixture of different types of tobacco in a cigar, including up to five types of filler leaves, a binder leaf and an outer wrapper. |
| Bloom | Harmless white film caused by tobacco oils rising to the surface of the cigar wrapper. Often indicates a strong taste. (Also called Plume). |
| Bouquet | Used to describe the smell of a fine cigar and fine wines. |
| Bunch | Filler tobacco used to create the body of a cigar. |
| Cap | A circular piece of wrapper leaf used to secure the wrapper at the cigar head. |
| Cigarillos | Thin, three-inch cigars, popular in Europe, generally machine-made. |
| Draw | Amount of air that gets pulled through a lit cigar. Easy/hot or tight/plugged. |
| Flag | Instead of a cap, flags are an extension of the wrapper leaf used to finish the head of a cigar. Sometimes tied off in a pigtail or a curly head. |
| Foot | The end of the cigar that you light. Often pre-cut. |
| Head | The closed end of the cigar that you put into your mouth. |
| Hot | A cigar draw that is too easy, often because it has been under-filled. |
| Hygrometer | Device used to measure humidity or percentage of moisture in the air. |
| Long Filler | Whole tobacco leaves used to fill a cigar; these leaves are long and can run the length of the cigar's bunch. Long filler should burn evenly and consistently. |
| Piercer | Used to cut/pierce a small hole in the end of a cigar (also called a 'lance'). |
| Plug | A blockage that prevents a cigar from drawing properly. (Gently massaging the cigar may relieve a plugged draw). |
| Ring Gauge | Diameter of a cigar's barrel, expressed in 64ths of an inch. A half-inch cigar would be a 32 ring (32/64). |
| Short Filler | Cigar bunch comprised of scraps of tobacco (parts of leaves and twigs). |
| Shoulder | Where the cap of the cigar meets the barrel. The cigar will unravel if cut. |
| Tunneling | Uneven burning of a cigar which occurs when a wrapper does not ash. |
| Wrapper | High-quality tobacco leaf wound around the finished bunch and binder. |
Installation
IMPORTANT SAFETY INSTRUCTIONS

To reduce the risk of fire, electrical shock, or injury when using your appliance, follow these basic precautions:
- Read all instructions before using the appliance.
![]()
or
![]()
An empty Wine Cooler and Cigar Humidor Center can be a hazardous for children or small pets. If disposing of the cigar cooler humidor, remove gasket seals, latches, lids or the entire door from your unused appliance, or take other action to ensure the appliance is harmless.- Never allow children to operate, play with, or crawl inside the appliance.
- Never clean appliance parts with flammable fluids or harsh chemicals. The fumes can create a fire hazard or explosion.
- Do not store or use gasoline or any other flammable vapors and liquids in the vicinity of this or any other appliance. The fumes can create a fire hazard or explosion.
BEFORE USING YOUR APPLIANCE
- Remove the exterior and interior packing.
- Clean the interior surface with lukewarm water using a soft cloth.
- You may see sticky blotches or glue-like residue on the cigar humidor, including the glass door, hydrometer or the Spanish Cedar wood. The sticky blotches or glue-like residue you see inside the cigar humidor is from the oils in the Spanish Cedar wood. Spanish Cedar is naturally oily and it is in the oils where Spanish Cedar gets the rich spicy aroma. Being a wood that naturally grows in the humid conditions of Central America, the Spanish Cedar wood is naturally mold resistant, and resistant to the tobacco beetle.
- The natural oils can migrate to the surface of shelves or drawers and other parts of the humidor, such as the door and humidity tray. These natural oils can be cleaned using alcohol. Although somewhat annoying, the more oils in your Spanish Cedar wood, the more pleasing the aroma will be.
- Please be assured that no glue is being used in the manufacturing process of our Whynter cigar humidors.
SEASONING THE UNIT
- Before placing any cigars inside of the unit, please wipe the inside of the cabinet walls, drawers and shelves with distilled water.
- This step is very important as cedar is a low density wood so the hydroscopicity is relatively large. Seasoning will allow the wood to absorb and hold moisture so that it does not absorb additional moisture once cigars are added.
INSTALLATION OF YOUR APPLIANCE
- The appliance is designed for a free standing installation.
![]()
Do not store or install the appliance outdoors.![]()
This appliance is designed for designed to storing and aging cigars. Do not store perishable food, medicine or other medical products.- Place your appliance on a hard and level floor that is strong enough to support it when it is fully loaded.
- To level your appliance, adjust the leveling legs at the bottom of the appliance if needed.
- When positioning the appliance, ensure that there is at least a 4" clearance at the sides and a 6" clearance at the back. This will allow for adequate ventilation of any heat generated by appliance.
- We do not recommend installing the appliance on carpet.
- Do not install the appliance near an oven or other heating source. Direct sunlight may affect the acrylic coating and heat sources may increase electrical consumption. For best performance, do not install the appliance behind a cabinet door or block the base grille. Extreme cold ambient temperatures may also cause the appliance not to perform properly.
- Avoid locating the appliance in area that may be exposed to excessive moisture.
- Plug in the appliance into an exclusive, grounded wall power outlet. Do not under any circumstances cut or remove the third (ground) prong from the power cord. Any questions concerning power and/or grounding should be directed toward a qualified electrician or an authorized service center.
ELECTRICAL CONNECTION
Improper use of the grounded plug can result in the risk of electrical shock. If the power cord is damaged, have it replaced by a qualified electrician or contact Whynter Service Department.
This appliance requires a standard 115/120 Volt AC ~/60Hz electrical ground outlet with three-prong. Have the wall outlet and circuit checked by a qualified electrician to make sure the outlet is properly grounded. The cord should be secured behind the appliance and not left exposed or dangling to prevent accidental injury. The appliance should always be plugged into its own individual electrical outlet which has a voltage rating that matches the rating label on the appliance. This provides the best performance and also prevent overloading house wiring circuits that could cause a fire hazard from overheated. Never unplug the appliance by pulling the power cord. Always grip the plug firmly and pull straight out from the receptacle. Repair or replace immediately all power cords that have become frayed or otherwise damaged. Do not use a cord that shows cracks or abrasion damage along its length or at either end. When moving the appliance, be careful not to damage the power cord.
EXTENSION CORD
Because of potential safety hazards, it is strongly recommended that you do not use an extension cord with this appliance. However, if you must use an extension cord, it is absolutely necessary that it be a UL/CUL-Listed, 3-wire grounding type appliance extension cord having a grounding type plug and outlet and that the electrical rating of the cord be 115 volts and at least 10 amperes.
BEFORE USING YOUR APPLIANCE
- Remove the exterior and interior packing.
- Clean the interior surface with lukewarm water using a soft cloth.
- Install the handle on the door
HANDLE BAR
To install the handles, you will need a Phillips head screwdriver.

- Open the door.
- Locate the two screw holes on the inside of the door (they may be partially obscured by the door seal so you may need to remove the door seal).
- Insert the screws into the screw holes until they stick out of the front of the door.
- Line up the holes in the handle with the screws and give each screw about 2-4 full turns into the handle bar.
- Now the turn the screws in all the way, and your handles are installed.
- Replace seal into door frame.
Operation and Controls
It is recommended you install the appliance in a place where the ambient temperature is between 68º-80ºF.
If the ambient temperature is above or below recommended temperatures, the performance may be affected. For example, placing your appliance in extreme cold or hot conditions may cause interior temperatures to fluctuate.

SETTING THE TEMPERATURE
The interior temperature can be adjusted in increments of 1 degree. You can set the temperature by pressing the Up and Down buttons on the control panel.
- Keeping to a storage temperature of between 50°F - 66°F is essential for preserving the quality of cigars.
- Generally for red wines, the temperature range should be between 57°F-61°F. For white wines, the temperature range should be 50°F-54°F, based on an ambient room temperature of 77°F.
INTERIOR LIGHT
You can turn on and off the interior light by pressing the "Light" button on the control panel.
LEVELING THE APPLIANCE
It is important for your appliance to be leveled in order to work properly. It can be raised or lowered by rotating each of the feet on the bottom of the machine. If you find that the surface is not level, rotate the feet until the appliance becomes level. You may need to make several adjustments to level it. We recommend using a carpenter's level to check the machine.
Note: This unit has 2 large levelling legs and 2 small levelling leg under the door hinge.

- Place a carpenter's level on top of the product to see if the appliance is level from front to back and side to side.
- Adjust the height of the feet as follows: Turn the leveling feet to the right to lower that side of the refrigerator. Turn the leveling feet to the left to raise that side of the refrigerator.
HUMIDITY CONTROL

- This appliance is equipped with a system for maintaining the correct level of humidity. Fill the humidity tray (small plastic reservoir) to about ¾ full with 100% distilled water, then place it onto the runners found on the top shelf of the appliance. Check the water level regularly and refill as necessary.
- Please ensure the reservoir is positioned correctly on the runners on the top shelf to avoid the possibility of water spillage.
HYGROMETER
This unit is equipped with a hygrometer, which is a gauge used to measure humidity levels inside the humidor. It is recommended to maintain a humidity level of 62% to 75% inside of a humidor to properly preserve and age cigars.
CIGAR CAPACITY
The listed cigar capacity for your cigar humidor is an estimated maximum capacity base on a standard five inches long and a half an inch in diameter cigar. For other size cigars, the capacity will vary.
BOTTLE CAPACITY
The listed bottle capacity for your wine cooler is an estimated maximum capacity base on a standard 750ml wine bottle. For other size bottles, the capacity will vary.
WINE SHELVES
The CWC-351DD wine cooler is equipped with 7 premium stainless steel trimmed scalloped shelves. If you are having trouble fitting the stated listed number of bottles of wine in the wine cooler, try flipping the wine racks over. To prevent damage to the door gasket, make sure the door is all the way opened when pulling the shelves out.
- For easy access of the wine bottles, you must pull the shelves approximately ⅓ out of the railing.
- When removing the shelves out of the railing, make sure to remove all items first.
- To remove the shelves, pull the shelf forward through the rail carefully.
TRANSPORT OF THE APPLIANCE
The ideal packaging for the wine cooler is its original packaging. Please keep the original packaging handy and repack the wine cooler if you need to transport the unit.
OPERATING THE APPLIANCE
It is recommended you install the appliance in a place where the ambient temperature is between 68º-78ºF. If the ambient temperature is above or below recommended temperatures, the performance may be affected. For example, placing your Wine Cooler in extreme cold or hot conditions may cause interior temperatures to fluctuate.
RECOMMENDED TEMPERATURE SETTINGS
| Conservation | 49 - 57ºF |
| Red Wines | 58 - 72ºF |
| Dry/White Wines | 48 - 57ºF |
| Rose Wines | 49 - 51ºF |
DEFROSTING
Under most ambient conditions, the wine cooler does not need to be defrosted. In cold ambient temperatures and/or high humidity, some frost may build up. To defrost, remove all items, unplug the wine cooler and leave the door open. Never use a knife or other metal instrument to scrape ice/frost. After defrosting, plug in the wine cooler and set the desired temperature.
Care and Maintenance

Failure to unplug the appliance could result in electric shock or personal injury
CLEANING YOUR APPLIANCE
- Turn off the power, unplug the appliance, and remove all cigars from the appliance and store them in a suitable place.
- Clean the inside, the door seal and the inside of the glass with a clean, damp cloth.
- Never use detergents or other substances that emit odors.
- Always keep the door closed when cleaning the outside of the appliance. Make sure no detergent odors penetrate into the appliance.
- Clean the side panels and door surfaces with a clean and soft cloth. If necessary, use a moist cloth. Alternatively, use a microfiber cloth.
- The humidity tray should be hand-washed with water and detergent. After cleaning, always make sure the tray is thoroughly rinsed with clean water before replacing.
VACATION TIME
- Short vacations: Leave the appliance operating during vacations of less than two days.
- Long vacations: If the appliance will not be used for an extended period, remove all items and turn off the appliance. Clean and dry the interior thoroughly.
MOVING YOUR APPLIANCE
- Remove all items inside the appliance.
- Securely tape down (we recommend using painter's tape) all loose items (shelves) inside your appliance.
- Turn the adjustable leg up to the base to avoid damage.
- Tape (we recommend using painter's tape) the door shut.
- Be sure the appliance stays secure in the upright position during transportation and protect the exterior of appliance with a blanket, or similar item.

- Do not touch the power plug when your hands are wet
- Never unplug the unit by pilling on the plug
PREPARING FOR STORAGE
If the appliance will not be used for a long time, or is to be moved to another place, it will be necessary to defrost the unit and dry the interior.
- Disconnect the appliance from the power supply by removing the power plug from the wall socket.
- Leave the door open to allow for air circulation and to prevent mold, mildew and unpleasant smells.
![]()
Store the unit out of the reach of children. If you have children, you may want to take additional precautions such as removing the door to prevent a child from being trapped inside the appliance.
ENERGY SAVING TIPS
- The appliance should be located in the coolest area of the room, away from heat producing appliances, and out of any direct sunlight.
- Ensure that the appliance is adequately ventilated. Never obstruct the air vents.
- Close the door tightly and do not open the appliance too frequently or for a long period of time.
- Store the content in an organized way.
- Do not over-fill the appliance to allow air to circulate.
Troubleshooting
| Problem | Possible Causes | Solutions |
The appliance does not operate |
|
|
The appliance is not reaching the desired temperature |
|
|
Frost forming inside the appliance |
|
|
The appliance turns itself on and off frequently |
|
|
The appliance makes too much noise |
|
|
The door does not close properly |
|
|
Condensation builds up on the glass door |
|
|
Frost forming inside the appliance |
|
|
Hygrometer reading is off |
|
|
| Sap/Oil spots can be found on shelves and drawers |
|
|
Safety Precautions
APPLIANCE SAFETY
Your safety and the safety of others are very important to us.
To reduce the risk of fire, electrical shock, or injury when using your appliance, follow these basic precautions
 This is the Safety Alert Symbol. This symbol alerts you to potential hazards that may result in serious injury. All safety messages will follow the Safety Alert Symbol and either the words" DANGER" or "WARNING".

Danger means that failure to heed this safety statement may result in severe injury or death.

Warning means that failure to heed this safety statement may result in extensive product damage, serious injury, or death.
Caution means that failure to heed this safety statement may result in minor or moderate injury, or property or equipment damage.
All safety messages will alert you to know what the potential hazard is, tell you how to reduce the chance of injury, and let you know what can happen if the instructions are not followed.
IMPORTANT SAFEGUIDES
Before the appliance is used, it must be properly positioned and installed as described in this manual, please read the manual carefully. To reduce the risk of fire, electrical shock or injury when using the appliance, follow basic precaution, including the following:
- Plug into a grounded 3-prong outlet, do not remove grounding prong, do not use an adapter, and do not use an extension cord.
- Do not use if the power supply cord is damaged. If damaged, it must be replaced by a qualified electrician.
- It is recommended that a separate circuit, serving only your appliance be provided. Use receptacles that cannot be turned off by a switch or pull chain.
- Never clean appliance parts with flammable fluids or harsh chemicals. These fumes can create a fire hazard or explosion.
- Do not store or use gasoline or other flammable vapors and liquids in the vicinity of the appliance or any other appliance.
- Before proceeding with cleaning and maintenance operations, make sure to unplug the appliance.
- Do not connect or disconnect the electric plug with wet hands.
- Do not attempt to repair or replace any part of your appliance unless it is specifically recommended in this manual. All other servicing should be referred to a qualified technician.
FOLLOW WARNING CALL OUTS BELOW ONLY WHEN APPLICABLE TO YOUR MODEL
- Use two or more people to move and install the appliance. Failure to do so can result in injury.
- When positioning the wine cooler, ensure that there isat least a 4" clearance at the sides and a 6" clearance at the back.
- Please note that this is a freestanding appliance and should not be placed into a built-in space. Even with the recommended clearance, there may not be adequate airflow.
- It is recommended that you install the wine cooler in a place where the ambient temperature is between (68°F- 78°F). This appliance must be installed in an area protected from the element, such as wind, rain, water spray or drips.
- The appliance should not be located next to ovens, grills or other sources of high heat.
- The appliance must be installed with all electrical connections in accordance with state and local codes.
- The fuse (or circuit breaker) size should be 15 amperes.
- It is important for the appliance to be leveled in order to work properly. For a stable installation, make sure the appliance is placed on a flat, level and solid surface.
- Ensure that the surface on which the appliance is placed is strong enough to hold the appliance and the items stored inside.
- This appliance is not intended for use by young children or physically-challenged persons without supervision/assistance. Young children must be supervised to ensure safety around this or any appliance.
- Do not use solvent-based cleaning agents of abrasives on the interior. These cleaners may damage or discolor the interior.
- Keep fingers out of the "pinch point" areas. Clearance between the doors and between the doors and cabinet are necessarily small. Be careful closing doors when children are in the area.
- Close the wine cooler immediately after putting in any items to keep the internal temperature relatively constant.
- Avoid placing any objects on top of the appliance.
- This is an electrical appliance, to avoid injury from electrical shock do not operate the unit with wet hands, while standing on a wet surface or while standing in water. Do not use outdoors or in wet conditions.
- When positioning or moving the appliance, ensure that it is not turned up side down or unleveled greater than 45°.
- Never pull the power cord to disconnect it from the outlet. Grasp the plug and pull it from the outlet.
- Never lift, carry or drag the appliance by the power cord.
- This appliance is designed for household, non-commercial use only. Any other use will void the warranty.
- Do not plug into the power outlet before set up is completed.
- Do not cut or remove the ground prong from the power cord.
- Do not move this appliance without emptying it and securing the door in a closed position.
Documents / Resources
References
Download manual
Here you can download full pdf version of manual, it may contain additional safety instructions, warranty information, FCC rules, etc.
Advertisement


Need help?
Do you have a question about the CWC-351DD and is the answer not in the manual?
Questions and answers