Advertisement
Quick Links
Advertisement

Subscribe to Our Youtube Channel
Related Manuals for argon audio ONE V3


Summary of Contents for argon audio ONE V3
- Page 1 Argon ONE V3 / M.2 NVMe PCIE Instructions Manual...
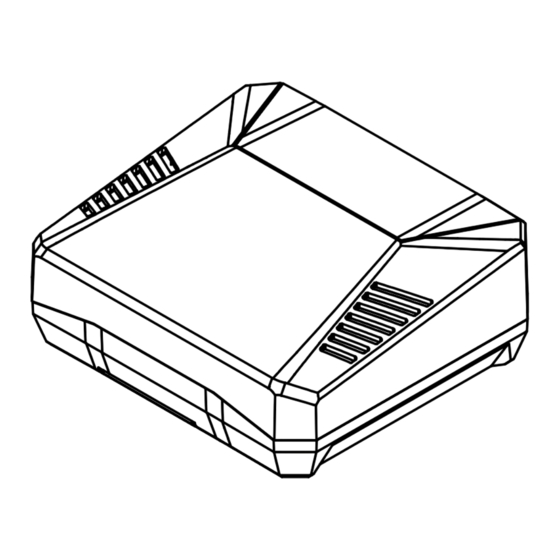
- Page 2 ARGON ONE V3 / M.2 NVMe PCIE PARTS ARGON ONE V3 ARGON ONE V3 M.2 NVMe PCIE Magnetic Removable Top Cover 40 Pin GPIO Access USB-C Power In 2 x USB 3.0 Power Pogo Pins Exhaust vents 2 x Type A HDMI 2 x USB 2.0...
- Page 3 Always ON Mode Power Button and Power Management 2 Regular HDMI Converted the micro HDMI of the RPi 5 to Regular HDMI GPIO Access Full GPIO Access with Magnetic cover Stay Happy. Argon ONE V3 Case for Raspberry Pi® 5...
- Page 4 ARGON ONE V3 ADD ON MODULES Add ON: Argon ONE M.2 Fully compatible with the Argon ONE M.2 NVME PCIE PCIE-NVME Expansion Expansion Board for the M.2 NVMe Storage via the PCIE of Board the RPi 5 Full high definition 24-bit 192kHz Texas Instruments PCM5122...
- Page 5 ASSEMBLY INSTRUCTIONS 1. Connect the Raspberry Pi® 5 to HDMI-Power Board. Place the Silicon Thermal Pads on the Argon ONE V3 case heatsinks (CPU and PMIC). *push all the way in the HDMI DAUGHTERBOARD SILICON THERMAL PADS Reminder: Peel off plastic on both sides of the thermal pads Stay Happy.
- Page 6 2. Connect the PCIe Pipe Flat Flex Cable to the Raspberry Pi® 5 PCIE port. Skip this step if you have not purchased the Argon ONE V3 M.2 NVMe PCIE Case or Expansion Board Copper side of the strip should be facing the white side of the PCIE connector of the Raspberry Pi®...
- Page 7 3. Connect the Argon ONE BLSTR DAC Board to the pins of the Argon ONE V3 Fan Board. Argon ONE BLSTR DAC is needed to activate the 3.5mm Audio Jack to work. Skip this step if you have not purchased the Argon ONE BLSTR DAC.
- Page 8 4. Carefully connect Raspberry Pi® 5 HDMI-Power assembly to the female GPIO port of the Argon ONE V3 case. FOR ARGON ONE V3 CASE ONLY: Please make sure that the microSD Card is NOT inserted to the Raspberry Pi during assembly.
- Page 9 5. Use flat head screws to fasten Raspberry Pi® 5 and HDMI-Power Board assembly to top case. Stay Happy. Argon ONE V3 Case for Raspberry Pi® 5...
-
Page 10: Default Settings
6. Select the Argon ONE V3 Power Button Management Mode: ARGON ONE V3 / M.2 NVMe PCIE CASE JUMPER PIN SETTING JUMPER PIN MODE BEHAVIOUR SETTING Default You need to PRESS button to Pin 1-2 Setting Power ON from shutdown or (Mode 1) power outage. - Page 11 7. Secure the bottom cover of the Argon ONE V3 using the round head screws. ARGON ONE V3 ARGON ONE V3 M.2 NVMe PCIE Stay Happy. Argon ONE V3 Case for Raspberry Pi® 5...
- Page 12 8. Connect your M.2 NVMe Drive to the Argon ONE V3 M.2 NVMe PCIE Expansion Board. This Board will accept M.2 Key M and M.2 Key B+M NVMe Storage Drive. THRML M.2 Heatsink *This Board is NOT compatible with M.2 SATA Storage Drives.
- Page 13 | bash 2. Reboot. UNINSTALL To uninstall the Argon ONE V3 script you may do so by clicking the Argon ONE V3 Desktop icon. You may also remove the script via “Terminal” by typing: argonone-uninstall Always reboot after changing any configuration or uninstallation for the revised settings to take effect.
- Page 14 Cooling and Power Management. Below are the SETTINGS that were automated by the Argon ONE Script. EEPROM Config config.txt Argon ONE PSU_MAX_CURRENT=5000 usb_max_current_enable=1 Power Button Argon ONE V3 dtparam=nvme BOOT ORDER=0xf416 M.2 NVME PCIE PCIE_PROBE=1 dtparam=pciex1_1=gen3 Argon ONE dtoverlay=hifiberry-dac BLSTR DAC www.argon40.com...
- Page 15 ARGON ONE V3 POWER BUTTON & FAN SPEED Upon installation of the Argon ONE V3 script by default, the settings of the Argon ONE V3 Power button and cooling system are as follows: ARGON ONE V3 CPU TEMP FAN POWER...
-
Page 16: Recommended Power Supply
The latest version has a programmable Infrared Receiver installed that can turn ON and OFF the device using the proprietary Argon 40 IR Remote. To configure the Infrared Receiver ON/OFF signal of Argon ONE V3 type in the Terminal App: argonone-ir Then follow the instructions indicated.
Need help?
Do you have a question about the ONE V3 and is the answer not in the manual?
Questions and answers