Table of Contents
Advertisement
Advertisement
Table of Contents

Subscribe to Our Youtube Channel
Related Manuals for Smeg SC445MCX


Summary of Contents for Smeg SC445MCX
- Page 1 Instructions for Use Bedienungsanweisung...
- Page 2 In this way you We ask you to read the instructions in this booklet can be sure that the packaging materials will be very carefully as this will allow you to get the best re-used. results from using your microwave oven.
-
Page 3: Table Of Contents
Lids ..............................24 Oven Cleaning and Maintenance ..................... 26 Front surface ..........................26 Oven interior ........................... 26 Oven ceiling ............................ 27 Accessories ............................ 27 What should I do if the oven doesn’t work? ................... 28 Technical characteristics ......................... 29 Installation ............................59... -
Page 4: Installation Instructions
Check that the oven door closes correctly and people, animals or property if these installation that the interior of the door and the front of the oven instructions are not observed. opening are not damaged. If you find any damage contact the Technical Assistance Service. -
Page 5: Microwave Safety
Never heat baby foods or drinks in bottles Switch off the oven and take the plug out of or jars with the teats or lids on them. After the socket or cut off the oven power supply. - Page 6 Never switch on the microwave when it is surface may deteriorate and this may empty. If there is no food inside there may be shorten the oven’s working life and could an electrical overcharge and the oven could even result in a dangerous situation.
-
Page 7: The Advantages Of Microwaves
Since the heat arises inside the food: outside. No heat is lost to the air, the walls of the This can be cooked with little or no liquid or oven cavity or the dishes and containers (if these fats/oils;... -
Page 8: Description Of Your Oven
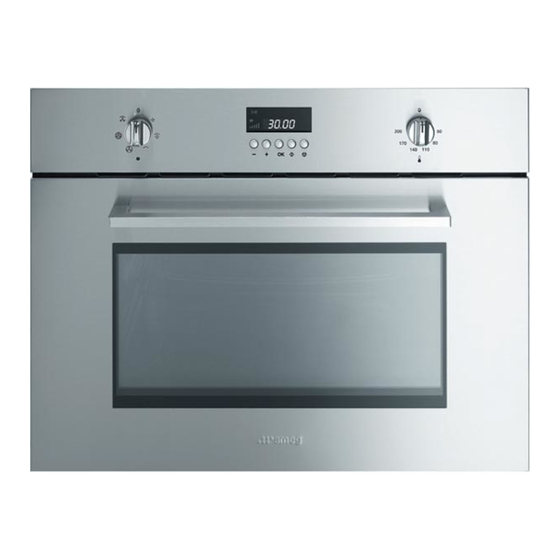
Rectangular Glass tray Hot Air Output Rectangular Rack 1. Function Selector 7. Stop key 2. Thermostat 8. Power level indicator light 3. Display 9. Operating time indicator light 4. “+” and “-“ keys 10. Defrost indicator light 5. OK key 11. -
Page 9: Basic Settings
Basic settings Setting the clock After your microwave oven is first plugged-in or after a power failure, the clock display will flash to indicate that the time shown is not correct. Before using the microwave oven, adjust the clock through the procedure described below but starting on Step 3. -
Page 10: Basic Settings
Basic settings Child lock The oven functioning can be blocked (for example to stop it being used by children). SAFE 1. To Block the oven, press the Stop key (7) for 3 2. To unblock the oven press again the Stop key (7) seconds. -
Page 11: Basic Functions
Basic Functions Microwaves Use this function to cook and heat vegetables, potatoes, rice, fish and meat. 1. Rotate the Function Selector (1) to the 6. The Power Level Indicator Light will start to position corresponding to the Microwave Function flash. -
Page 12: Microwaves + Grill
Basic Functions Microwaves + Grill Use this function to cook lasagne, poultry, roast potatoes and toasted foods. 1. Rotate the Function Selector (1) to the 4. Press the OK key (5). position corresponding to the Microwave + Grill 5. The Power Level Indicator Light will flash. -
Page 13: Microwaves + Hot-Air
4. Press the OK key (5). Grill + Fan Use this function to bake evenly the food and at the same time brown their surface. 3. With the “+” (4) and “-” (3) keys set the desired 1. Rotate the Function Selector (1) to the position corresponding to the Grill + Fan operating time. -
Page 14: Defrosting By Time (Manual)
6. The Power Level Indicator Light will start to position corresponding to the Microwave Function flash. 7. Using the “+” (4) and “-” (3) keys set the required microwave power level. 2. The Operating Time Indicator Light flashes. 8. Press the OK key (5). -
Page 15: When The Oven Is Working
Press the “+” and “-” keys to change the If you wish, at this time you can: power level. 1. Turn or stir the food to ensure it will be evenly cooked. Press the OK key. 2. Change the process parameters. -
Page 16: Defrosting
The thickest parts of fish or do is take off the lid. For all other cases you chicken drumsticks should be turned towards should put the food into containers that are the outside. - Page 17 Defrosting To defrost food you should select Microwave The table below shows different defrosting and function with one of the following Power Levels: standing times (in order to ensure the food temperature is evenly distributed) for different types Position Power Level Power and weights of food, plus recommendations.
-
Page 18: Cooking With A Microwave Oven
Cooling with microwaves... evaporation is very quick. The oven then works as if it was empty and the food may burn. The 1. The greater the amount of food, the longer the oven and the container may be damaged in cooking time. - Page 19 Instructions (Watt) (min.) Time (min.) Cook covered over. Turn after half of Fish fillets 10-12 cooking time. Cook covered over. Turn after half of Whole fish cooking time. You may wish to cover up the small edges of the fish.
-
Page 20: Cooking With The Grill
Cooking with the grill For good results with the grill, use the grid iron 4. If the grill is used for extended period of time it supplied with the oven. is normal to find that the elements will switch themselves off temporarily due to the safety IMPORTANT POINTS: thermostat. - Page 21 Place the fork before grilling. grid on a bowl so that the water and the fat can After half the grilling time has passed, check on drop. The times shown are merely indicative and...
- Page 22 Before using a dish in the microwave oven make If the time is not enough to brown the food well, sure that it is suitable for microwave use. Only use put it under the grill for another 5 or 10 minutes.
-
Page 23: Cooking With Microwaves + Hot-Air
70/80 Do not turn. Advice for roasting meat If the weight of the meat to be roasted does not appear on the table choose the settings for the Turn the pieces of meat halfway through the weight immediately below and extend the cooking cooking time. -
Page 24: Cooking With Hot-Air
The most commonly used type of baking ware is Make small holes in the cake with a tooth pick black metal tins. If you are also going to use the after baking has finished. Then sprinkle the cake microwave, use glass, ceramic or plastic baking with some fruit juice or alcoholic drink. -
Page 25: What Kind Of Ovenware Can Be Used
Important: aluminium foil cannot come into How to test ovenware you want to use contact with the cavity walls since this may Put the item you want to use in the oven for 20 cause electrical arcing. seconds at maximum microwave power. After that... - Page 26 What kind of ovenware can be used? Table of Ovenware The table below gives you a general idea of what type of ovenware is suitable for each situation. Operating mode Microwave Microwave + Grill Defrosting / Grill Type of Cooking...
-
Page 27: Oven Cleaning And Maintenance
Do not switch on the oven without the Normally you just need to clean the oven with a turntable and the respective support being in damp cloth. If it is very dirty, add a few drops of place. dishwashing liquid cleaning water. -
Page 28: Oven Ceiling
The mica cover (3) located in the ceiling must Oven ceiling always be kept clean. Any food remains that If the oven ceiling is dirty, the grill can be lowered collect on the mica cover can cause damage or provoke sparks. -
Page 29: What Should I Do If The Oven Doesn't Work
Check if: - You have inadvertently used metal ovenware. - You have selected the correct operating times and power level. - The food you have put inside the oven is a larger amount or colder than you usually put... -
Page 30: Technical Characteristics
Cooking vegetables and food. Cooking and heating carefully. Heating and cooking small portions of food. Heating delicate 800 W food 1000 W Cooking and rapidly heating liquids and pre-cooked foods Toasting food 200 W Grilling poultry and meat 400 W... -
Page 31: Installation
Insert the screws through the front holes. Mikrowelle Nische einschieben entsprechend anpassen. Die Tür der Mikrowelle öffnen und das Gerät mit den vier mitgelieferten Schrauben am Küchenmöbel wie im Bild dargestellt befestigen.
Need help?
Do you have a question about the SC445MCX and is the answer not in the manual?
Questions and answers