Rowenta Compact Valet IS6200 - Garment Steamer Manual
- Manual (119 pages) ,
- User manual (30 pages) ,
- Manual (90 pages)
Advertisement
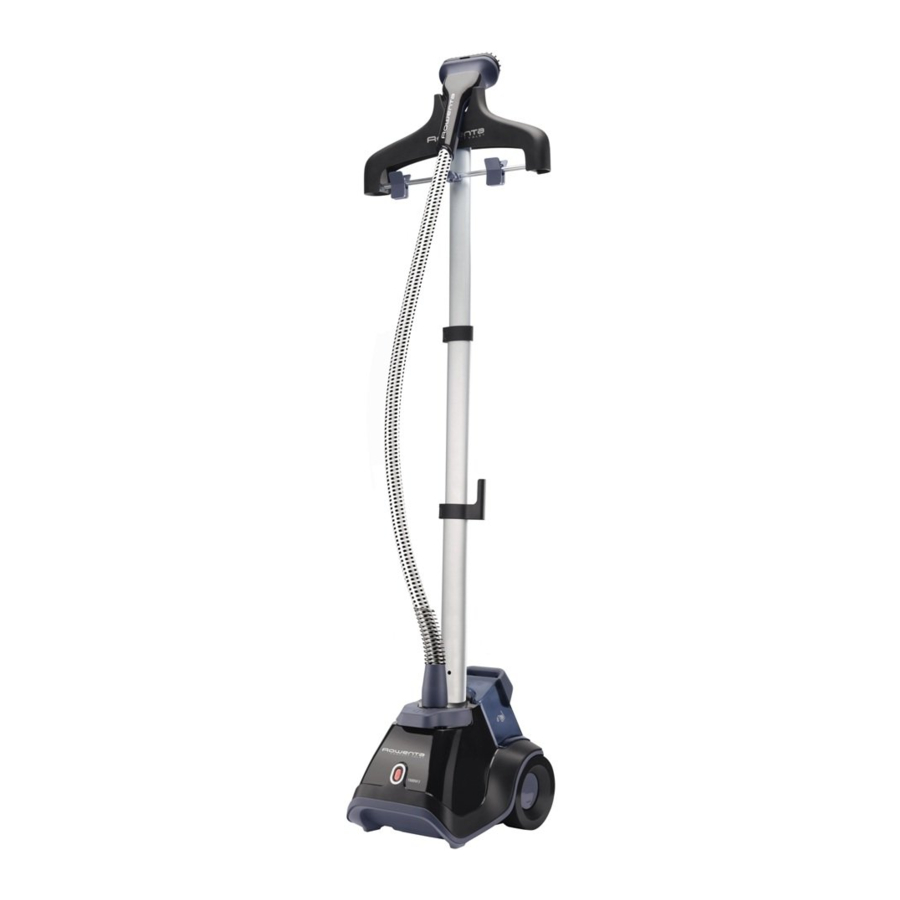
DESCRIPTION

- Steam head
- Steam head hook
- Built in hanger
- Trouser/dress clips
- Hanger holder
- Pole locking clips
- Electric cord holder
- Electric cord
- Velcro strip
- Telescopic pole
- Pole fastening screw
- Steam hose connector
- Removable water tank
- ON/OFF pedal
- Transport wheels
- Textile steam hose
- On/off light
- Built in accessories
- Fabric brush
- Crease attachment
- Lint pad
PRODUCT ASSEMBLY
Pole and hanger assembly
- Unscrew the pole's fastening screw on the base of the pole.(fig. 1)
![]()
- Hold the pole such that the cord holder is on the left. Check that the 2 pole clips are unlocked.(fig. 2)
![]()
- Insert the pole into the base by pressing downwards until the holes of the pole and base are at the same level, so that you can put the screw back. If the holes are not aligned, check that the clips of the pole are well and truly unlocked.(fig. 3)
![]()
- Screw the pole fastening screw back in as far as it will go so that the pole is firmly fixed to the base.(fig. 4)
![]()
- Push the hanger on the top of the pole vertically until you hear a click.(fig. 5)
![]()
- Adjust the pole to the height required by sliding it upwards then locking the 2 clips.(fig. 6a, 6b)
![]()
![]()
- Install the steam head between the hanger hooks.


Filling the water tank

Never use water that contains additives (starch, perfume, aromatic substances, softener, etc) in the steamer. Additives such as these can affect the properties of the steam and lead to the formation of deposits.
- Ensure that the steamer is unplugged. Remove the water tank from the base of the appliance by pulling the handle upwards (fig. 7). Unscrew the tank cap and fill the tank.(fig. 8). Maximum capacity is indicated by the "max" mark.

- The steamer must be used with TAP WATER. If the water in your area is hard, Rowenta recommends that you mix half tap water and half distilled water, which reduces the hardness. You can also use bottled spring water.
- After closing the cap, turn the tank down and hold it by the handle. Checkout that no water is leaking through the cap.
- Place the water tank on the base (fig. 9).
![]()


USE

Never steam a garment while it is being worn.
The flexible pipe and the end of the steam head can become extremely hot during use. This is perfectly normal. Be careful and avoid any prolonged contact.
- Only operate the steamer on the floor clear of any materials which may obstruct the base of the steamer (flat and horizontal surface). Do not obstruct the openings on the lower part of the appliance. This device should not be used on very thick carpets or rugs.
- Undo the Velcro strip and completely unwind the electrical cord.(fig.10)
![]()
- Plug in to power socket.(fig.11)
![]()
- Switch on by pressing the pedal located at the front of the device. The power indicator light will come on.(fig.12)
![]()
- The device will begin producing steam after approximately 60 seconds.
- Hang the garments from the built-in hanger or from another hanger which may be suspended from the hook located on the hanger rod. To steam trousers, we recommend that you also use the support with clips as indicated in the illustration.(fig.14)
![]()
- Grasp the steam head with the steam vents pointing away from you.
- Start steaming by brushing material lightly with the grain of the fabric in an up/down vertical motion. The fabric brush opens the weave of the fabrics for better steam penetration.
- Start at the top the garment and gradually move downward (fig.13). Always steam in a vertical position.
![]()
- For more ease, we recommend to pull the garment downward with your free hand while steaming. Be careful not to touch the hot steam.
- During use, the hose may make a gurgling noise. This is a normal occurrence due to condensation. If the device begins to gurgle, rest the steam head on its support for a few moments in order to direct the condensation into the device once again.


ACCESSORIES
Before using an accessory, check the manufacturer recommendations. It is also recommend that you carry out a test on part of the fabric which cannot be seen.
Fabric brush
The fabric brush opens the weave of the fabrics for better steam penetration.
Be sure unit is unplugged and completely cool before attaching accessories.
- Attach the fabric brush to the steam head by lining up the bottom of the brush with the bottom of the steam head. Gently push the top of the brush onto the steam head until it clicks into place.
![]()
- Gently brush the area to be steamed with the grain or nap of the fabric.
![]()
- Remove the fabric brush once unit is unplugged and completely cool. Remove it by pressing on the release tab on top of brush while pulling it forward.


Crease attachment
- Remove the fabric brush. Completely slide the hook of the accessory into the slot located in the lower part of the steam head.
![]()
- Push on the handle to open the crease attachment.
- Place the garment between the crease attachment and steam head.
- Release the handle.
- Starting at the top of the garment, move the crease attachment in a downwards motion.
![]()
- Once unit is unplugged and completely cooled down, remove the crease attachment by sliding it off of the steam head.


Lint pad
The lint pad is a separate accessory and cannot be attached to the steam head. You can use the lint pad independently from the steamer.
The lint pad removes hair, lint and animal fur for a professional finish.
- To use the lint pad, slowly brush the clothing with the grain or nap of the fabric.
- The pad can be cleaned by brushing it in the opposite direction. We recommend cleaning the pad on an old cloth that can be discarded.
AFTER USE
- After using the garment steamer, switch off the device by pressing the pedal once again. The power indicator light will go off, and you can then unplug the device.
- Hang the steam head in an upright position on the hook when not in use.
- Empty and rinse the water tank each time before storage in order to flush out any scale particles. (fig.15)
![]()
- Loosely wind up the electrical cord and close with the Velcro strip, then hang it from the clip on the pole.(fig.16a, 16b)

- Do not carry the steamer by the water tank handle. This appliance includes luggage style wheels for added convenience when transporting.


Never touch the steam head until it has cooled down completely.
TRANSPORT
- Your device is fitted with two wheels for ease of transport. Tilt the device towards the rear holding the pole and then pull along to transport.
- You can also lift up the device in order to transport it, again holding the device by the pole.
Do not attempt to lift up or transport the device holding the pedal, the water tank handle or the built-in hanger.
CLEANING
- Clean the main unit with a damp cloth.
- To maintain maximum performance, your steamer must be descaled occasionally. The time between descaling operations depends on the quality of the water and the frequency with which you use the appliance.
The appliance must be descaled at least once a year or after 50 hours of use.
- To carry out a descaling operation, follow the following steps:
- Ensure that the appliance has cooled down completely (2 hours minimum).
- Fill the water tank with fresh water and place it on the main unit allowing water to fill the boiler.
- Remove the water tank from the base and empty out the water via the water tank filling hole by tipping the device over a sink. Limescale and other residues are thus removed.
- Repeat step 2 and 3 several times until the scale has been removed.

Don't fill the boiler by the steam head holes! Never immerse the steam head in water!
TIPS FOR BEST RESULTS WITH YOUR UNIT
- We recommend checking the garment care label for manufacturer recommendations before steaming. We also recommend testing the garment and strength of the color on an unobtrusive area such as an inner seam.
- Gently pull down on bottom of garment while steaming
- Gently press steamer brush into fabric while making slow passes
- To put crisp edges on pants and shirts, use crease attachment
- Avoid contact between the steam head and silk or velvet.
- Certain garments are smoothed more easily on the reverse side.
- Heavy fabrics may need to be steamed longer.
- If you are using the steam head at a position close to the ground, raise the hose frequently in order to avoid the formation of condensation. A gurgling noise may be heard if the flexible pipe is pinched.
- If no steam is produced, if a gurgling sound is heard or if water is dripping through the holes of the steam head, raise the steam hose occasionally to remove condensation inside.
- Be careful at all times.
TROUBLESHOOTING
| Problems | Possible causes | Solutions |
There is no steam | The appliance has not been turned on. | Check that the device has been plugged in correctly. Next press the On/Off pedal, the power indicator light located at the front of the device will come on. |
| The hose has been obstructed. | Check that the hose is not bent or twisted. | |
| There is no water left in the water tank. | Switch off the device and fill the water tank. | |
The steam flow is low | Your steamer has a build-up of scale because it has not been rinsed out regularly. | See descaling process (Cleaning paragraph). |
| The hose has been obstructed. | Check that the hose is not bent or twisted. | |
Water runs through the holes of the steam head | There is condensation in the hose. | Never use a steamer in the horizontal position. Hold the hose vertically outstretched and wait for the condensed water to return to the steamer. |
| The steamer takes a long time to heat and/or ejects white particles | Your steamer has a build-up of scale because it has not been descaled regularly. | See descaling process (Cleaning paragraph). |
If it is not possible to establish the cause of the problem, seek the assistance of an approved ROWENTA Service Center www.rowenta.com
IMPORTANT SAFETY INSTRUCTIONS
- When using your appliance, basic precautions should always be followed, including the following:
- Read all instructions before using this product.
- This product has been designed for domestic and indoor use only. Any commercial use, inappropriate use or failure to comply with the instructions, the manufacturer accepts no responsibility and the guarantee will not apply.
![]()
The voltage of your electrical installation must correspond to that of the appliance (120V). Connecting to the wrong voltage may cause irreversible damage to the appliance and will void the guarantee.- Use appliance for its intended use only.
- To reduce the risk of contact with hot water emitting from steam vents, check appliance before each use by holding it away from body.
- Never pull on the cord to disconnect the appliance from electrical outlet; instead, grasp plug and pull to disconnect the appliance.
- Do not allow cord to touch hot surfaces. Let appliance cool completely down before putting away.
- Always disconnect appliance from electrical outlet when filling with water or emptying, and when not in use.
![burn hazard]()
![shock hazard]()
Do not operate appliance with a damaged cord or if appliance has been dropped or damaged. To avoid the risk of electric shock, do not disassemble or attempt to repair the appliance. Take it to the nearest authorized approved service center for examination and repair. Incorrect reassembly or repair could cause a risk of fire, electrical shock or injury to persons when the appliance is used.- Close supervision is necessary for any appliance being used by or near children.
- Do not leave appliance unattended while plugged in or while it is still hot.
![]()
Burns could occur from touching hot metal or plastic parts, hot water or steam.- Use care when you empty a steam appliance. There may be hot water in the reservoir.
![burn hazard]()
![shock hazard]()
If an extension cord is absolutely necessary, a cord with a 15A ampere rated shall be used. A cord rated for less amperage can result in a risk of fire or electric shock due to overheating. Care shall be taken to arrange the cord so that it cannot be pulled or be tripped over.![shock hazard]() To protect against a risk of electric shock, do not immerse the appliance in water or other liquids.
To protect against a risk of electric shock, do not immerse the appliance in water or other liquids.- Do not direct steam at people, animals or clothes while they are being worn.
- This appliance is not intended for use by persons (including children) with reduced physical, sensory or mental capabilities, or lack of experience and knowledge, unless they have been given supervision or instruction concerning use of the appliance by a person responsible for their safety. Children should be supervised to ensure that they do not play with the appliance.
![burn hazard]()
![shock hazard]()
The use of other accessory attachments than those provided by is not recommended and may result in fire, electric shock or personal injury.- The appliance must be rested on a stable surface. When placing the appliance on its base, ensure that the surface on which the base is placed is stable.
- The appliance must not be used if it has been dropped, if there are visible signs of damage or if it is leaking.
- Check the electrical power for sign and ware or damage prior to use. If the electrical power is damaged, it must be replaced at an approved service center to avoid any danger.
![shock hazard]() To reduce the risk of electric shock, this appliance has a polarized plug (one blade is wider than the other). This plug will fit in a polarized outlet only one way. If the plug does not fit fully in the outlet, reverse the plug. If it still does not fit, contact a qualified electrician to install the proper outlet. Do not change the plug in any way.
To reduce the risk of electric shock, this appliance has a polarized plug (one blade is wider than the other). This plug will fit in a polarized outlet only one way. If the plug does not fit fully in the outlet, reverse the plug. If it still does not fit, contact a qualified electrician to install the proper outlet. Do not change the plug in any way.![burn hazard]() The surfaces which are marked or close to with this sign are very hot during the use of the appliance. Do not touch these surfaces before the appliance has cooled down.
The surfaces which are marked or close to with this sign are very hot during the use of the appliance. Do not touch these surfaces before the appliance has cooled down.


SAVE THESE INSTRUCTIONS
CANADA
GROUPE SEB CANADA
345 Passmore Avenue
Toronto, ON
M1V 3N8
1-800-418-3325
MEXICO
GROUPE SEB MÉXICO, S.A. de C.V.
Goldsmith 38 Desp. 401
Col. Polanco,
Delegación Miguel Hidalgo
C.P. 11560 México D.F.
(01800) 112 83 25
U.S.A.
GROUPE SEB USA
2121 Eden Road
Millville, NJ 08332
800-769-3682
Documents / Resources
References
Download manual
Here you can download full pdf version of manual, it may contain additional safety instructions, warranty information, FCC rules, etc.
Download Rowenta Compact Valet IS6200 - Garment Steamer Manual
Advertisement


Need help?
Do you have a question about the Compact Valet IS6200 and is the answer not in the manual?
Questions and answers