Table of Contents
Advertisement
Available languages
Available languages
Quick Links
Advertisement
Chapters
Table of Contents

Related Manuals for OBSIDIAN CONTROL SYSTEMS Netron EN12i


Summary of Contents for OBSIDIAN CONTROL SYSTEMS Netron EN12i
- Page 1 Installation Guide...
- Page 2 ©2024 OBSIDIAN CONTROL SYSTEMS all rights reserved. Information, specifications, diagrams, images, and instructions herein are subject to change without notice. Obsidian Control Systems logo and identifying product names and numbers herein are trademarks of ADJ PRODUCTS LLC. Copyright protection claimed includes all forms and matters of copyrightable materials and information now allowed by statutory or judicial law or hereinafter granted.
-
Page 3: Table Of Contents
C O N T E N T S GENERAL INFORMATION LIMITED WARRANTY SAFETY GUIDELINES OVERVIEW INSTALLATION CONNECTIONS MAINTENANCE SPECIFICATIONS DIMENSIONS FCC STATEMENT... -
Page 4: General Information
G E N E R A L I N F O R M AT I O N FOR PROFESSIONAL USE ONLY INTRODUCTION Please read and understand the instructions in this manual carefully and thoroughly before attempting to operate this device. These instructions contain important safety and use information. UNPACKING Every device has been thoroughly tested and has been shipped in perfect operating condition. -
Page 5: Limited Warranty
(including negligence), misrepresentation, strict liability, breach of warranty of Elation or Obsidian Control Systems or any supplier, and even if Elation or Obsidian Control Systems or any supplier has been advised of the possibility of such damages. -
Page 6: Safety Guidelines
This device is a sophisticated piece of electronic equipment. To guarantee a smooth operation, it is important to follow all instructions and guidelines in this manual. OBSIDIAN CONTROL SYSTEMS is not responsible for injury and/or damages resulting from the misuse of this device due to the disregard of the information printed in this manual. -
Page 7: Overview
O V E R V I E W The NETRON EN12i is a powerful high-density Ethernet to DMX gateway with twelve RDM compatible wire terminal or RJ45 outputs. Easy to configure with a range of integrated presets plus a wide array of advanced merge and routing features it is the ideal device for permanent installations requiring a lot of physical DMX ports. -
Page 8: Installation
I N S TA L L AT I O N I N S T R U C T I O N S DISCONNECT POWER BEFORE PERFORMING ANY MAINTENANCE! ELECTRICAL CONNECTIONS A qualified electrician should be used for all electrical connections and/or installations. USE CAUTION WHEN POWER LINKING OTHER MODEL DEVICES AS THE POWER CONSUMPTION OF OTHER MODEL DEVICES MAY EXCEED THE MAXIMUM POWER OUTPUT OF THIS DEVICE. -
Page 9: Connections
C O N N E C T I O N S AC CONNECTION The Obsidian Control Systems NETRON EN12i is rated 100-240V. Do not connect it to power outside this range. Damage resulting from incorrect connection is not covered under warranty. - Page 10 C O N N E C T I O N S FRONT DMX CONNECTION: The front DMX Output connection is a 5pin female XLR; pin 1 to shield, pin 2 to cold (-), and pin 3 to hot (+). Pins 4 and 5 are not used. Carefully connect DMX cable to the DMX port.
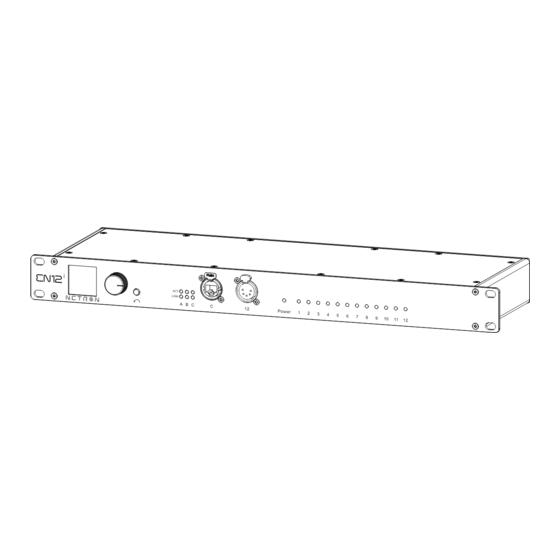
- Page 11 C O N N EC TI O N S FRONT CONNECTIONS • (1) 5pin XLR DMX/RDM optically isolated port Bidirectional for DMX In or Output • (1) Locking RJ45 Gigabit Ethernet • Full color OLED display • LED Status feedback array •...
- Page 12 CON N E C T I O N S REAR CONNECTIONS • (2) RJ45 Gigabit Ethernet • (1) Remote Connection • (2x6) DMX connection plates (RJ45 or Terminal Block) Bidirectional for DMX In or Output • (10) Contact Closures (Terminal Block) •...
- Page 13 CONNEC TI O NS CONNECTION PLATES To install either the Terminal Connection Plate or the RJ45 DMX Plates, first loosen the thumbscrews that secure the currently installed Connection Plates. Next, unplug and carefully remove each plate. Finally, install the replacement Connection Plates and secure them with their respective thumbscrews.
-
Page 14: Maintenance
M A I N T E N A N C E The Obsidian Control Systems NETRON EN12i is designed as rugged, roadworthy device. The only required service is occasional cleaning. For other service-related concerns, please contact your Obsidian Control Systems dealer, or visit www.obsidiancontrol.com. -
Page 15: Specifications
S P E C I F I C AT I O N S Mounting: Rackmount Connections: Front: (1) 5pin XLR DMX/RDM optically isolated port Bidirectional for DMX In or Output (1) Locking RJ45 Gigabit Ethernet Full color OLED display LED Status feedback array Encoder w. -
Page 16: Dimensions
D I M E N S I O N S... -
Page 17: Fcc Statement
F C C S TAT E M E N T FCC Class A Warning: Please note that changes or modifications of this product that are not expressly approved by the party responsible for compliance could void the user’s authority to operate this equipment. NOTE: This equipment has been tested and found to comply with the limits for a Class A digital device, pursuant to part 15 of the FCC Rules. - Page 19 Guide d'installation...
- Page 20 Le logo Obsidian Control Systems et les noms et numéros d’identification des produits dans le présent document sont des marques commerciales d’ADJ PRODUCTS LLC. La protection du droit d’auteur revendiquée comprend toutes les formes et toutes les questions de matériel...
- Page 21 C O N T E N U INFORMATIONS GÉNÉRALES GARANTIE LIMITÉE CONSIGNES DE SÉCURITÉ APERÇU INSTALLATION CONNEXIONS MAINTENANCE CARACTÉRISTIQUES DIMENSIONS DÉCLARATION DE LA FCC...
-
Page 22: Informations Générales
I N F O R M AT I O N S G É N É R A L E S POUR USAGE PROFESSIONNEL SEULEMENT INTRODUCTION Veuillez lire et comprendre attentivement les instructions de ce manuel avant d’essayer d’utiliser cet appareil. Ces instructions contiennent des informations importantes sur la sécurité et l’utilisation. DÉBALLAGE Chaque appareil a été... -
Page 23: Garantie Limitée
Obsidian Control Systems conclut, après inspection, qu’elle affecte la fiabilité du produit ; si le produit a été réparé ou entretenu par quelqu’un d’autre que l’usine Obsidian Control Systems, à moins qu’une autorisation écrite préalable n’ait été délivrée à l’acheteur par Obsidian Control Systems ; si le produit est endommagé... -
Page 24: Consignes De Sécurité
Cet appareil est un équipement électronique sophistiqué. Pour garantir un bon fonctionnement, il est important de suivre toutes les instructions et directives de ce manuel. OBSIDIAN CONTROL SYSTEMS n’est pas responsable des blessures et/ou des dommages résultant d’une mauvaise utilisation de cet appareil en raison du non-respect des informations imprimées dans ce manuel. -
Page 25: Aperçu
A P E R Ç U Le NETRON EN12i est un puissant concentrateur Ethernet vers DMX à haute densité avec douze sorties RDM compatibles avec des connecteurs à vis ou RJ45. Facile à configurer avec une gamme de presets intégrés et une large gamme de fonctionnalités avancées de fusion et de routage, il s’agit de l’appareil idéal pour les installations permanentes nécessitant un grand nombre de ports DMX... -
Page 26: Installation
I N S T R U C T I O N S D ’ I N S TA L L AT I O N D É B R A N C H E Z L’ A L I M E N TAT I O N A V A N T D ’... - Page 27 C O N N E X I O N S COUPLAGE AC Le NETRON EN12i d’Obsidian Control Systems est classé 100-240V. Ne le connectez pas à une alimentation en dehors de cette plage. Les dommages résultant d’une connexion incorrecte ne sont pas couverts par la garantie.
- Page 28 C O N N E X I O N S CONNEXION DMX AVANT: La connexion de sortie DMX avant est une XLR femelle à 5 broches ; broche 1 au blindage, broche 2 à froid (-) et broche 3 à chaud (+). Les broches 4 et 5 ne sont pas utilisées. Connectez soigneusement le câble DMX au port DMX.
-
Page 29: Connexions
CONNEXI ON S CONNEXIONS AVANT • (1) Port 5 broches XLR DMX/RDM isolé optiquement pour DMX In ou Output bidirectionnel • (1) RJ45 Gigabit Ethernet verrouillable • Affichage OLED couleur pleine • Tableau de rétroaction LED de statut • Encodeur avec bouton de sélection/sortie par pression Locking RJ45 Port 5 broches XLR DMX/RDM Gigabit Ethernet... - Page 30 C ON N E XI O N S CONNEXIONS ARRIÈRE • (2) Ethernet Gigabit RJ45 • (1) Connexion à distance • (2x6) Plaques de connexion DMX (RJ45 ou Bornier) Bidirectionnelles pour entrée ou sortie DMX • (10) Fermetures de contact (bornier) •...
- Page 31 C O N N EX I O N S PLAT ES DE C O N NE XI ON Pour installer la plaque de connexion de terminal ou les plaques DMX RJ45, desserrez d’abord les vis moletées qui fixent les plaques de connexion actuellement installées. Ensuite, débranchez et retirez soigneusement chaque plaque.
-
Page 32: Maintenance
Les systèmes de contrôle Obsidian NETRON DMX10-5, DMX10-3, et DMX10 sont conçus comme des appareils robustes et en état de rouler. Le seul service requis est le nettoyage occasionnel. Pour d’autres problèmes liés au service, veuillez contacter votre revendeur Obsidian Control Systems ou visiter www.obsidiancontrol.com. - Page 33 S P É C I F I C AT I O N S MONTAGE: Montant de rack CONNEXIONS: AVANT: (1) Port 5 broches XLR DMX/RDM isolé optiquement pour DMX In ou Output bidirectionnel (1) RJ45 Gigabit Ethernet verrouillable Affichage OLED couleur pleine Tableau de rétroaction LED de statut Encodeur avec bouton de sélection/sortie par pression ARRIÉRE:...
-
Page 34: Dimensions
D I M E N S I O N S DRAING NOT TO SCALE... - Page 35 D É C L A R AT I O N F C C Avertissement de classe A de la FCC : Veuillez noter que les changements ou modifications de ce produit qui ne sont pas expressément approuvés par la partie responsable de la conformité peuvent annuler l’autorité de l’utilisateur à utiliser cet équipement.
Need help?
Do you have a question about the Netron EN12i and is the answer not in the manual?
Questions and answers