
Subscribe to Our Youtube Channel
Related Manuals for anko LD-T7005


Summary of Contents for anko LD-T7005
- Page 1 Toaster LD-T7005 User Manual PLEASE READ AND SAVE THESE INSTRUCTIONS FOR FUTURE REFERENCE...
-
Page 2: Important Safeguards
IMPORTANT SAFEGUARDS When using electrical appliance, basic safety precautions should always be followed including the following: 1. Please read all instructions before operating and retain for future reference. 2. Make sure that your outlet voltage corresponds to the voltage stated on the rating label of the toaster. - Page 3 17. Be sure to take the bread out carefully after toasting to avoid injuries from hot surfaces. WARNING! When toasting small bread slices less than 85mm length, you must pay attention to the potential risk of burning. 18. The appliance is not intended to be operated by means of an external timer or separate remote-control system.
-
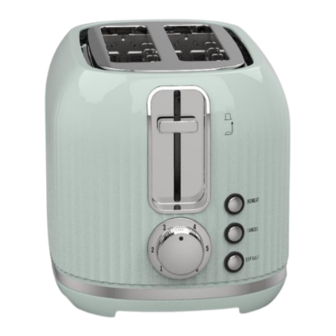
Page 4: Know Your Toaster
KNOW YOUR TOASTER Parts and operating controls Toast slot Push-down/start lever Body Reheat button with LED Stop button with LED Defrost button with LED Time knob Crumb tray Base FIRST TIME USE When the toaster is used for the first time it will emit a slight odour. This is normal and should disappear after some time. -
Page 5: Using Your Toaster
USING YOUR TOASTER Important: Never let the toaster operate unattended. Important: Do not operate the toaster without the crumb tray. Toasting 1. Unwind the power cable and connect the supply cord plug into a mains power outlet socket. 2. Use the selector knob to set the required toasting level between 1 and 6. For a medium, golden brown, select level 3. -
Page 6: Care And Cleaning
5. The bread slot is for toasting regular bread slice. 6. To achieve uniform toast colour, we recommend that you wait a minimum of 30s between each toasting time so that browning colour control can reset automatically. CARE AND CLEANING 1. - Page 7 12 Month Warranty Thank you for your purchase. Your new product is warrantied to be free from defects in materials and workmanship for the period stated above, from the date of purchase, provided that the product is used in accordance with accompanying recommendations or instructions where provided.
Need help?
Do you have a question about the LD-T7005 and is the answer not in the manual?
Questions and answers