Advertisement
Quick Links
Advertisement

Related Manuals for Rogers Athletic BASIC RACK


Summary of Contents for Rogers Athletic BASIC RACK
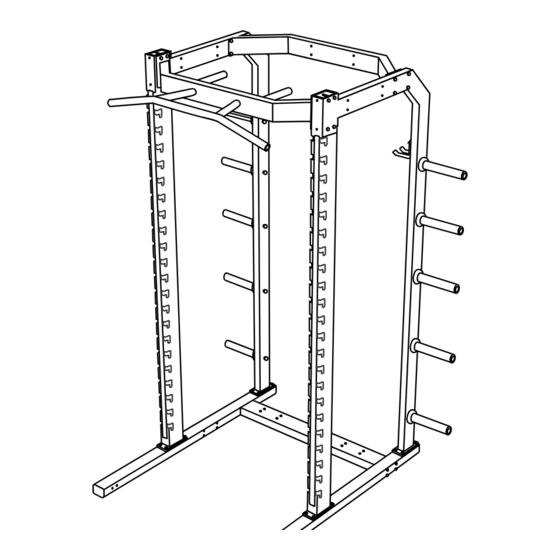
- Page 1 ASSEMBLY INSTRUCTIONS BASIC RACK Updated: 11/14/23...
-
Page 2: General Safety Rules
Pendulum Rack System and its functions. If your manual is lost or destroyed, Rogers Athletic will gladly provide you with a new copy. Should you require additional information or assistance, please feel free to contact us at 800-457-5337. - Page 3 Set up Pendulum Basic Rack on level surface. Accessories such as Monster Arms, Lock-N Load Hook, Technique Trays, Safety Bars and Spotter Platforms may not work properly if Pendulum Basic Rack is assembled on uneven ground.
-
Page 4: Hardware List
Hardware List 3/8” X 4” Bolt 3/8” x 1-1/4” Bolt 3/8” X 4-1/2” Bolt 3/8” Flanged Nylock Nut 3/8” X 2-3/4” Bolt 1/2” x 1-1/2” MP-1500 Nylon Plug MP-1000 Nylon Plug... -
Page 5: Tools Needed
Tools Needed Impact Driver Impact Sockets Rubber Mallet Socket Size 9/16” 3/4” Optional Although an impact driver is recommended for assembly a set of 9/16” and 3/4” box wrenches can be used if no impact driver is avaialble. WARNING: Read and understand all instructions. Failure to follow all instructions listed may result in serious personal injury. - Page 6 STEP 1 Arrange rack base in desired location ensuring floor is level, then use (QTY 8) 3/8”x 4-1/2” bolts to fasten the rack legs to the rack base.
- Page 7 STEP 2 Fasten rack uprights using (QTY 8) 3/8” x 1-1/4” bolts, and (QTY 8) 3/8” flanged nylock nuts per column. Do not completely tighten bolts.
- Page 8 STEP 3 Attach the weight trees using (QTY 12) 3/8” x 1-1/4” bolts, and (QTY 12) 3/8” flanged nylock nuts per side. Do not completely tighten bolts.
- Page 9 STEP 4 Install the upper brace using (QTY 8) 3/8” x 2-3/4” bolts and (QTY 8) 3/8” flanged nylock nuts. Tighten all bolts on the rack.
- Page 10 STEP 5 NOTE: If using a bridge to link multiple racks together refer to step 8 before continuing. Model shown here may differ from yours shipped with rack. Install the front chin up bar using (QTY 8) 3/8” x 4” bolts and (QTY 8) 3/8”...
- Page 11 STEP 6 Install (QTY 10) weight horns by inserting them into the holes of the weight tree and secure using (QTY 10) 1/2” x 1-1/2” bolts.
- Page 12 STEP 7 Anchor to floor using 3/8” grade 5 or better fasteners (Hardware not included). Insert MP-1000, and MP-1500 plugs into holes.
- Page 13 STEP 8 (Optional) If linking multiple racks together with rack bridges use (QTY 8) 3/8” x 4-1/2” bolts instead of the 3/8” x 4” bolts that were called out in Step 5. Use (QTY 8) 3/8” flanged nylock nuts to secure.
- Page 14 STEP 9 (Optional) 3/8” x 1-1/4” Bolt Attach optional bar hanger by using (QTY 4) bolts per hanger.
- Page 15 STEP 10 (Optional) Rack top attachments such as band hangers, flex ball mounts, or medicine ball mounts should be attached with (QTY 4) 3/8” x 3” bolts, and (QTY 4) 3/8” Flanged Nylock Nuts. 3/8” x 3” Bolt 3/8” Flanged Nylock Nut...
-
Page 16: Need Help
Need Help? For parts or service contact Rogers Athletic Company. When ordering parts be sure to provide all relevant information available. Customer service hours are Monday through Friday from 8:00 a.m. to 5:00 p.m. Eastern Standard Time. service@RogersAthletic.com (800) 457-5337 Rogers Athletic Company 3760 W.
Need help?
Do you have a question about the BASIC RACK and is the answer not in the manual?
Questions and answers