Advertisement
Quick Links
Advertisement

Related Manuals for Rogers Athletic SECOND LEVEL SLED


Summary of Contents for Rogers Athletic SECOND LEVEL SLED
- Page 1 ASSEMBLY INSTRUCTIONS SECOND LEVEL SLED TEK SLED ADD-ON Updated: 11/21/23...
-
Page 2: General Safety Rules
Careful study of this manual is encouraged to obtain a thorough understanding of your new Second Level Sled and its functions and maintenance. If your manual becomes lost or destroyed, Rogers Athletic will gladly provide you with a new copy. - Page 3 Unit is designed for training multiple offensive and defensive drills with proper technique. Do not use the Second Level Sled for anything other than its approved purpose. l Always wear a helmet when training with the Second Level Sled.
-
Page 4: Hardware List
Hardware List 5/8” X 6-1/2” Bolt 5/8” Nut 5/8” Lock Washer 3/8” x 1” Bolt 3/8” Flanged Nylock Nut Large PVC washer 7/16” x 4” Bolt Small Nylon Washer 5/8”x 1” Bolt 3/8” x 3-1/2” Bolt (NOTE: Could be partially or fully threaded) 7/16”... -
Page 5: Tools Needed
Hardware List (cont.) Long Spacer Medium Spacer Short Spacer Tools Needed Box Wrench Size Utility Knife or Sockets 15/16” 3/4” 11/16” 5/8” 9/16” 3/8” For added help scan this QR code with your phone to view our setup video on this product on YouTube. - Page 6 STEP 1 Skip to step 2 if assembling a new TEK Sled. Start by disassembling the runner from the connection link. Remove the two 5/8” bolts and nuts. Move the sled runner about 6” away from the connection link. These bolts can be discarded.
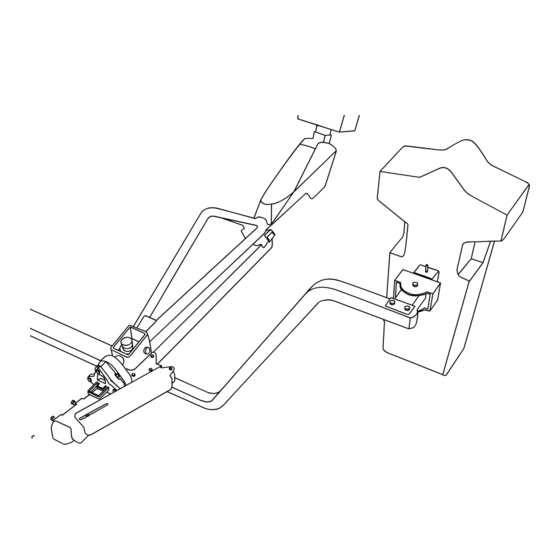
- Page 7 STEP 2 Install the support plate between the runner and the connection link using (QTY 2) 5/8” x 6-1/2” Bolts and (QTY 2) 5/8” lock washers. Make sure to insert the bolts from the connection link side as shown in the above diagram.
- Page 8 STEP 3 Install the arm assembly over the two bolts inserted through the sled runner in step 2, then secure with (QTY 2) 5/8” nuts. Secure the support plate to the arm assembly using (QTY 2) 3/8” x 1” bolts, and (QTY 2) 3/8”...
- Page 9 STEP 4 Attach the rear spring mount to the runner by tightening (QTY 2) 5/8” x 1” pinch bolts. Make sure the mount is placed as far back on the runner as possible while still in front of the weld.
- Page 10 STEP 5 Install the long spacer on the second level arm post, and short spacer onto the rear spring mount post. Install the shock by swinging the arm assembly until the holes in the shock align. Do not remove the banding around the shock until it is fully installed. NOTE: It is critical that the shock be installed in the correct orientation.
- Page 11 White Nylon Washer Large Black Washer STEP 6 Install (QTY 2) medium spacers onto the shafts. Use the large PVC washer, small nylon washer, and (QTY 2) 1/4” x 1/2” bolts to secure the cover plate. Tighten bolt just enough to secure the cover but do not over tighten.
- Page 12 STEP 7 Use (QTY 2) 3/8” x 3-1/2” bolts and (QTY 2) 3/8” flanged nylock nuts to attach the pivot pad adapter base to the second level arm.
- Page 13 STEP 8 Use (QTY 1) 7/16” x 4” bolt and (QTY 1) 7/16” lock nut to attach the pivot. Tighten enough to secure but do not over tighten. Pivot should still turn freely after tightening.
- Page 14 STEP 9 Slide pad onto the Pivot Pad Adapter and insert the Fastpin (tethered to your pad) to lock the pad in place.
-
Page 16: Need Help
Need Help? For parts or service contact Rogers Athletic Company. When ordering parts be sure to provide all relevant information available. Customer service hours are Monday through Friday from 8:00 a.m. to 5:00 p.m. Eastern Standard Time. service@RogersAthletic.com (800) 457-5337 Rogers Athletic Company 3760 W.
Need help?
Do you have a question about the SECOND LEVEL SLED and is the answer not in the manual?
Questions and answers