Table of Contents
Advertisement
Quick Links
Advertisement
Table of Contents

Related Manuals for Essence MyShield


Summary of Contents for Essence MyShield
- Page 1 Smart Security MyShield User Guide August 2022...
-
Page 2: Table Of Contents
Replacing the Canister ........................15 Replacing the Batteries ........................19 Specifications ..........................24 Appendix A Voice Announcements ....................27 Appendix B LED Indications ......................28 Smart Security MyShield User Guide © 2022 Essence Security International (E.S.I.) Ltd.- All Rights Reserved - Proprietary and Confidential... -
Page 3: Overview
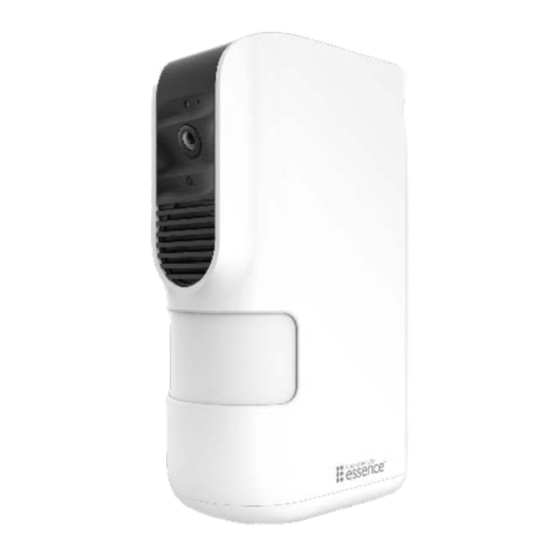
OVERVIEW 1. Overview The MyShield is a remotely triggered, smoke generating security device. It is bi-directional cellular and battery operated. The MyShield is monitored and operated either by a professional monitoring center, or using the MyShield smartphone app. The MyShield features: Intrusion detection ... -
Page 4: Setting Up Myshield
SETTING UP MYSHIELD 2. Setting Up MyShield MyShield setup includes the following: Installing the app Choosing an installation location Preparing the required equipment Installing MyShield Testing the installation Smart Security MyShield User Guide... -
Page 5: Installing The App
2. Install the app and follow the onscreen instructions to create a user. 2.2. Choosing an Installation Location The MyShield is mounted with screws. It can be mounted flat on a wall, angled on a wall or in a corner. Choose an installation location that is: Indoors ... -
Page 6: Installing Myshield
SETTING UP MYSHIELD 2.4. Installing MyShield To install the MyShield: 1. With the bottom of the MyShield facing up, slide the bottom panel until it clicks. 2. Remove the bottom panel. 3. Pull the wall mount up until it clicks. - Page 7 8. Align the wall mount with the wall anchors. 9. Screw the screws through the wall mount, into the wall anchors. 10. Turn the MyShield right-side up. 11. Insert the SIM card into the slot until it clicks. 12. While pressing the release, pull out the battery holder.
- Page 8 A new battery may explode if incorrectly installed. Use only the same or equivalent battery type recommended by the manufacturer. 14. Slide the battery holder into the battery compartment until it clicks. The LED flashes red. 15. In the MyShield app, add the MyShield device: Smart Security MyShield User Guide...
- Page 9 Scan the QR code on the MyShield. e. Follow the onscreen instructions. 16. Place the MyShield over the wall mount so that the top of the MyShield is slightly higher than the top of the wall mount and slide the MyShield down until it clicks.
- Page 10 18. Slide the canister into the MyShield until it stops. 19. Turn the canister handle clockwise until it clicks. 20. Push the canister handle up until it clicks. The MyShield beeps. The LED lights green and then flashes red. Smart Security MyShield User Guide...
-
Page 11: Testing The Installation
If the LED does not light red, wait a few minutes and try again. 2.5.2 Intrusion Test with App If you are using the MyShield app, perform the following intrusion test to ensure that the camera and audio work properly. -
Page 12: Intrusion Test With Monitoring Center
If you are using a monitoring center, perform the following intrusion test to ensure that the camera and audio work properly. 1. Request that the monitoring station arm the MyShield. 2. Stand outside of the MyShield’s coverage area for two minutes. 3. Walk past the MyShield. ... -
Page 13: Operating Myshield
Verify intrusions Deploy smoke If you are using a monitoring center, the MyShield is operated for you. If you are not using a monitoring center, use the MyShield app to operate your MyShield. MyShield operation includes: Arming and disarming ... - Page 14 OPERATING MYSHIELD NOTE: Replace the canister and batteries after deploying smoke. Refer to 4 Replacing the Canister on page 15 and 5 Replacing the Batteries on page 19. Smart Security MyShield User Guide...
-
Page 15: Replacing The Canister
4. Replacing the Canister After deploying smoke, the canister must be replaced. To replace the canister: 1. Slide the MyShield’s bottom panel until it clicks. 2. Remove the bottom panel. 3. Pull down the canister handle. Smart Security MyShield User Guide... - Page 16 REPLACING THE CANISTER 4. Turn the canister handle counterclockwise until it clicks. 5. Pull the canister out of the MyShield. 6. Pull down the new canister’s handle. Smart Security MyShield User Guide...
- Page 17 REPLACING THE CANISTER 7. Slide the new canister into the MyShield until it stops. 8. Turn the canister handle clockwise until it clicks. 9. Push up the canister handle until it clicks. 10. Place bottom panel over the bottom of the MyShield.
- Page 18 REPLACING THE CANISTER 11. Slide the bottom panel toward the back of the MyShield until it clicks. Smart Security MyShield User Guide...
-
Page 19: Replacing The Batteries
REPLACING THE BATTERIES 5. Replacing the Batteries Replace batteries after each smoke deployment, and when the MyShield app notifies you that batteries are low. The canister must be removed before you can replace the batteries. To replace the batteries: 1. Slide the MyShield’s bottom panel until it clicks. - Page 20 REPLACING THE BATTERIES b. Turn the canister handle counterclockwise until it clicks. c. Pull the canister out of the MyShield. 4. While pressing the release, pull out the battery compartment. Smart Security MyShield User Guide...
- Page 21 6. Insert new batteries, observing the correct polarity. WARNING! A new battery may explode if incorrectly installed. Use only the same or equivalent battery type recommended by the manufacturer. 7. Slide the battery holder into the battery compartment until it clicks. Smart Security MyShield User Guide...
- Page 22 REPLACING THE BATTERIES 8. Slide the canister into the MyShield until it stops. 9. Turn the canister handle clockwise until it clicks. 10. Push the canister handle up until it clicks. 11. Place bottom panel over the bottom of the MyShield.
- Page 23 REPLACING THE BATTERIES 12. Slide the bottom panel toward the back of the MyShield until it clicks. Smart Security MyShield User Guide...
-
Page 24: Specifications
SPECIFICATIONS 6. Specifications The MyShield’s technical specifications appear in the following table. Category Details ES900MS Part number Cat-M Communications Protocol NB-IoT Remove from wall Security Tamper alarm Remove canister Open battery compartment Batteries Six CR123 3V batteries... - Page 25 -- Reorient or relocate the receiving antenna. -- Increase the separation between the equipment and receiver. Smart Security MyShield User Guide...
- Page 26 Les antennes utilisées pour ce produit ne doivent pas être situés ou exploités conjointement avec une autre antenne ou transmetteur. Changes or modifications to this equipment not expressly approved by the party responsible for compliance (Essence SmartCare Ltd.) could void the user’s authority to operate the equipment. Smart Security MyShield User Guide...
-
Page 27: Appendix A Voice Announcements
VOICE ANNOUNCEMENTS Appendix A Voice Announcements The MyShield makes the following voice announcements: Condition Announcement Repetition Motion detected when "Protected area – leave Three times with two second MyShield is armed immediately" interval between announcements Deploying smoke "Deploying Smoke - Clear the Three times with two second area"... -
Page 28: Appendix Bled Indications
LED INDICATIONS Appendix B LED Indications The MyShield’s LED displays the following operational information: LED Behavior Meaning Self-test failed Lights red Tamper Flashes red continuously Communication failure Lights green Self-test passed Smart Security MyShield User Guide... - Page 29 Nothing contained herein shall be construed as conferring by implication, estoppels, or otherwise any license or right, either express or implied, under any patent or trademark of Essence or any third party. No use of any trademark may be made without the prior written authorization of Essence.
Need help?
Do you have a question about the MyShield and is the answer not in the manual?
Questions and answers