Advertisement
Quick Links
USA office: Fontana
AUS office: Truganina
GBR office: FDS Corporation Limited,Unit 4, Blackacre Road, Great Blakenham,Ipswich, Ip6 0FL,United Kingdom
If you're having difficulty, our friendly
customer team is always here to help.
Étagère de Cuisine avec Armoire à Portes Basculantes
FRA office: Saint Vigor d'Ymonville
THIS INSTRUCTION BOOKLET CONTAINS IMPORTANT SAFETY INFORMATION.
USA:cs.us@costway.com
AUS:cs.au@costway.com
PLEASE READ AND KEEP FOR FUTURE REFERENCE.
GBR:cs.uk@costway.com
FRA:cs.f r @costway.com
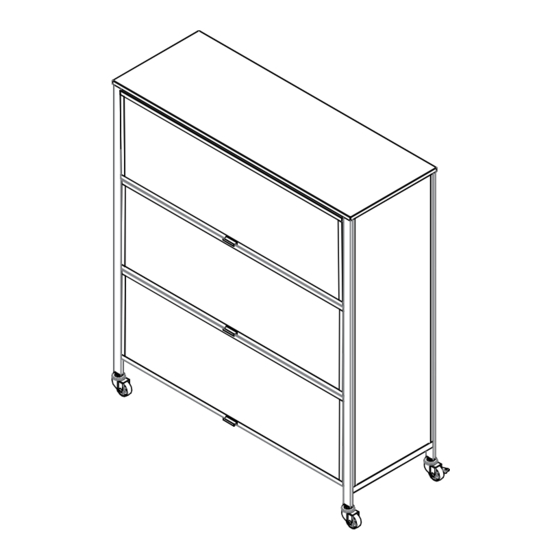
Baker's Rack with Flip Door Cabinet
JV11316
Advertisement

Subscribe to Our Youtube Channel
Related Manuals for Costway JV11316


Summary of Contents for Costway JV11316
- Page 1 GBR office: FDS Corporation Limited,Unit 4, Blackacre Road, Great Blakenham,Ipswich, Ip6 0FL,United Kingdom THIS INSTRUCTION BOOKLET CONTAINS IMPORTANT SAFETY INFORMATION. USA:cs.us@costway.com If you're having difficulty, our friendly AUS:cs.au@costway.com PLEASE READ AND KEEP FOR FUTURE REFERENCE. GBR:cs.uk@costway.com customer team is always here to help. FRA:cs.f r @costway.com...
-
Page 2: Before You Start
1 x1 2 x3 Before You Start Main frame Shelf Please read all instructions carefully. Cadre principal Étagère Retain instructions for future reference. Separate and count all parts and hardware. 3 x1 5 x3 4 x3 Read through each step carefully and follow the proper order. We recommend that, where possible, all items are assembled near to the area in which they will be placed in use, to avoid moving the product unnecessarily once assembled. - Page 3 Step1: Lay the Main frame(Part①) on the floor so that you have access to the base of the rack. Step4: Insert the Back panel(Part ④) into the U-channel at the back. Étape 1 : Posez le cadre principal (pièce ①) sur le sol de manière à avoir Étape 4 : Insérez le panneau arrière accès à...
- Page 4 Step9: Install the remaining front door, which is a flip up and down type that can be inserted into the side frame when opened. Step7: Screw through the Étape 9 : Installez la porte avant corresponding hole position of the restante, qui est de type basculant Front door(Part⑤) and use Philip vers le haut et vers le bas et qui...
- Page 5 Return / Damage Claim Instructions DO NOT discard the box / original packaging. In case a return is required, the item must be returned in original box. Without this your return will not be accepted. Take a photo of the box markings. A photo of the markings (text) on the side of the box is required in case a part is needed for replacement.
Need help?
Do you have a question about the JV11316 and is the answer not in the manual?
Questions and answers