Advertisement
Quick Links
OWNER' S GUIDE & INSTALLATION INSTRUCTIONS
Retractable, Thru-Hull
Depth/Temperature Sensor
Models: D800 and DT800
IMPORTANT : Please read the instructions completely
before proceeding with the installation. These
instructions supersede any other instructions in your
instrument manual if they differ.
CAUTION : NEVER USE SOLVENTS
Cleaners, fuel, paint, sealants, and other products may
contain strong solvents, such as acetone, which attack
many plastics greatly reducing their strength.
Applications
• Plastic housings recommended for fiberglass or metal hulls only.
Never install a plastic housing in a wood hull since swelling of the
wood may overstress the plastic causing a fracture.
• Bronze housings recommended for fiberglass or wood hulls.
Never mount a bronze housing in an aluminum hull because
electrolytic corrosion will occur.
• Stainless steel housing compatible with all hull materials.
Recommended for metal hulls to prevent electrolytic corrosion.
A stainless steel housing must be isolated from a metal hull.
• Never install a metal housing in a vessel with a positive ground
system.
Tools and Materials
Water-based antifouling paint ( mandatory in salt water )
Safety goggles
Dust mask
Electric drill with 10mm (3/8") or larger chuck capacity
Drill bit
3mm or 1/8"
51mm or 2" (plastic or bronze housing)
Hole saw:
57mm or 2-1/4"
Countersink tool (installing a flush housing)
Sandpaper
Mild household detergent or weak solvent (such as alcohol)
File (installation in a metal hull)
Marine sealant
Additional washer [for aluminum hull less than 6mm (1/4") thick]
Slip-joint pliers (installing a bronze housing)
Zip-ties
Installation in a cored fiberglass hull (see page 3):
Hole saw for hull interior
Fiberglass cloth and resin
or Cylinder, wax, tape, and casting epoxy
(stainless steel housing in a metal hull)
60mm or 2-3/8"
Record the information found on the cable tag for future reference.
Part No._________________Date___________Frequency________kHz
Antifouling Paint
Marine growth can accumulate rapidly on the sensor's surface
reducing its performance within weeks. Surfaces exposed to salt
water must be coated with antifouling paint. Use water - based
antifouling paint only. Never use ketone-based paint, since
ketones can attack many plastics possibly damaging the sensor.
It is easier to apply antifouling paint before installation, but allow
sufficient drying time. Reapply paint every 6 months or at the
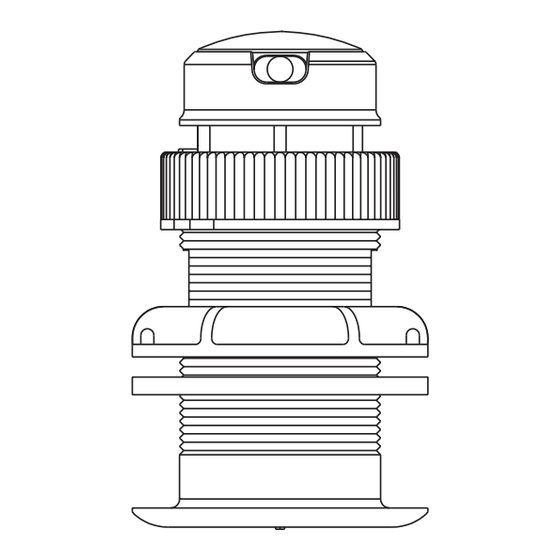
beginning of each boating season. Paint the following surfaces
(see Figure 1):
• Outside wall of the
insert below the lower
O-ring
• Exposed end of the
insert
• Bore of the housing up
30mm (1-1/4")
• Exterior lip of the
housing
• Blanking plug below the
lower O-ring including
the exposed end
P17
Plastic
Low profile housing
insert
outside wall
below lower
O-ring
housing
exposed end
exterior lip
of housing
bore of housing
up 30mm (1-1/4")
Figure 1. Antifouling paint
Advertisement

Related Manuals for Airmar D800


Summary of Contents for Airmar D800
- Page 1 Retractable, Thru-Hull Record the information found on the cable tag for future reference. Part No._________________Date___________Frequency________kHz Depth/Temperature Sensor Models: D800 and DT800 IMPORTANT : Please read the instructions completely before proceeding with the installation. These instructions supersede any other instructions in your instrument manual if they differ.
- Page 2 Inboard —Mount well ahead of the propeller(s) and shaft(s). Step-hull —Mount just ahead of the first step. pressure waves Boat capable of speeds above 25kn (29MPH)—Review the installation location and operating results of similar boats before proceeding. 1/3 aft • Fin keel sailboats —Mount on or as close as possible to the 150-300mm centerline and forward of the fin keel 300–600mm (1–2').
- Page 3 Cutting the cable or removing the Plastic housing — Do not clamp tightly on the wrenching flats, connector, except when using Airmar’s junction box, will void the possibly causing the housing to fracture. warranty. Plastic hull nut — Hand - tighten only. Do not over tighten.
- Page 4 Airmar metal housing. If you have purchased a low profile housing and prefer a flush housing, 5. If you are skilled with fiberglass, saturate a layer of fiberglass see below.
Need help?
Do you have a question about the D800 and is the answer not in the manual?
Questions and answers