Subscribe to Our Youtube Channel
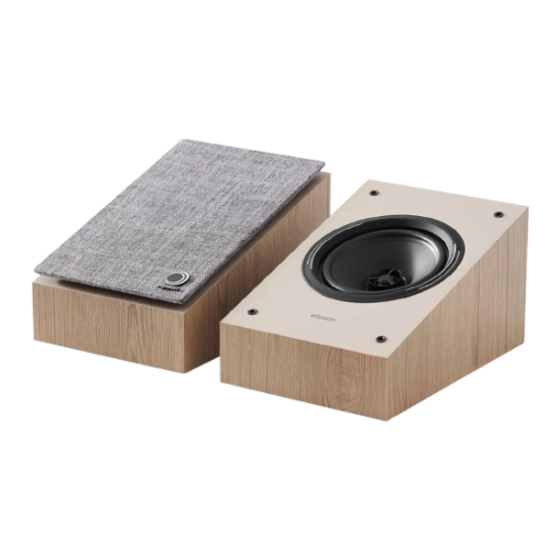
Summary of Contents for Elipson Horus 6 ATM
- Page 1 Horus 6 ATM ENCEINTE ATMOS / SURROUND ATMOS / SURROUND LOUDSPEAKER Manufactured under license from Dolby Laboratories www.elipson.com...
-
Page 2: Table Of Contents
Dolby Atmos ® III. Préparation IV. Positionnement avant des horus 6 ATM (en mode atmos) et 11F V. Branchement avant des horus 6 ATM (en mode atmos) et 11F VI. Positionnement arrière des horus 6 ATM (en mode atmos) et 11F VII. -
Page 3: Horus 6 Atm Certifiées
HORUS 6 ATM Afin de vivre une experience optimale, il est recommandé d’acquérir un modèle Horus 11F compatible avec le modèle Horus 6 ATM. Il suffit ainsi de déposer l’enceinte Horus 6 ATM sur la colonne 11F, une fois celle-ci bien positionnée. -
Page 4: Positionnement Avant Des Horus 6 Atm (En Mode Atmos) Et 11F
FRONT L FRONT HEIGHT R FRONT HEIGHT L Connectez vos Horus 6 ATM aux bornes FRONT HEIGHT (ou PRESENCE) de votre amplif- icateur. Puis, connecter vos horus 11F aux bornes FRONT (ou MAIN) de votre amplifi- cateur. Connectez le pôle « + » de l’enceinte (Rouge) au pôle « + » de l’amplificateur, puis le pôle «... -
Page 5: Positionnement Arrière Des Horus 6 Atm (En Mode Atmos) Et 11F
REAR HEIGHT R REAR HEIGHT L Connectez vos Horus 6 ATM aux bornes REAR HEIGHT (ou PRESENCE) de votre amplif- icateur. Puis, connecter vos horus 11F aux bornes SURROUND de votre amplificateur. Connectez le pôle « + » de l’enceinte (Rouge) au pôle « + » de l’amplificateur, puis le pôle «... -
Page 6: Positionnement Des Horus 6 Atm (En Mode Surround)
Amplificateur Positionner le sélecteur (situé, au niveau du bornier) sur la position SRD (mode surround). Connectez vos Horus 6 ATM aux bornes SURROUND de votre amplificateur. Vous pouvez positionner l’enceinte sur un mur grâce à ses deux accroches murales, en respectant l’inclinaison indiquée sur le schéma ci-dessus. -
Page 7: Caractéristiques
X. CARACTÉRISTIQUES XI. CERTIFICATION Dolby Atmos ® Dolby Atmos® est une technologie de reproduction du son surround pour le cinéma et le home-cinéma. Le procédé Dolby Atmos permet la gestion de la verticalité du ® son en plus des formats Dolby 5.1 ou 7.1 (plan horizontal) et crée donc une immersion sonore totale. - Page 8 Définition de la garantie La garantie est limitée à la réparation de l’équipement Elipson. En aucun cas, le transport, les coûts associés ainsi que l’installation ne sont couverts par la garantie. La garantie n’est applicable qu’au premier propriétaire et n’est pas transférable.
- Page 10 Dolby Atmos® III. Setup IV. Front setup of horus 6 ATM (in ATMOS mode) and 11F V. Connections for front horus 6 ATM (in ATMOS mode) and 11F VI. Rear setup of horus 6 ATM (in ATMOS mode) and 11F VII.
-
Page 11: Setup
In order to enjoy an optimal experience, it is recommended to acquire the compliant Horus 11F model with the Horus 6 ATM. Simply place the Horus 6 ATM loudspeaker on the 11F floorstanding, once this 11F loud- speaker has been positioned correctly. -
Page 12: Front Setup Of Horus 6 Atm (In Atmos Mode) And 11F
FRONT HEIGHT R FRONT HEIGHT L Connect your Horus 6 ATM to the FRONT HEIGHT (or PRESENCE) terminals of your amplifier. Then, connect your Horus 11F to the FRONT (or MAIN) terminals of your amplifier. Connect the pole “+” of the loudspeaker (Red) to the pole “+” of the amplifier, then the pole “-”... -
Page 13: Rear Setup Of Horus 6 Atm (In Atmos Mode) And 11F
REAR HEIGHT R REAR HEIGHT L Connect your Horus 6 ATM to the REAR HEIGHT (or PRESENCE) terminals of your amplifier. Then, connect your Horus 11F to the SURROUND terminals of your amplifier. Connect the pole “+” of the loudspeaker (Red) to the pole “+” of the amplifier, then the pole “-”... -
Page 14: Sides Setup Of Horus 6 Atm (In Surround Mode)
Set the selector (on the rear binding post) to the SRD position (surround mode). Connect your Horus 6 ATM to the SURROUND terminals of your amplifier. You can position the loudspeaker on a wall using the two wall hooks, as shown on the above drawing. -
Page 15: Specifications
There are also specific loudspeakers that direct the sound to the ceiling from the floor. It is this second solution, certified, that Elipson has adopted, sim- HORUS plifying the installation process. - Page 16 It should be returned to a center for the recycling Elipson equipment. If you cannot contact your original dealer, or if you are using your Elipson of electronic equipment. This symbol on the product indicates that it has been product outside the purchase country, you should contact Elipson national distributor in the designed so that it can be recycled according to specific procedures.
- Page 17 Horus 6 ATM ENCEINTE ATMOS / SURROUND ATMOS / SURROUND LOUDSPEAKER www.elipson.com...


Need help?
Do you have a question about the Horus 6 ATM and is the answer not in the manual?
Questions and answers