Table of Contents
Advertisement
Quick Links
Advertisement
Table of Contents

Related Manuals for GridConnect grid45

Summary of Contents for GridConnect grid45
- Page 1 Evaluation Kit Quick Start Guide Revision A.3 December 18, 2023...
- Page 2 Grid Connect and the Grid Connect logo, and combinations thereof are registered trademarks of Grid Connect, Inc. All other product names, company names, logos or other designations mentioned herein are trademarks of their respective owners. GRID45™ and gridconnect© are trademarks of Grid Connect, Inc. Grid Connect Inc. 1630 W. Diehl Rd.
- Page 3 Changes or modifications to this device not explicitly approved by Grid Connect will void the user's authority to operate this device. The information in this guide may change without notice. The manufacturer assumes no responsibility for any errors that may appear in this guide. GRID45™ Evaluation kit Quick Start Guide...
-
Page 4: Table Of Contents
Powering the Evaluation board ..........................8 Quick Start for connecting a serial interface to the GRID45 Evaluation board ........9 Quick Start for connecting to the Network interface of the GRID45 Evaluation board ....14 GRID45™ Evaluation kit Quick Start Guide... -
Page 5: Overview
GRID45 into their product. The GRID45 OEM module is a powerful, Wi-Fi + Ethernet co-processor module that can be used in a wide variety of IIoT applications. It is designed to be a simple, easy to integrate add-on module to an OEMs host processor that provides many of the popular IIoT communication protocols. -
Page 6: Additional Documentation
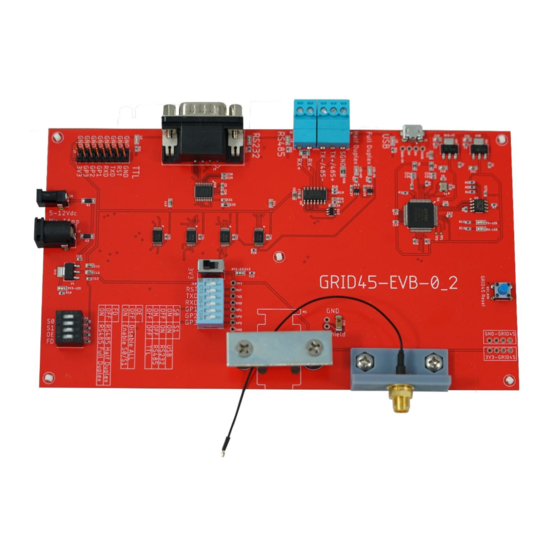
The Evaluation board is easily powered using the provided +5V wall adaptor and provides pin sockets for a GRID45 module to be easily plugged into the evaluation board. The pin sockets also allow the module to be swapped in or out. -
Page 7: Evaluation Kit
Install the GRID45 Module The evaluation board has pin sockets for the GRID45 module that makes it easy to plug in the GRID45 module on the board. The pin sockets allow the module to be interchanged or swapped out as the testing or qualification requires. -
Page 8: Powering The Evaluation Board
There is a power switch on the evaluation board labeled 3V3. This switch controls the +3.3 volt power line to the GRID45 module to powered On or Off. • Toggle this switch to ON When installing or removing a GRID45 module from the board, set this switch to off. GRID45™ Evaluation kit Quick Start Guide... -
Page 9: Quick Start For Connecting A Serial Interface To The Grid45 Evaluation Board
Quick Start for connecting a serial interface to the GRID45 Evaluation board For this example, we will connect to the GRID45 using a direct connection to the serial port with a USB cable. We will also use a terminal program called Tera Term. - Page 10 PC may be different. Make note of the COM port numbers that the PC established. 5. After verifying the correct COM ports, you can close the Device Manager window. • Open the Tera Term Application GRID45™ Evaluation kit Quick Start Guide...
- Page 11 • Select the radio button for Serial • Click on the drop-down box, select the higher of the 2 COM ports. In this case, select COM6. • Click OK That brings up the following window. GRID45™ Evaluation kit Quick Start Guide...
- Page 12 • Click on the Setup menu. From the dropdown list of options -> click on Serial Port • Verify that the serial parameters are: 9600. 8 bits, none for parity, 1 bit for stop bits. Adjust your settings to match this. When done, click on the NEW Setting button. GRID45™ Evaluation kit Quick Start Guide...
- Page 13 There is a COM6 terminal connection now established with the correct serial port settings. • On the keyboard, press the “shift and +” keys and hold them down. • Press the RESET button on the GRID45 Eval Bd • You should see a menu pop up in the terminal window...
-
Page 14: Quick Start For Connecting To The Network Interface Of The Grid45 Evaluation Board
• Plug a CAT5 cable into the GRID45 RJ45 connector. Plug the other end into an active Network Switch with a network connection to a DHCP server • Verify the right LED on the GRID45 is flashing or solid on to indicate that you have an Ethernet link •... - Page 15 Click on the found GRID45 and it will open up the following window with details on the GRID45 configuration. You can also go directly into the GRID45s WEB manager by using its IP address in a browser. • Open an Internet browser (in this case Google Chrome). Enter the discovered IP address in the URL input box.
- Page 16 • Click Sign In (no parameters required) From here you can configure all of the configuration parameters of the GRID45. GRID45™ Evaluation kit Quick Start Guide...
Need help?
Do you have a question about the grid45 and is the answer not in the manual?
Questions and answers