Table of Contents
Advertisement
Quick Links
Advertisement
Table of Contents

Related Manuals for Remigo One


Summary of Contents for Remigo One
- Page 1 RemigoOne User Manual...
-
Page 2: Product Identification
Thanks for choosing RemigoOne electric outboard. We will do our best to make boating for you as easy You’ll find two ID labels with serial numbers on the product - one on the casing and the second on the as possible. We are dedicated to providing the ultimate user experience. High-performance technology, transom/mounting bracket. -
Page 3: Mounting Bracket
Maximum tiller bracket mounting height (shaft length) trim pin with safety ring on one side screws and bolts tiller bracket: 15 cm Maximum tiller bracket mounting height is 15cm below the transom bracket: interface, which corresponds to the 60cm transom height - 23"... -
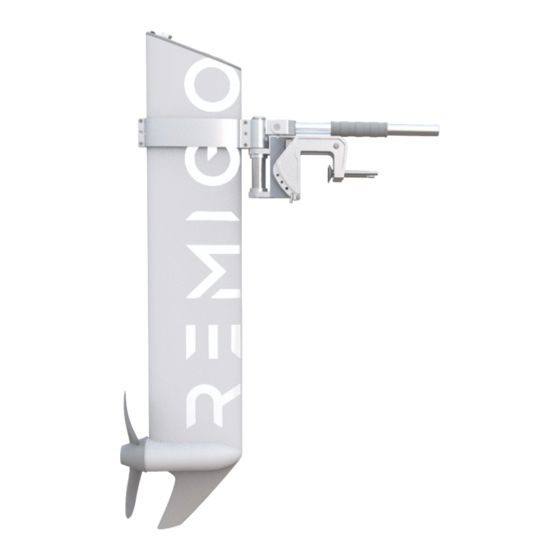
Page 4: Understanding The Interface
RemigoOne parts Understanding the interface user interface vent charging port built-in battery pack port cap tiller bracket safety bracket pin speed indicator battery indicator main mounting axis = console mount transom bracket transom anode speed reduction > reverse adding speed > forward propeller 2 anodes magnetic killswitch... -
Page 5: Installation
RemigoOne technical data sheet Installation Mount the transom bracket on the transom of the boat and tighten the two tightening clamps. Transom thickness range: 12 mm - 65 mm Adjust the trim angle of the mounting bracket so that the main axis on the console mount is 1000 W input power in a vertical position. -
Page 6: Operation
applications. The optimum mounting height is affected by the conditions of the boat and its require- Press the button again to increase power (10 steps available). ments. It’s recommended to test running the outboard at different mounting heights to find the optimal To decrease power, press the other button. -
Page 7: Propeller Assembly
There are two indicators consisting of 10 LEDs (10 steps) on the user interface. Check the propeller quickly before each use. If it gets damaged and you need to change it, please follow The left one indicates battery level - each LED representing 10% of the battery level. LEDs will these instructions: change from green to orange when 40% is reached and to red when the last 20% of battery power is reached. - Page 8 • If an error occurs and the outboard malfunctions, remove the killswitch and wait White color and a thermo-conducting design help RemigoOne stay cool in any normal for one minute before setting it back on. weather condition • When the battery voltage is lower than a set threshold, the outboard will stop automatically to •...
- Page 9 Standard: EN ISO 25197:2012+A1:2014 – Small cra� – Electrical/electronic control systems for steering, If the motor is damaged, find your dealer or Remigo service center for help. shi� and thro�le EN ISO 16315:2016 – Small marine cra� – Electrical propulsion systems 2.
- Page 10 Date of purchase any apparently faulty goods, it is imperative to coordinate the delivery with Remigo. You can contact us by phone, email or post. You can find the contact details at the end of the user manual. Please note that we are unable to deal with products of which we have not been notified and will therefore refuse to accept the delivery.
- Page 11 You are most welcome to contact us about anything: question, experience, concern, idea... : https://remigo.eu/ info@remigo.eu +386 41 769 489 Remigo d. o. o. Stanežiče 27e 1210 Ljubljana - Šentvid Slovenia, EU RemigoOne User Manual / February 2024 V 4.6 Copyright © 2023 Remigo, d.o.o. All Rights Reserved...
Need help?
Do you have a question about the One and is the answer not in the manual?
Questions and answers