Advertisement
Quick Links
Advertisement

Subscribe to Our Youtube Channel
Related Manuals for Superior 600


Summary of Contents for Superior 600
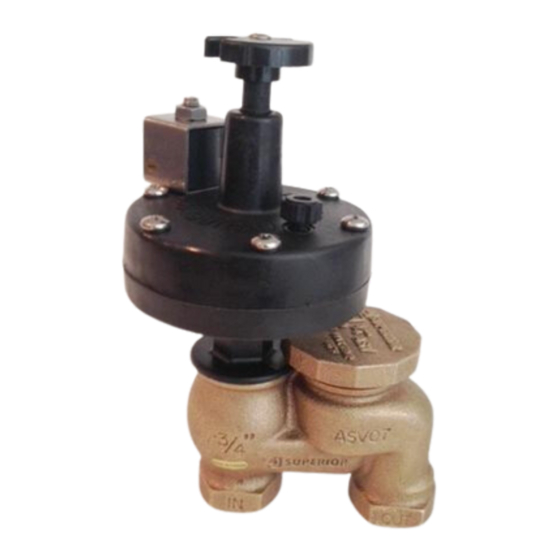
- Page 1 Model 600 Disassembly Instructions and Troubleshooting...
- Page 2 Index Adaptor Disassembly Instructions 6-8 Removing Adaptor from Anti-siphon Body 4,5 Parts, Sub-Assemblies, and Repair Kits 15 Solenoid Disassembly Instructions 2,3 Troubleshooting Valve will not close. 9-11 Valve will not open. 12 Water leaks out around flow-control stem. 13 Water leaks out between adaptor and body. 14 Water weeps past valve.
- Page 3 Solenoid Disassembly Instructions 1. Remove retaining nut (or yellow 2. Using a flathead screwdriver, unscrew and remove solenoid post retaining cap on earlier models) from from top of adaptor. solenoid post and slide coil and U-frame off of solenoid post.
- Page 4 Solenoid Disassembly Instructions 3. Solenoid plunger will drop out of Solenoid cavity: The center port is the exhaust port. The other port connects the plunger tube as post id removed from solenoid cavity to the diaphragm chamber. solenoid cavity.
- Page 5 Removing Adaptor from the Anti-siphon Body 1. After shutting off water supply to the 2. Using channel locks, remove anti-siphon adaptor, remove solenoid retainer nut, coil, cap from valve body. and U-frame from solenoid post.
- Page 6 Removing Adaptor from the Anti-siphon Body 3. Unscrew manual bleeder a few turns 4. Apply a wrench to hex portion (neck) of to relieve pressure from the top of the adaptor and unscrew it from the valve diaphragm. body.
- Page 7 Adaptor Disassembly Instructions 1. Using a 7/16” wrench, unscrew orifice 2. Remove disc holder and rubber seat screw from bottom of diaphragm shaft. disc from diaphragm shaft.
- Page 8 Adaptor Disassembly Instructions 3. Unscrew and remove screws that fasten 4. Remove spring and lift diaphragm bonnet to lower section. Next, lift bonnet assembly out of lower diaphragm housing. straight up taking care that metering rod clears top of diaphragm assembly and spring.
- Page 9 Adaptor Disassembly Instructions 5. To disassemble the diaphragm 6. To remove flow-control from bonnet, first rotate flow-control handle clockwise assembly, unscrew upper diaphragm plate as many turns as possible, then remove from diaphragm shaft and remove the nut and handle from top of flow-control diaphragm and lower diaphragm plate stem.
-
Page 10: Troubleshooting
Troubleshooting PROBLEM: Valve will not close CAUSE #2: Debris in valve body or debris embedded CAUSE #1: Malfunctioning solenoid. CAUSE #2: Solenoid plunger is unable to seal exhaust Debris in valve body or debris port due to debris in the solenoid chamber or embedded in rubber seat disc is plunger stuck in plunger tube and will not preventing seat disc from... - Page 11 Troubleshooting PROBLEM: Valve will not close CAUSE #3: CAUSE #4: Torn diaphragm. Clogged inlet orifice is preventing water SOLUTION: from entering upper diaphragm chamber. Replace diaphragm. To check, open manual bleeder. If no water exhausts from manual bleeder, then cause is confirmed.
- Page 12 Insufficient flow. Irrigation valves and adaptors have a minimum flow requirement in order to close. The larger the valve size, the greater the minimum flow requirement . A ¾” 600 adaptor has a minimum flow requirement of about 5 GPM. SOLUTION:...
- Page 13 Troubleshooting PROBLEM: Valve will not open when energized CAUSE #1: CAUSE #2: Solenoid is not receiving power. Flow-control handle is turned all the way SOLUTION: closed (clockwise). SOLUTION: Place your fingers around the solenoid coil to see if it is receiving power. There should While solenoid is energized, turn flow- be a slight vibration and humming.
- Page 14 Troubleshooting PROBLEM: PROBLEM: When valve is closed, water is weeping Water leaks out of top of adaptor where flow past the valve and coming out the lowest control stem protrudes from top housing. head. CAUSE: CAUSE: Damaged flow-control o-ring. Small debris in seat disc, or pitted seat disc SOLUTION: that is allowing water to seep by.
- Page 15 Troubleshooting PROBLEM: Water leaks out between adaptor and anti-siphon body CAUSE: Damaged fiber body washer SOLUTION: Replace fiber body washer.
- Page 16 Parts, Sub-Assemblies, and Repair Kits Solenoid Coil: 16008 Stem and Plunger Assembly: 16010-2A Solenoid Assembly: 16200 Diaphragm: ¾” & 1”-16056A Fiber Body Washer: ¾”-15053, 1”-15054 Repair Kits (includes all rubber and fiber parts): ¾”-14029, 1”-14030 Diaphragm Assembly: ¾”-14025, 1”-14026...
Need help?
Do you have a question about the 600 and is the answer not in the manual?
Questions and answers