Table of Contents
Advertisement
Available languages
Available languages
Quick Links
Advertisement
Table of Contents

Related Manuals for Maverick MTX-400


Summary of Contents for Maverick MTX-400
- Page 1 INSTRUCTIONS...
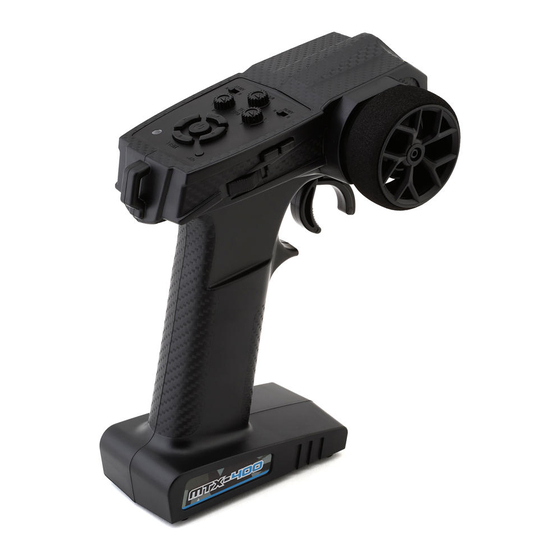
- Page 2 Transmitter Your Transmitter is an advanced controller designed for the beginner to be easy to use and tune. You will need to follow the steps below to ensure you prepare the controller correctly for use and understand the adjustment possibilities available. The function switches on the transmitter 1.
- Page 3 Channel 3 Control Channel 4 Control 100 position range used for optional 3 position switch used for optional parts. Single press will change the parts. position by 1. Hold down will change If using HPI LED adaptor #160581, the position by 10. The central CH3 Switch is used for the LED ON- position is denoted with a double OFF Functions.
- Page 4 Sender Ihr Sender ist ein modernes Steuergerät, dass auch von einem Anfänger leicht zu bedienen und einzustellen ist. Mit den unten aufgeführten Schritten stellen Sie sicher, dass der Sender für die Verwendung richtig vorbereitet ist und dass Sie die vorhandenen Einstellmöglichkeiten vollständig verstehen. Funktionsschalter am Sender 1.
-
Page 5: Stromversorgung Einschalten
Steuerung Kanal 3 Steuerung Kanal 4 Skala mit 100 Positionen zur Schalter mit 3 Positionen zur Verwendung für optionale Teile. Durch Verwendung für optionale Teile. einmaliges Drücken ändert sich die Bei Verwendung des HPI LED- Position um 1. Durch Gedrückthalten Adapters #160581 wird der ändert sich die Position um 10. - Page 6 Émetteur Votre émetteur est un régulateur avancé conçu pour faciliter l’utilisation et le réglage pour le débutant. Vous devrez suivre les étapes ci-dessous pour vous assurer que vous avez préparé correctement le régulateur et que vous avez compris les possibilités disponibles de réglage.
-
Page 7: Préparation De L'émetteur
Contrôle du canal 3 Contrôle du canal 4 Plage de 100 positions utilisée pour les Commutateur 3 positions utilisé pour les pièces en option. Une simple pression pièces en option. modifi e la position de 1. Maintenir la Si vous utilisez l’adaptateur LED HPI touche enfoncée permet de modifi... - Page 8 Transmisor Su transmisor es un regulador avanzado diseñado para que sea de fácil manejo y ajuste para el principiante. Deberá seguir los pasos que se dan a continuación para asegurarse de que prepara el regulador correctamente para su uso y que comprende las posibilidades de ajuste disponibles Los interruptores de función en el transmisor LED de potencia...
-
Page 9: Cómo Preparar El Transmisor
Control del canal 3 Control del canal 4 Intervalo de 100 posiciones utilizado Interruptor de 3 posiciones para piezas para las piezas opcionales. Una opcionales. pulsación cambiará la posición en 1. Si se utiliza el adaptador HPI LED Si se mantiene pulsado, la posición #160581, el interruptor CH3 se emplea cambiará... -
Page 10: Fcc Compliance Statement
FCC authorization to operate this equipment. RF Exposure Statement The MTX-400 transmitter has been tested and meets the FCC RF exposure guidelines when used with the accessories supplied or designated for this product, and provided at least 20cm separation between the antenna the user\s body is maintained. - Page 11 Notes, Notizen, Notas...
- Page 12 HPI RACING A/S Jegindoevej 21 8800 Viborg, Denmark info@hpiracing.com WWW.MAVERICK-RC.COM...
Need help?
Do you have a question about the MTX-400 and is the answer not in the manual?
Questions and answers
i just cant figure out how to set the controller up properly
To set up the Maverick MTX-400 controller properly:
1. Turn on the transmitter.
2. Press and release the setup button on the receiver. The LED will flash.
3. Press and hold the bind button on the transmitter for one second until the receiver LED stays solid.
4. For fail-safe setup: With the transmitter on, press and release the setup button on the receiver. The LED will flash.
5. For brake setup (nitro models): Hold the brake fully on the transmitter, press the setup button, wait for the LED to flash quickly, then release the brake when the LED stays solid. Finally, release the setup button.
This answer is automatically generated