Table of Contents
Advertisement
Quick Links
Advertisement
Table of Contents

Related Manuals for Tower Hobbies T17131


Summary of Contents for Tower Hobbies T17131
-
Page 2: Table Of Contents
TABLE OF CONTENTS THIS BOX CONTAINS SPECIFICATIONS IMPORTANT SAFETY INFORMATION • Key Safety Points • General Safety • Whilst Air Frying • Plug And Cord • Wiring Safety STRUCTURE OF YOUR APPLIANCE CONTROL PANEL BEFORE FIRST USE • Preparing For Use •... -
Page 4: Important Safety Information
IMPORTANT SAFETY INFORMATION Please read these safety NOTES carefully • Cleaning and user maintenance should BEFORE using your Tower appliance. not be undertaken by children without supervision. These warnings have been provided in the interest of safety. Basic safety precautions •... -
Page 5: Whilst Air Frying
WHILST AIR FRYING PLUG AND CORD • Please ensure that the appliance is used • Check that the voltage of the main on a stable, level, and heat resistant circuit corresponds with the rating of the surface. appliance before operating. •... -
Page 6: Wiring Safety
WIRING SAFETY FOR UK USE ONLY • On no account must either the brown or the blue wire be connected to the Earth Fuse (Green/Yellow) [EARTH] terminal. • Always ensure that the cord grip is Neutral Live fastened correctly. (Blue) (Brown) •... -
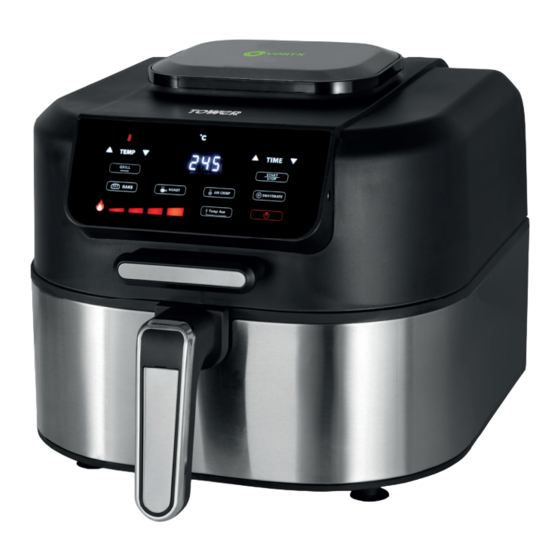
Page 8: Control Panel
CONTROL PANEL Temperature selection panel Temp Ace function key Roasting mode selection key 10. LED Display Temperature indicator 11. Grill temperature display Air Frying mode selection key 12. Baking mode selection key Time selection panel 13. Grill mode selection key Start/Stop key Dehydrate mode selection key NOTE: The Temp ACE function... -
Page 9: Before First Use
BEFORE FIRST USE PREPARING FOR USE AIR FRYER INNER POT SAFETY SWITCH: 1. Remove your appliance from the packaging. For your safety, this air fryer contains a safety switch in the inner pot designed 2. Check that there is no damage to the to keep if from accidentally turning on cord or any visible damage to the body. -
Page 10: Using Your Air Fryer
USING YOUR AIR FRYER INSTALLING AND REMOVING TURNING THE APPLIANCE ON THE SPLASH GUARD AND OFF This unit comes complete with a splash Once the splash guard and inner pot guard, to help protect the top of the have been correctly installed, plug the appliance while cooking. -
Page 11: Mode Selection
USING YOUR AIR FRYER SELECTING THE GRILLING When the unit has finished pre-heating, TEMPERATURE the LED screen will display ‘Add Food’, to indicate the unit is ready to cook. Lift the Once grilling mode has been selected, lid, add food to the pot and close the lid. repeatedly press the Grill key to The cooking process will automatically cycle between the four available... -
Page 12: Grilling Tips
USING YOUR AIR FRYER The new cooking time will be displayed on A meat thermometer will show the the unit’s LED screen to show this setting internal temperature of a medium steak as has been adjusted 65-70°C / 150-160°F. Medium well: Cook on one side until Once all the correct settings have been selected, press the Start/Stop key to start moisture is pooling on top surface. -
Page 13: Roast Mode
USING YOUR AIR FRYER The new cooking time will be displayed on function and the unit’s temperature the unit’s LED screen to show this setting probe. Refer to page 15/16 for instructions has been adjusted. on how to carry out this measurement. TIP: Adjust baking times on conventional Once the correct temperature has been recipes by about 10 minutes, to... -
Page 14: Air-Frying Tips
USING YOUR AIR FRYER NOTE: The crisping temperature and can help prevent unevenly fried for specific items can also be set ingredients. automatically, using the Temp ACE • For perfectly fluffy fries, it is function and the unit’s temperature recommended that potatoes be probe. -
Page 15: The Temp Ace Functionality
USING YOUR AIR FRYER NOTE: Take care to ensure the key to increase the time, or the temperature probe is correctly installed, to decrease it. The new cooking time will as detailed in the section above and be displayed on the unit’s LED screen to diagram opposite, before selecting the show this setting has been adjusted. -
Page 16: Weights And Measures
USING YOUR AIR FRYER NOTE: The probe can also be used IMPERIAL Metric to measure the inner temperature of 1/2 oz ingredients, even if no cooking program has been selected. To do this, insert the 1 oz probe into the food, as detailed below, 2 oz then press the Temp ACE button for approximately two seconds. -
Page 17: Settings Table
SETTINGS Min- Max Time Temp (°C) Extra information Shake Weight (g) (mins) POTATO & FRIES Thin Frozen Fries 400-500 18-20 Thick Frozen Fries 400-500 20-25 Potato Gratin 20-25 MEAT & POULTRY Steak 100-600 10-15 Pork Chops 100-600 10-15 Hamburger 100-600 10-15 Sausage Roll 100-600... -
Page 19: Cleaning And Care
CLEANING AND CARE WARNING! Do not immerse the appliance TIP: If dirt is stuck to the bottom of the in water or any other liquid. inner pot, fill the inner pot with hot water with some washing-up liquid. Let NOTE: Clean the appliance after every use. the inner pot soak for approximately 10 minutes. -
Page 20: Troubleshooting
TROUBLESHOOTING PROBLEM POSSIBLE CAUSE POSSIBLE SOLUTION The air fryer does not The appliance is not Plug the appliance into an work. plugged in. earthed wall socket. The timer has not been Set the time required. set. The Power ON/OFF key Press the Power ON/OFF key. - Page 21 TROUBLESHOOTING PROBLEM POSSIBLE CAUSE POSSIBLE SOLUTION The appliance is The ingredients have a Smoking will be normal. smoking high oil content. White smoke is caused by The unit contains grease grease heating up inside the from previous use. fryer. Clean the unit properly after each use.
-
Page 22: Disposal Of The Unit
DISPOSAL OF THE UNIT Appliances bearing the symbol shown The WEEE directive, introduced in August here may not be disposed of in domestic 2006, states that all electrical items must rubbish. You are required to dispose of old be recycled, rather than taken to landfill. electrical and electronic appliances like Please arrange to take this appliance to this separately. - Page 28 We hope you enjoy your appliance for many years... This product is guaranteed for 12 months days of purchase. If you do not register from the date of original purchase. the product with us within the 28 day period, your product is guaranteed for If any defect arises due to faulty 1 year only.
Need help?
Do you have a question about the T17131 and is the answer not in the manual?
Questions and answers
The entire plugs come off how do I put it back together
The plug must be fitted with a fuse of the same rating already installed and conforming to BS 1362. Use an ASTA-approved fuse. The wire connections should be as follows:
- Blue (Neutral) [N] must be connected to the terminal marked [N].
- Brown (Live) [L] must be connected to the terminal marked [L].
- Green/Yellow (Earth) must be connected if applicable.
If in doubt, consult a qualified electrician.
This answer is automatically generated