Advertisement
Quick Links
Advertisement

Subscribe to Our Youtube Channel
Related Manuals for VEIKOUS PG0210-09

Summary of Contents for VEIKOUS PG0210-09
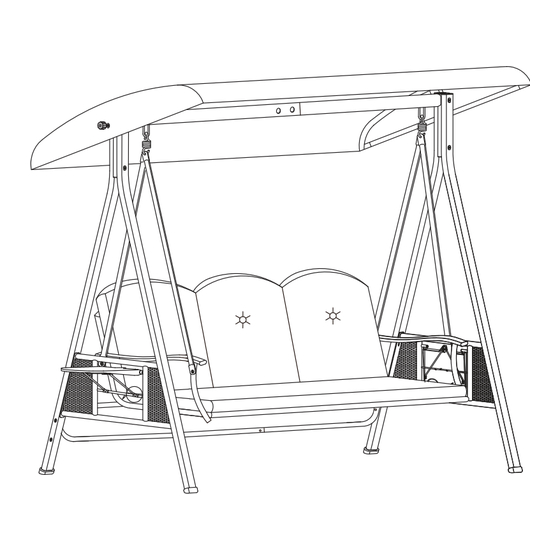
- Page 1 3-PERSON PATIO SWING WITH CANOPY...
- Page 2 1-858-324-1911 (Mon - Fri, 10:00 am to 7:00 pm EST) you can also e-mail customerservice@veikous.com or visit www.veikous.com Please prefer email contact. Due to busy lines, there may be a wait for calls to be answered.
-
Page 3: Hardware List
HARDWARE LIST M6X68 M6X32... -
Page 4: Parts List
PARTS LIST... - Page 5 Step1 Assembling the beam Connect beam(A) and beam(A1) together with two screws(7) as shown in the figure.
- Page 6 Step2 Assembling the swing frame Assemble legs(B) and legs(C) to the beam on both sides accordingly with six screws(1) in total as shown.
- Page 7 Step3 Assembling the seat retaining rod Connect D and D1 with one screw (8) in the middle, and then assemble the whole rod with four screws(6) in between to the left and right legs of B.
- Page 8 Step4 Assembling the cup holder Assemble the two cup holders(E) between the legs using eight screws(10) with four on each side as shown.
- Page 9 Step5 Attaching the arms to the seat Connect the two armrests(G) to the seat(F) with totaly four screws(3) and four gaskets(X1)(two on each side), and then attach the long swing pipes(I) to the armrests(G) with one screw(5) and one gasket(X1) on each side as shown below.
- Page 10 Step6 Attaching the backrest to the seat 1.Firstly, connect the two armrests(G) to the backrest(H) at bottom with two screws(4) and two gaskets(X1),one on each side as shown below. 2.Secondly, do the same for the above two but with two screws(2) and four gaskets(X1) instead, along with two short swing pipes(J) as shown in the figure.
- Page 11 Step7 Attaching the seat to the swing frame Attach the assembled seat to the swing frame using the two spring hooks(K).
- Page 12 Step8 Assembling the canopy frame 1 1.Assemble the curved bar(P) with supporting bar(O) like below with three screws(9). 2.Repeat the step twice to make sure you get two canopy frames assebmbled ready.
- Page 13 Step9 Assembling the canopy frame 2 1.Connect the supporting bar(M) and bar(N) together with screw(11) in the middle,and then fix the entire bar tube to the curved bars(P) with two screws(9), one on each side. 2.Repeat the step twice to make sure you get the whole canopy frame assembled.
- Page 14 Step10 Attaching the top frame to the top bar 1 Make sure the canopy frame and 滚滚长江东逝水 the top bar align each other.
- Page 15 Step11 Attaching the top frame to the top bar 2 Place the canopy(L) on the assembled top frame.
- Page 16 Step12 Attaching the top frame to the top bar 3 1.Attach the top frame to the top bar using the screw knobs(P1) on both sides. 2.Tie the canopy(L) to the curved bars(P) by affixing the velcro. 3.Place the back cushions(Q) and the seat cushion(R) on the seat.
-
Page 17: Care And Cleaning
Enjoy your product ! Note 1. Adjust the angle of the top frame and fully tighten the screw knobs for everytime you adjust the canopy. 2. Make sure to fix all cushions to the seat using ties in case they are blew away by wind.
Need help?
Do you have a question about the PG0210-09 and is the answer not in the manual?
Questions and answers