Advertisement
Quick Links
Advertisement

Related Manuals for VEIKOUS PG0210-10WRD

Summary of Contents for VEIKOUS PG0210-10WRD
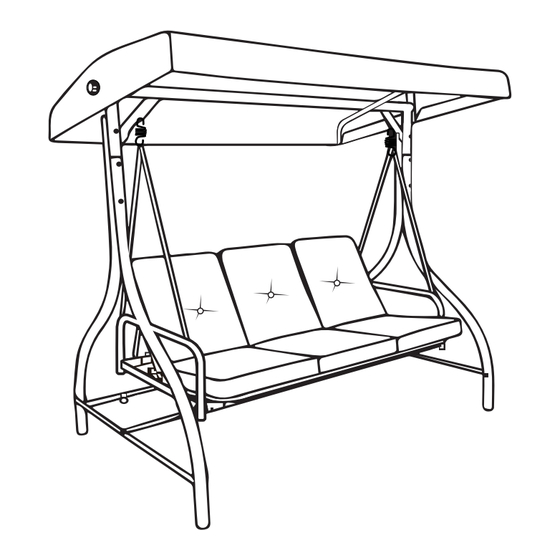
- Page 1 3-PERSON 2-IN-1 CONVERTING PATIO SWING WITH CANOPY...
- Page 2 1-858-324-1911 (Mon - Fri, 10:00 am to 7:00 pm EST) you can also e-mail customerservice@veikous.com or visit www.veikous.com Please prefer email contact. Due to busy lines, there may be a wait for calls to be answered.
-
Page 3: Hardware List
HARDWARE LIST M8X100 Bolt M8X98 Bolt M8X75 Bolt 2PCS 4PCS 2PCS M6X40 Bolt M6X60 Bolt M6X35 Bolt 4PCS 6PCS 4PCS M6X32 Bolt Nut cover M6X30 Bolt 6PCS 24PCS 2PCS 2PCS 2PCS 2PCS... -
Page 4: Parts List
PARTS LIST... - Page 5 Step1 Assembling the swing frame 1. Attach the shorter leg(B) and the longer leg(C) on one side as shown below, and put one bolt(1)on the first top hole, two bolts(2) on the bottom two holes and then fasten all of them by using three nuts(9) at back. 2.
- Page 6 Step2 Assembling the swing frame support 1.Attach the support bar(E) in between to the legs(C) (the back of the swing), and then fasten it by using one bolt(4) and one nut(9) ONLY at the bottom hole on each side.(DO NOT do with the top hole now) 2.Attach two side bars(D) in between the leg(B) and leg(C) on both sides with four bolts(4) and four nuts(9).
- Page 7 Step3 Assembling the swing frame support Attach the bottom supporting bar(F) in between to the two side bars(D) with two bolts(8)and two nuts(9). Back Front Back...
- Page 8 Step4 Assembling the seat frame 1.Insert the front bar(G) and rear bar(H) into the arm(J) and the arm(I), and then connect them with four bolts(6) and four nuts(9). 2.Attach the four swing pipes(K) to the arm(J) and the arm(I) using four bolts(5) and four nuts(9).
-
Page 9: Step5 Assembling The Seat
Step5 Assembling the seat Connect the seat(L) to the arm(I) and arm(J) on both sides with two bolts(3), two nuts(9) and two plastic gaskets(11) as shown below. The seat(L) support rod is stuck in the rear bar(H) buckle to hold the seat in place. - Page 10 Step6 Assembling the canopy 1 Place the two supporting bars(N) across the canopy(O) as shown below.
- Page 11 Step7 Assembling the canopy 2 1.Connect the bar(N) to the curved bar(M) with three bolts(7). 2.Repeat the step twice to make sure you get the whole canopy frame assembled.
- Page 12 Step8 Assembling the canopy 3 1.Place the canopy(O) on the assembled top frame.Attach the top frame to the top bar using the screw knobs(12) on both sides. Another side is also assembled in the same way...
- Page 13 Step9 Attaching the seat to the swing frame 1.Attach the assembled seat to the swing frame using the two spring hooks(10). 2.Place the three seat cushions(P) on the seat.
- Page 14 The product can be used in 2 ways Patio swing as normal with upright backrest. Laying down as a swing bed with the back fixed to the rear supporting bar.
-
Page 15: Care And Cleaning
Enjoy your product! Note 1. Adjust the angle of the top frame and fully tighten the screw knobs for everytime you adjust the canopy. 2. Make sure to fix all cushions to the seat using ties in case they are blew away by wind.
Need help?
Do you have a question about the PG0210-10WRD and is the answer not in the manual?
Questions and answers