Table of Contents
Advertisement
Quick Links
Advertisement
Table of Contents

Related Manuals for 4O3A ANTENNA GENIUS


Summary of Contents for 4O3A ANTENNA GENIUS
- Page 1 ANTENNA GENIUS User Manual Software Version 4.1.8...
-
Page 2: Table Of Contents
4O3A Signature – Antenna Genius User Manual TABLE OF CONTENTS TABLE OF CONTENTS ........................1 WELCOME ..........................3 1.1. Software Version 4 ....................... 3 1.2. Considerations Before Upgrading ..................4 1.3. Backing Up Your Configuration .................... 5 SPECS & FEATURES ........................7 LEGAL ............................ - Page 3 4O3A Signature – Antenna Genius User Manual 9.4. Initial Configuration ......................37 9.5. The Configuration Menu ....................37 9.6. Always On Top ......................... 38 9.7. View Output Relays ......................38 9.8. Device Settings ........................ 39 9.8.1. Basic Information ......................39 9.8.2.
-
Page 4: Welcome
1.1. Software Version 4 This is the user manual for the new generation of Antenna Genius software - Version 4. This version is completely rewritten from scratch with the focus on stability, reliability, and a significant extension in features. -
Page 5: Considerations Before Upgrading
4O3A Signature – Antenna Genius User Manual 1.2. Considerations Before Upgrading Important! The API and network protocol for this version have been completely redesigned and rewritten so any custom software that worked previously will not be compatible with new version out of the box, and will need to be updated. -
Page 6: Backing Up Your Configuration
However, the new version is completely backwards compatible with the previous generation configuration file. The configuration is stored in the memory on-board the Antenna Genius but it can be backed up into an XML configuration file stored on your PC. - Page 7 2. Click on the Export Configuration button. 3. Choose a path and name and save your config file. You can load this file into your Antenna Genius again after upgrading the firmware to version 4. Index Page 6 of 56...
-
Page 8: Specs & Features
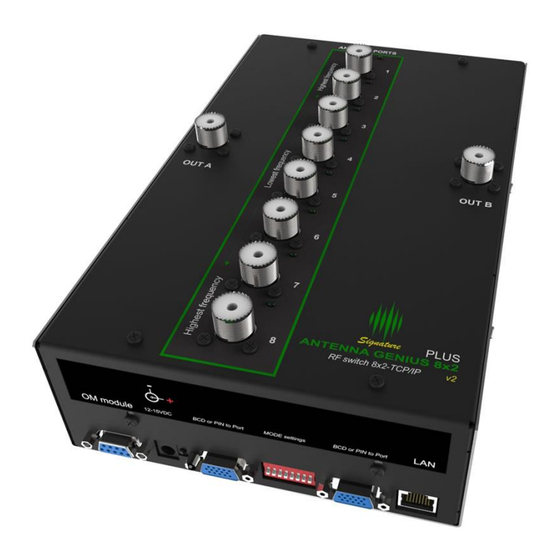
4O3A Signature – Antenna Genius User Manual SPECS & FEATURES Manufacturer 4O3A Signature by Sky Sat d.o.o. Model Antenna Genius 8x2 Plus v2 Functionality 8 antenna 2 radio RF matrix switch controlled via TCP/IP (LAN or WAN), BCD, or +12 VDC Pin-To-Port... -
Page 9: Legal
4O3A Signature – Antenna Genius User Manual LEGAL Radio & Television interference 3.1. (FCC Part 15 - §15.21 and §15.105) This equipment has been tested and found to comply with the limits for a Class B digital device, pursuant to part 15 of the FCC Rules. These limits are designed to provide reasonable protection against harmful interference in a residential installation. -
Page 10: European Community Ce Conformity
4O3A Signature will insure the package and pay return shipping. What is not covered: This Limited Warranty as it pertains to the Antenna Genius or components does not cover repair or damage caused by (1) misuse, negligence or user modifications; (2) any performance malfunctions involving non-4O3A Signature equipment;... -
Page 11: Trademarks
4O3A Signature equipment or components used in conjunction with our products. Any such repair or replacement is the responsibility of the customer. 4O3A Signature will not be liable or responsible for reimbursement for any special, indirect, incidental or consequential damages, including but not limited to any loss of business or profits, loss of property, loss of revenue, loss of use, loss of data, inconvenience or cost of unauthorized service. -
Page 12: What Can Antenna Genius Tm Do
- prevent the same antenna from being connected to both radios. This, along with AG’s ultra- high port-to-port isolation help protect your radios from front end damage. AG in action with SmartSDR @ 4O3A (AG Always on top option engaged) Multiple control options 4.1. - Page 13 ��EXPERT TIP! All 4O3A Genius System products use standard TCP/IP protocols to communicate with each other and with other suitably-equipped devices. The 4O3A Signature team believes in open standards in ham radio and makes its APIs (library of commands) available freely to other manufacturers and software authors.
-
Page 14: How It Works
4O3A Signature – Antenna Genius User Manual HOW IT WORKS Antenna Genius brings together a powerful CPU, fast network interface, rugged, high-power relays and a programming/control App that runs in all supported versions of Windows. We are confident AG is the best antenna switch you can buy. -
Page 15: Online Resources
Antenna Genius , Rotator Genius , Tuner Genius and more. 4O3A Web Site Downloads: current owners manuals, white papers, Apps, firmware, and changelog are available at: https://4o3a.com/support/downloads 4O3A Web Site Forum: https://4o3a.com/support/forum... -
Page 16: Hardware
4O3A Signature – Antenna Genius User Manual HARDWARE ��EXPERT TIP! Read this and the following Software section carefully before installing any hardware. Front panel 8.1. Front panel features: • SO-239 (or N-female) connector for Port A • SO-239 (or N-female) connector for Port B •... -
Page 17: Top Panel
4O3A Signature – Antenna Genius User Manual Top panel 8.3. The top panel features: • A DC power connector for stacking multiple AG units. This enables a single switch to switching between 16, 24 or 32 antennas. • Two pairs of dedicated PTT input and output RCA ports for hot switching protection. - Page 18 ��EXPERT TIP! For outdoor UTP (Ethernet) cable runs, be sure to use outdoor-rated cable including UV-resistance properties if located in direct sunlight. 4O3A Signature encourages all amateur radio operators to employ single point ground systems for both protection from lightning induced power surges and also for RFI mitigation. A good...
-
Page 19: Dc Power Connection
4O3A Signature – Antenna Genius User Manual https://arrl.org Another excellent resource for station grounding information and RFI mitigation are several documents written by Jim Brown, K9YC, available for free download at: http://www.audiosystemsgroup.com/K9YC/K9YC-old AG is a computer and thus its electronics will generate some heat. Also, the relays and other components will generate heat when under load. -
Page 20: Dip Switch Configurations
4O3A Signature – Antenna Genius User Manual and your station LAN switch or hub (switches preferred over hubs). This should be the same place where your FLEX-6000 Signature Series radio connects to your LAN. Note this LAN connection can be as simple as a port on a DSL router or as fancy as a standalone Gigabit switch. - Page 21 4O3A Signature – Antenna Genius User Manual Click on the Settings wheel and select Firmware Recovery You will be prompted with a window that looks like this: click Yes wait for the progress bar to fill up move DIP 7 to to OFF position...
-
Page 22: Lan Control Mode
4O3A Signature – Antenna Genius User Manual LAN Control Mode 8.8. LAN Control Mode is used if you want to obtain band data from a FlexRadio. In this mode AG gets band data from a FlexRadio using the TCP/IP network. - Page 23 4O3A Signature – Antenna Genius User Manual Click on the FlexRadio under Bands and your FlexRadio will be discovered automatically and listed on the right: Set Antenna: option to assign the desired Flex antenna port to Port A and Port B, respectively.
-
Page 24: Bcd Control Mode
Typical radios using BCD band data include Yaesu FT-1000 MP, FT DX 5000, FT-1000D, Elecraft K3, Ten-Tec Omni V and Orion II and many more. In order to use BCD mode on your Antenna Genius, go to the app and click on the band source button then select BCD. - Page 25 4O3A Signature – Antenna Genius User Manual This is the pinout when looking at the device connector: This is the BCD data table: Band 160M None Frequency Band A Band B Band C Band D HEX Code Note that it is not possible to select 60M band through BCD.
-
Page 26: Pin-2-Port Control Mode
In this mode you can use an external switch for manual switching. You will be able to switch up to 8 different antennas per port. In order to use P2P mode on your Antenna Genius, go to the app and click on the band source button then select P2P. -
Page 27: Automatic Mode
You will never be allowed to do manual band selection if in AUTO mode even if no band sources are available. In order to use automatic mode on your Antenna Genius, go to the app and click on the band source button then select AUTO. -
Page 28: Manual Mode
4O3A Signature – Antenna Genius User Manual 8.12. Manual Mode The manual mode is a new, special mode that’s used for testing and debugging of your configuration. When the manual mode is enabled, you will be able to see the band manually and by doing so, verify that your configuration is exactly as you want it to. -
Page 29: Initial Set-Up
4O3A Signature – Antenna Genius User Manual 6. Allowing remote operation. 7. Updating AG with the latest firmware. ��EXPERT TIP! AG will default to last antenna selected for a particular band in automatic mode after which operator can manually select an alternative antenna for that band. Note that you will be prohibited from switching to antennas which have not been programmed for the band in question. - Page 30 Now you should see the Ready to Install window. Double check the data, if correct, hit Install. If not correct, use the Back button to navigate to the applicable window and revise Hit Finish to launch Antenna Genius Windows App: Index...
- Page 31 4O3A Signature – Antenna Genius User Manual 9.1.2. Using DHCP to set the network address AG comes factory preset for using your network’s DHCP server (Dynamic Host Configuration Protocol), which is built into an Ethernet switch or DSL router on most home networks.
- Page 32 4O3A Signature – Antenna Genius User Manual When you first run the AG Windows App, it will open the AG Launch window: Your AG should be detected automatically by the app. If so, just click on Connect. If you don’t see your AG under local devices, it is possible your LAN subnet does not correspond with your AG device network settings.
-
Page 33: Device Information
4O3A Signature – Antenna Genius User Manual You should see the AG Control window (Both - SO2R mode pictured) ��EXPERT TIP! You can select “Always on top” the AG App in Windows to make it easy to find and launch. Just click on configure and select Always on Top Device Information 9.2. - Page 34 4O3A Signature – Antenna Genius User Manual The Device Information selection in the Windows App Gear menu has comprehensive info on your Antenna Genius and its settings. You cannot change any settings in this window, it is for displaying device status only.
-
Page 35: Is Your Firmware Up-To-Date
4O3A Signature – Antenna Genius User Manual IP Address Internet Protocol Address, a numerical label assigned to each device participating in a computer network that uses the Internet Protocol for communication, AG uses IPv4 addresses set by DHCP or manually Subnet Mask Set by DHCP or manually, usually 255.255.255.0... - Page 36 4O3A Signature – Antenna Genius User Manual Your AG will be detected on the network automatically. Double click and connect to your AG. You will be prompted to confirm the upgrade process. Considerations: Make sure your network connection is stable and reliable.
- Page 37 4O3A Signature – Antenna Genius User Manual The firmware installation file comes pre-loaded with the Utility application. Click the Upgrade Firmware button and wait for the process to finish. Should not take longer than a few seconds. Click the OK button when done.
-
Page 38: Initial Configuration
4O3A Signature – Antenna Genius User Manual Initial Configuration 9.4. If you have selected Port A or Port B mode, your AG Control Window prior to initial antenna programming will look like this, in this example both Radio Port A and Radio Port B are using LAN mode. -
Page 39: Always On Top
This feature displays the status of all the output ports on the relay output module. It is designed for debugging and making sure you configured your device as intended. Antenna Genius v4.1 supports up to 3 Output Modules, each module having 16 relay outputs. This window is not used for configuration but for viewing only. -
Page 40: Device Settings
4O3A Signature – Antenna Genius User Manual Device Settings 9.8. Click on the Device Settings in the config menu to access the main configuration menu for the AG. 9.8.1. Basic Information Under the basic information tab, you can name your Antenna Genius device. -
Page 41: Antennas
4O3A Signature – Antenna Genius User Manual 9.8.2. Antennas Fill in your antenna info giving each antenna a unique name. For each antenna, select the applicable band or bands that are usable with that particular antenna. The bands assigned to the antennas are listed here for an overview. -
Page 42: Antenna Keyboard Shortcuts
4O3A Signature – Antenna Genius User Manual After you’re done programming your antenna and band connections, select Save and Reset, AG App will write your antenna-band logic to your AG. The Reset device button re-sends the current antenna-band data to AG. -
Page 43: Output Relays Designer
4O3A Signature – Antenna Genius User Manual 9.8.5. Output Relays Designer Output relay designer is used to configure your output relay module. Relays are controlled by buttons and buttons are organized into groups. You need the OM Module (output module) in order to use this functionality. - Page 44 4O3A Signature – Antenna Genius User Manual The green plus button adds another Output button. If Toggle is checked this button will turn off all the other buttons in the group. If Toggle is unchecked you will be able to turn on multiple buttons in the group at the same time.
- Page 45 4O3A Signature – Antenna Genius User Manual The output relay window shows three rows of 16 relays and represents 3 OM modules connected together (daisy chained). Relays 1-16 correspond to the first OM, 17-32 to the second and 33-48 to the third.
-
Page 46: Keyboard Shortucuts
4O3A Signature – Antenna Genius User Manual You can use the output relay window to verify that your relay selection is correct and as desired. The output relay window can be checked in the main configuration menu: 9.8.7. Keyboard Shortucuts... -
Page 47: Bands Range Configuration
4O3A Signature – Antenna Genius User Manual 9.8.8. Bands Range Configuration Like in the previous version you can fully customize your band ranges. Note you have 4 custom bands at the bottom of the table. The frequency ranges are relevant when using FlexRadio as band source only. -
Page 48: Bcd
4O3A Signature – Antenna Genius User Manual Click Save. 9.8.10. BCD BCD as band source works exactly the same as in version 3 and has the exact same pinout. If your radio doesn’t have a BCD output but rather a CAT or CI-V you can use the B2BCD Genius accessory to convert it to BCD: https://4o3a.com/b2bcd-band-to-bcd-decoder... -
Page 49: Ptp
4O3A Signature – Antenna Genius User Manual 9.8.11. PTP P2P or Pin To Port is the most direct and primitive way to control AG, turning it into a classic switch. One pin corresponds to the port on the AG, not taking into account frequency at all. -
Page 50: Stacking
4O3A Signature – Antenna Genius User Manual 9.8.13. Stacking The current version supports 16x2 stacking only. Support for other stacking modes will be added in the next release (24x2, 32x2 and 8x4, 8x6, 8x8. To activate stacking check the Enable Stacking (16x2) checkbox. -
Page 51: Advanced Options
4O3A Signature – Antenna Genius User Manual All 16 antenna ports will now be available. Note: You will be able to connect to the slave AG in order to see and verify that switching is occurring correctly but you will not be able to control it directly. -
Page 52: Static Entries / Remote Operation
4O3A Signature – Antenna Genius User Manual 9.8.15. Static Entries / Remote Operation You can add a static entry for your AG if it has a fixed IP address. This is mainly used for remote operation. The other prerequisite for remote operation is setting up your router with port forwarding so you can access the switch from outside the network. -
Page 53: Auto Connect On Startup
4O3A Signature – Antenna Genius User Manual 9.8.16. Auto Connect on Startup If you use only one AG you can check this option to connect to your AG automatically, bypassing the selection menu. If you are using DHCP, the app will connect to your AG based on the serial number so you don’t have... -
Page 54: Operation
4O3A Signature – Antenna Genius User Manual OPERATION AG can operate both locally and remote. Locally, it is the part of your own LAN and the most common Remotely, AG is part of another network. It is up to you to choose how to access to that other network. - Page 55 4O3A Signature – Antenna Genius User Manual Internal voltage is used for testing and programming, and it is strongly recommended to use proper external power supply and set jumpers to EXT. Internal power supply in AG is 1A, which is on the margin if all relays are in use.
-
Page 56: Troubleshooting
4O3A Signature – Antenna Genius User Manual TROUBLESHOOTING 12.1. Re-riving a bricked device The most typical scenario of bricking an AG is interrupting a firmware upgrade or failing a firmware upgrade due to a bad network connection. AG features a bootloader software enabling you to reinstall the firmware at any time. -
Page 57: Changelog
- This version has been written from the ground up and has nothing in common with the previous versions under the hood. - This version is backwards compatible with every hardware version of Antenna Genius. Index Page 56 of 56...
Need help?
Do you have a question about the ANTENNA GENIUS and is the answer not in the manual?
Questions and answers