Advertisement
Quick Links
CO/NO
CALIBRATION KIT
2
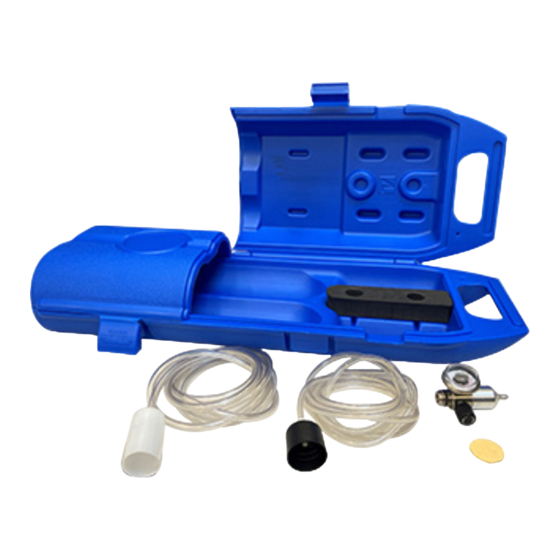
MODEL GDT-CALKIT-CNC
The GDT-CALKIT-CNC is a kit to correctly test or calibrate Greystone's Series GDT CO/NO2
detectors, CMD Series CO detectors and NDD Series NO2 detectors. The GDT-CALKIT-CNC
includes:
•
Tubing
•
Regulator
•
Calibration Cap 1 (GDT Series)
•
Calibration Cap 2 (CMD/NDD Series)
•
Carrying Case
•
Sponge (For CO only)
Note: Calibration Gas is not included. To be purchased locally.
Calibration Gas Requirements:
Tank Size: 103 liter
Tank Connection: Female, 5/8" - UNF - C-10
250ppm CO in air
10ppm NO2 in air
process. When the calibration is complete, the display will indicate DONE. Then press <MENU> to advance to the next selection. A CO
250 Calibration Counter is incremented every time this step is performed. The CO Re-Cal timer is reset whenever this step is performed. If
reading is not within +/- 10% of expected value the unit will not calibrate and report a failure.
NO2 Zero
The following section describes how to calibrate for the NO
Cal GO
3 seconds to initiate the calibration process. When the calibration is complete, the display will indicate DONE. Then press <MENU> to
advance to the next selection. A NO
performed. Attach to the 10 ppm NO2 gas bottle to the regulator and firmly tighten it by hand. Sponge should not be used for NO
Pod to be calibrated. Turn on the regulator to begin gas application. Wait 3-5 minutes for sensor to stabilize, then press and hold the <UP> key for 3 seconds to
initiate the calibration process. When the calibration is complete, the display will indicate DONE. Then press <MENU> to advance to the next selection. A NO
Calibration Counter is incremented every time this step is performed. The NO
GREYSTONE HAS AN ISO 9001 REGISTERED QUALITY SYSTEM
PRE-CALIBRATED SENSOR REPLACEMENT:
The GDT sensor features a gas sensor POD that is pre-calibrated. This means that the POD can simply be replaced with a
new calibrated POD if desired without having to remove the enclosure and the main processor board. This sensor swap can
be completed in seconds. Simply unplug the POD cable connection from the main board in enclosure, remove the POD by
unscrewing counterclockwise, install the POD by screwing it in clockwise and reconnect the POD cable to connector on main
PCB. There is no need to make any adjustments or apply gas to the transmitter using the sensor swap method.
CALIBRATION:
The device may also be calibrated or verified with the CO or NO
calibration kit consisting of a bottle of gas, a tank pressure regulator with flow restrictor and the
necessary tubing with a calibration cap to cover to the sensor. Calibration can be done at 20 to 27°C.
Verification with gas can be done without removing the device cover. For surface mount products,
simply apply gas using the calibration cap over the POD to be calibrated. See the below images for reference.
The sensor must be continuously powered for at least 1/2 hour prior to calibration. To put device into calibration mode the
cover on main unit should be opened. Press and release the <Menu> key to enter the Setup Menu. Continue to press the
menu key and release to step through choices until the CO (or NO
The following section describes how to calibrate for the CO sensor. Ensure the sensor is in clean air. Press and hold the
<UP> key for 3 seconds to initiate the calibration process. When the calibration is complete, the display will indicate DONE.
Then press <MENU> to advance to the next selection. A CO Zero Calibration Counter is incremented every time this step is
performed. The CO ReCal timer is reset whenever this step is performed. Attach to the 250 ppm CO gas bottle to the regulator
and firmly tighten it by hand. Moisten the sponge and squeeze out any excess water. Place the sponge in the cap so it does
not plug the hole in the side of the cap. Install cap over the CO Pod to be calibrated. Turn on the regulator to begin gas
application. Wait 3-5 minutes for sensor to stabilize, then press and hold the <UP> key for 3 seconds to initiate the calibration
Zero Calibration Counter is incremented every time this step is performed. NO
2
gas if required. This requires a field
2
) Calibration screen is shown.
2
sensor. Ensure the sensor is in clean air. Press and hold the <UP> key for
2
Re-Cal timer is reset whenever this step is performed.
2
CO Zero
Cal GO
Re-Cal timer is reset whenever this step is
2
gas. Install cap over the NO
2
2
10
2
Advertisement

Related Manuals for Greystone Energy Systems GDT-CALKIT-CNC


Summary of Contents for Greystone Energy Systems GDT-CALKIT-CNC
- Page 1 CO/NO CALIBRATION KIT MODEL GDT-CALKIT-CNC The GDT-CALKIT-CNC is a kit to correctly test or calibrate Greystone’s Series GDT CO/NO2 detectors, CMD Series CO detectors and NDD Series NO2 detectors. The GDT-CALKIT-CNC includes: • Tubing • Regulator • Calibration Cap 1 (GDT Series) •...
- Page 2 CMD SERIES CO DETECTORS PRE-CALIBRATED SENSOR REPLACEMENT The CO transmitter features a cover mounted sensor PCB that is pre-calibrated. This means that the entire sensor PCB can simply be replaced with a new calibrated PCB if desired without having to remove the enclosure and the main processor board. This sensor swap can be completed in seconds. Simply unplug the device ribbon cable connection, remove the old sensor PCB, install the new PCB and reconnect the ribbon cable.
- Page 3 Greystone Energy Systems, Inc. Ph: +1 (506) 853-3057 Fax: +1 (506) 853-6014 150 English Drive, Moncton, North America: 1-800-561-5611 New Brunswick, Canada E1E 4G7 E-mail: mail@greystoneenergy.com PRINTED IN CANADA Copyright © Greystone Energy Systems Inc. All Rights Reserved www.greystoneenergy.com OM-GDTCALKITCNC-03...
Need help?
Do you have a question about the GDT-CALKIT-CNC and is the answer not in the manual?
Questions and answers