Table of Contents
Advertisement
Available languages
Available languages
Quick Links
Advertisement
Table of Contents

Related Manuals for LITELINE LC-CRTL-DIM-1


Summary of Contents for LITELINE LC-CRTL-DIM-1
- Page 1 MODEL: LC-CRTL-DIM-1 Wi-Fi Smart Control with Dimmer User Manual Limited 3-Year Warranty For complete warranty information, including details on consumer legal rights as well as warranty exclusions, visit www.liteline.com/warranty.
-
Page 2: Product Overview
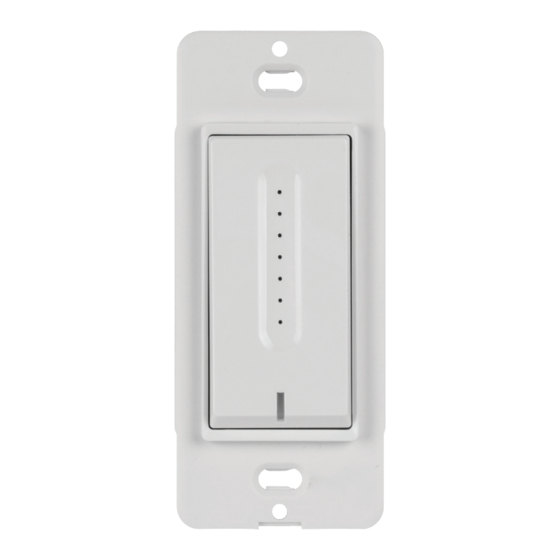
Product overview Brightness Indicator Lights Touch Dimming Area ON/OFF Switch Power/Connectivity Indicator Light Specifi cations Wireless Frequency: 2.4GHz, 802.11b/g Input: 120VAC, 60Hz Output Power (120VAC): LED/Fluorescent: 150W Max Incandescent: 400W Max Output Current: 3.3A Standby Power: 0.5W Enclosure Type: Type 1 Enclosure (after installation) Action type: Type 1.Y action... -
Page 3: Before You Start
Before you start IMPORTANT: Review this installation guide in its entirety before starting installation of your Smart Dimmer Switch or removal of your old switches. Installation and maintenance involving electrical wiring must be done by qualifi ed person(s). Risk of Electric Shock: Electricity can cause personal injury and property damage if handled improperly. -
Page 4: What You Need
What you need Screwdrivers Pliers Wire Stripper Voltage Tester Installation 1. Turn OFF the power at the circuit breaker and confi rm with the voltage tester at the switch before proceeding. Place voltage tester against the existing switch checking the wall plate, screws and switch at various points to determine that there is no power present. - Page 5 Load Neutral 4. Disconnect and remove the (Required) existing switch. 5. Connect the Smart Dimmer as per the below wiring diagram. The ground wires must be connected to the electrical box. Live (Required) Ground 6. Mount the Smart Dimmer in the existing gang box with the provided screws and attach the wall plate (press fi...
- Page 6 Dimmer functions INDICATOR LIGHTS STATUS LIGHTS INDICATOR LIGHT COLOR STATUS STATUS Powered OFF Powered ON Power / Single Blink Ready for Smart Pairing mode WHITE Connectivity Note: When the DIMMER is fi rst Indicator connected to power, it will enter into Light Smart Pairing mode automatically.
-
Page 7: Troubleshooting
Troubleshooting PROBLEM CAUSE SOLUTION Unable to fi nd the Smart Dimmer Long Press the ON/OFF switch (5 seconds) Smart Dimmer on may not be in to enter into Connectivity Mode: Searching the network Connectivity Mode for Wi-Fi Network. Review and confi rm the INSTALLATION Wiring issue section in this manual. - Page 8 WiZ Quick Setup Guide QR CODE Downloading the WiZ App Direct to Apple app store / Google play store Before you start, make sure you install the WiZ App from either Google Play or the Apple App Store (both offer the same set of features).
- Page 9 Installing and pairing smart dimmer The dimmer switch is connected through the app and will only operate on your home’s 2.4GHz Wi-Fi network. Most new routers are dual-bandwidth (both 2.4GHz and 5GHz), ensure you select the 2.4GHz network which covers a wider range than the 5GHz.
- Page 10 Note: Upon fi rst boot-up, the fi rmware may need to be updated. Please allow up to 1 minute for the Smart Dimmer to update after completing WiZ app setup. For additional support, visit www.liteline.com/WiZsupport...
- Page 11 Manuel de l’utilisateur – Contrôle intelligent Wi-Fi avec Gradateur Garantie limitée de 3 ans Pour connaître le texte complet de la garantie, notamment les renseignements sur les droits des consommateurs ainsi que les exclusions au titre de la garantie, consultez www.liteline.com/warranty.
-
Page 12: Aperçu Du Produit
Aperçu du produit Témoins de Zone luminosité tactile de variation d’intensité Interrupteur Témoin de courant / connectivité Spécifi cations Fréquence du sans fi l : 2,4 GHz, 802.11b/g Entrée : 120 VCA, 60 Hz Puissance à la sortie (120 VCA) : DEL / Fluorescent : 150 W Max Incandescence : 400 W Max Intensité... -
Page 13: Avant Tout
Avant tout IMPORTANT : Lisez ce guide d’installation en entier avant de débuter l’installation du gradateur intelligent ou d’enlever les interrupteurs existants. Installation et entretien impliquant le câblage électrique doivent être effectués par des personnes qualifi ées. Avant que le circuit ne soit connecté au dispositif, un interrupteur extérieur de jeu d’air doit être installé. -
Page 14: Ce Dont Vous Avez Besoin
Ce dont vous avez besoin Tournevis Pinces Pince à dénuder Voltmètre Installation 1. Avant de procéder, coupez le courant au disjoncteur du circuit et confi rmez l’absence de courant à l’interrupteur à l’aide du voltmètre. Placez le voltmètre contre l’interrupteur existant, vérifi... - Page 15 Charge Neutre 4. Déconnectez et enlevez (requis) l’interrupteur existant. 5. Consultez le schéma de câblage ci-dessous pour connecter le gradateur intelligent. Les fi ls de terre doivent être connectés à la boîte électrique. Tension (requis) Terre 6. Posez le gradateur intelligent dans la boîte électrique à l’aide des vis fournies puis posez la plaque murale (fi...
- Page 16 Fonctions du gradateur STATUT DE TÉMOINS LUMINEUX TÉMOINS STATUT DE COULEUR STATUT TÉMOINS LUMINEUX ALLUMÉ Éteint ÉTEINT Sous tension Clignotement unique Prêt pour le mode jumelage intelligent Note : Lorsque le VARIATEUR Témoin de BLANC est connecté pour la première courant / fois à...
-
Page 17: Dépannage
Dépannage PROBLÈME CAUSE SOLUTION Gradateur Appuyez longuement sur l’interrupteur Le gradateur intelligent intelligent (5 secondes) pour passer au mode de n’est pas au mode de introuvable sur le connectivité : recherche du réseau connectivité réseau Wi-Fi. Passez en revue la section Problème de câblage INSTALLATION et confi... - Page 18 Guide de confi guration rapide WiZ QR CODE Téléchargement de l’appli WiZ Direct to Apple app store / Google play store Avant tout, assurez-vous d’avoir installé l’appli WiZ depuis Google Play ou Apple App Store (les deux versions offrent les mêmes caractéristiques). L’appli peut aussi être adaptée aux tablettes si on le désire.
- Page 19 Installation et jumelage du gradateur intelligent Le gradateur se connecte par l’entremise de votre appli et ne fonctionne que sur de votre réseau Wi-Fi 2,4 GHz ménager. La plupart des nouveaux routeurs sont à double bande (2,4 GHz et 5 GHz); assurez-vous de sélectionner le réseau 2,4 GHz qui offre une plage plus étendue que le 5 GHz.
- Page 20 Note : Lors du démarrage initial, vous aurez peut-être à faire une mise à niveau du micrologiciel. Prévoyez autant qu’une minute pour la mise à niveau du gradateur intelligent une fois l’appli WiZ confi gurée. Pour une assistance supplémentaire, visitez www.liteline.com/WiZsupport...
- Page 21 Guía de Usuario – Control Inteligente Wi-Fi con Atenuador Garantía limitada de 3 años Para obtener información completa sobre la garantía, incluidos detalles sobre los derechos legales del consumidor y las exclusiones de la garantía, visite www.liteline. com/warranty.
-
Page 22: Descripción Del Producto
Descripción del producto Luces indicadoras de brillo Área táctil de atenuación Interruptor Luz indicadora de encendido / conectividad Frecuencia Inalámbrica: 2,4 GHz, 802.11b/g Entrada: 120VAC, 60Hz Potencia de Salida (120 VAC): LED/Fluorescente: 150W Max Incandescente: 400W Max Corriente de Salida: 3.3A Energía de Reserva: 0.5W... -
Page 23: Previo A La Instalación
Previo a la instalación IMPORTANTE: Lea esta guía de instalación en su totalidad antes de instalar el interruptor atenuador inteligente o quitar los interruptores antiguos. La instalación y el mantenimiento que involucran cableado eléctrico deben ser realizados por personas califi cadas. Riesgo de descarga eléctrica: La electricidad puede causar lesiones personales y daños a la propiedad si se maneja incorrectamente. -
Page 24: Instalación
Qué se necesita Destornilladores Alicates Pelacables Probador de voltaje Instalación 1. Desconecte la energía en el disyuntor y confi rme con el probador de voltaje en el interruptor antes de continuar. Coloque el probador de voltaje contra el interruptor existente, verifi... - Page 25 Carga Neutro 4. Desconecte y retire el (Requerido) interruptor existente. 5. Conecte el atenuador inteligente según el diagrama de cableado a continuación. Los cables de tierra deben estar conectados a la caja eléctrica. Vivo (Requerido) Conexión a tierra 6. Instale el atenuador inteligente en la caja eléctrica existente con los tornillos proporcionados y fi...
- Page 26 Funciones de atenuación ESTADO DE LUCES INDICADORAS LUCES ESTADO DE LUCES COLOR ESTADO INDICADORAS ENCENDIDO APAGADO APAGADO ENCENDIDO Un parpadeo Listo para el modo de emparejamiento inteligente Nota: Cuando el ATENUADOR se conecte BLANCO Luz indicadora por primera vez a la alimentación, de encendido / entraré...
-
Page 27: Solución De Problemas
Solución de problemas PROBLEMA CAUSA SOLUCIÓN Es posible que Mantenga presionado el interruptor (5 No se puede el atenuador segundos) para ingresar al modo de encontrar el inteligente no conectividad: Buscando red Wi-Fi. atenuador esté en modo de inteligente en la red conectividad Problema de Verifi... - Page 28 Guía de confi guración rápida de WiZ QR CODE Descargar la aplicación WiZ Direct to Apple app store / Google play store Antes de comenzar, asegúrese de instalar la aplicación WiZ desde Google Play o Apple App Store (ambas ofrecen el mismo conjunto de funciones).
- Page 29 Instalación y Emparejamiento del Atenuador Inteligente El atenuador se conecta a través de la aplicación y solo funcionará en la red Wi-Fi de 2,4 GHz de su hogar. La mayoría de los nuevos enrutadores tienen un ancho de banda dual (tanto de 2,4 GHz como de 5 GHz); asegúrese de seleccionar la red de 2,4 GHz que cubre un rango más amplio que el de 5 GHz.
- Page 30 : Tras el primer arranque, es posible que deba actualizar el fi rmware. Espere hasta 1 minuto para que el atenuador inteligente se actualice después de completar la confi guración de la aplicación WiZ. Para obtener ayuda adicional, visite www.liteline.com/WiZsupport...
- Page 31 Notes...
- Page 34 FCC DECLARATION OF CONFORMITY: The following importer is the responsible party: LLC Sales, Inc. DBA Liteline USA 1209 Orange Street, Wilmington, DE, 19801 liteline.com/contact-us This device complies with part 15 of the FCC Rules. Operation is subject to the following two conditions: (1) This device may not cause harmful interference, and (2) this device must accept any interference received, including interference that may cause undesired operation.
- Page 35 DÉCLARATION DE CONFORMITÉ FCC : L'importateur suivant est la partie responsable : LLC Sales, Inc. SN Liteline USA 1209, rue Orange, Wilmington, DE, 19801 liteline.com/contact-us Ce dispositif est conforme aux exigences de la partie 15 des règlements de la FCC.
- Page 36 Los cambios o modifi caciones no aprobados expresamente por la parte responsable podrían anular la autoridad del usuario para operar el aparato. LITELINE CORPORATION Telephone 1.866.730.7704 | Fax 1.888.738.9736 liteline.com UM_LC-CRTL-DIM-1_3.19.24 Copyright © 2024, Liteline Corporation. All rights reserved.
Need help?
Do you have a question about the LC-CRTL-DIM-1 and is the answer not in the manual?
Questions and answers