Table of Contents
Advertisement
Quick Links
A-dec Inspire
Specialty Cabinet
I
NSTALLATION
Contents
Before You Begin . . . . . . . . . . 2
Unpack the Cabinet . . . . . . . . 3
Level the Cabinet . . . . . . . . . . 6
Anchor the Cabinet . . . . . . . . 9
Connect the Wires . . . . . . . . 12
Install the False Bottoms . . 13
Install and Adjust the
Doors . . . . . . . . . . . . . . . . . . . 14
Drawers . . . . . . . . . . . . . . . . . 17
Install the Base Covers . . . . 19
Test the Cabinet . . . . . . . . . . 20
86.1084.00 Rev A
397
®
G
UIDE
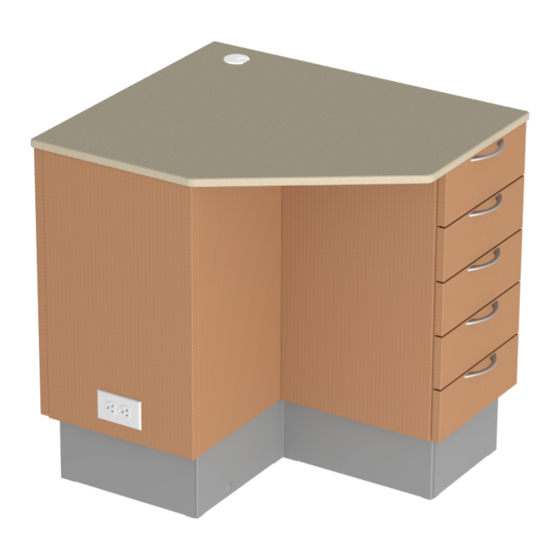
A-dec Inspire 397 - 24" Specialty Cabinet Shown
Product Models and Versions Covered in This Document*
Models
397
*Some product models, versions, and options in this document may not be available in certain regions.
Versions
Description
A
Dental Furniture
Advertisement
Table of Contents

Subscribe to Our Youtube Channel
Related Manuals for Adec Inspire 397

Summary of Contents for Adec Inspire 397
-
Page 1: Table Of Contents
Test the Cabinet ..20 Regulatory Information and Warranty ....20 A-dec Inspire 397 – 24" Specialty Cabinet Shown Product Models and Versions Covered in This Document* Models... -
Page 2: Before You Begin
A-dec Inspire 397 Specialty Cabinet Installation Guide Before You Begin • Clear the room of all debris and thoroughly clean the floors. • Verify that manual air shut-off is installed. • Purge any debris from the air line. • Check with local building and code authorities about installation requirements specific to your location. -
Page 3: Unpack The Cabinet
A-dec Inspire 397 Specialty Cabinet Installation Guide Unpack the Cabinet Remove the items from the top of the cabinet. To remove the doors, pull on the release at the back of the hinge. Remove the false bottoms. Make note of the installed location of each item to help with reinstallation. - Page 4 A-dec Inspire 397 Specialty Cabinet Installation Guide Lower Rails Use a 7/16" socket and ratchet to remove the anchors securing the cabinet to the pallet. Lift and pull the anchors to remove them from the feet. Discard all anchors. Do not reuse anchors to secure the cabinets to the floor.
- Page 5 A-dec Inspire 397 Specialty Cabinet Installation Guide Unwrap the quad box and position it on the floor near the electrical stub up. Ensure the conduit is not wrapped around or protruding beyond any feet. 86.1084.00 Rev A...
-
Page 6: Level The Cabinet
A-dec Inspire 397 Specialty Cabinet Installation Guide Level the Cabinet Read all of the next three pages before beginning the leveling procedure. READ THIS! Use a four-foot level on the floor to identify the high point of the floor by the cabinet, for both side to side and front to back. - Page 7 A-dec Inspire 397 Specialty Cabinet Installation Guide When adjusting the leveling screw, be sure to use a CAUTION 6 point socket. 12 point sockets can damage the screws. To maintain the complete look and functionality of CAUTION the cabinet, do not raise the cabinet more than 3/4" (19 mm).
- Page 8 A-dec Inspire 397 Specialty Cabinet Installation Guide All Leveling Screws Touch the Floor Use a level on the bottom edges of the side panels to make sure the cabinet is level. Make sure all of the leveling screws are touching the floor.
-
Page 9: Anchor The Cabinet
A-dec Inspire 397 Specialty Cabinet Installation Guide Anchor the Cabinet Determine the Anchor Locations Place two anchors on the feet nearest the chair and two anchors on the feet in the corners on the side opposite of the chair. 86.1084.00 Rev A... - Page 10 A-dec Inspire 397 Specialty Cabinet Installation Guide Secure the Anchors At each anchor location, complete the steps in the section for the type of floor. See the next page for wood floors. Concrete Floors If the flooring material is not at CAUTION least 4"...
- Page 11 A-dec Inspire 397 Specialty Cabinet Installation Guide Wood Floors If the flooring material is not at CAUTION least 3" (76.2 mm) thick, consult a licensed contractor about adding reinforcement to the flooring. Place the anchor on the foot or support column and align it with a 2-5/8"...
-
Page 12: Connect The Wires
A licensed electrician or other qualified personnel is required to connect the quad box per CAUTION local codes and regulations. Make the electrical connections. Refer to the A-dec Inspire 397 Specialty Cabinet and Related Modules Pre-Installation Guide (p/n 86.1101.00). To Auxiliary Device If the system includes auxiliary devices, route the power cords and data lines through the cord drops in the worksurface and false bottom to connect to the duplex outlets in the quad box. -
Page 13: Install The False Bottoms
A-dec Inspire 397 Specialty Cabinet Installation Guide Install the False Bottoms Install the False Bottoms Install the modules for the system's configuration before you install the false bottoms. See the instructions that ship with the modules. Place the right false bottom. -
Page 14: Doors
A-dec Inspire 397 Specialty Cabinet Installation Guide Install and Adjust the Doors Install the Doors Insert the door hinge onto the front catch of the hinge mounting plates. To lock the hinge in place, press the back of the hinge onto the hinge plate. - Page 15 A-dec Inspire 397 Specialty Cabinet Installation Guide Adjust the Doors Recommended Tool • #2 Pozidriv screwdriver To avoid damaging the screws, use a #2 Pozidriv screwdriver to adjust the door hinge screws. CAUTION Side to Side Hinge Plate Adjust Up and Down...
- Page 16 A-dec Inspire 397 Specialty Cabinet Installation Guide Back to Front Hinge Plate Adjust 86.1084.00 Rev A...
-
Page 17: Install And Adjust The Drawers
A-dec Inspire 397 Specialty Cabinet Installation Guide Install and Adjust the Drawers Install the Drawers Pull out the drawer slides. Place the drawer aligned with the extended slides then insert the drawer onto the slides. Push the drawer in and ensure that it is engaged with both slides. - Page 18 A-dec Inspire 397 Specialty Cabinet Installation Guide Adjust the Drawer Faces Adjust the face of the drawers to align them properly. To avoid damaging the screws, use a #2 Pozidriv screwdriver to adjust the screws that move the CAUTION drawer faces.
-
Page 19: Install The Base Covers
A-dec Inspire 397 Specialty Cabinet Installation Guide Install the Base Covers Recommended Tool • Phillips head screwdriver Actual Size Base Cover Under the Delivery System Use a Phillips head screwdriver and four screws to install the base cover under the delivery system. -
Page 20: Test The Cabinet
A-dec Inspire 397 Specialty Cabinet Installation Guide Test the Cabinet After you have completed the installation, use the A-dec Dental Furniture Installation Checklist (p/n 86.0624.00) to test the cabinet. The checklist ships with the product. Regulatory Information and Warranty For required regulatory information and the A-dec warranty, see the Regulatory Information, Specifications, and Warranty document (p/n 86.0221.00) available in the Resource Center at www.a-dec.com.
Need help?
Do you have a question about the Inspire 397 and is the answer not in the manual?
Questions and answers