Advertisement
Quick Links
Advertisement

Related Manuals for UNAKA 1003-MK56-00


Summary of Contents for UNAKA 1003-MK56-00
- Page 1 Ford Transit HSLD Rack Installation Manual SKU: 1003-MK56-00 REV 1 Date: 3/7/24 Revision: 1...
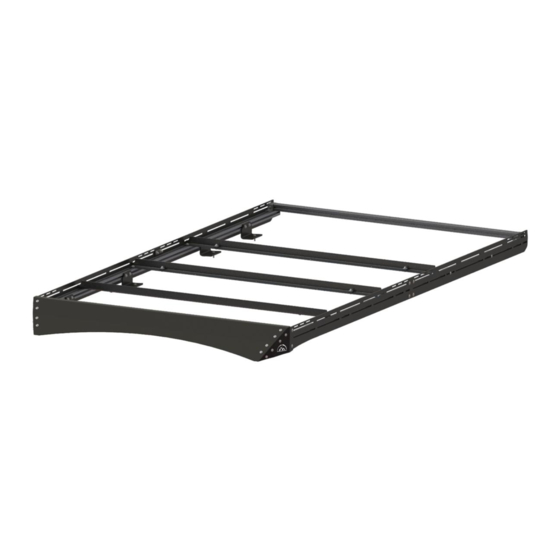
- Page 2 Comes with 4 cross bars to install 2 solar panels Rubber bulb seal prevents air from going under your wind fairing Unaka’s original bi-directional wind Low Profile Precision Cut Aluminum Side *Bulb seal not shown on this image* fairing looks great and deflects air up Plates that match the profile of your van and over your rack and solar panels.
- Page 3 Safety and PPE Ladders: Installation of this roof rack requires two ladders for two people to help with the installation. Make sure that your ladders are tall enough, and that you have a level area to use them on. Accessing the roof of your van will put you at extreme risk to potential falls which can result in injury or death.
-
Page 4: Required Tools
Required Tools Required Tools • 1 to 2 tall sturdy ladders • Standard set of box wrenches • Standard socket set • Torque Wrench The items below are only required if the Ford Transit roof mounting holes are misaligned in the van frame •... - Page 5 Torque Specs Torque Specs & Notes • Before installing any Unaka Product, review the most up to date manual completely which can be found on our website here: https://unakagearco.com/pages/manuals • The Torque reference manual does not replace any information found on the individual product manual.
- Page 6 Loctite & Anti-seize A small tube of Blue Loctite 242 and Loctite anti-seize are provided with each kit. Follow manufactures recommendation for application and safety. Loctite 242 Blue Loctite 242 • Apply this to any bolt that is not used with a nylock nut Loctite Anti-seize •...
- Page 7 Layout of Rack Parts, Iso View Rear 8020 Rail, 55-5/8” Lg: Qty 2 Roof rack bracket: Qty 8 15 Series 8020 Cross Bar, 61.29”: Qty 1 Splice Plates: Qty 2 Front 8020 Rail, 63” Lg: Qty 2 Rear Side Plate: Qty 2 Main Cross Bar: Qty 4 Wind Fairing: Qty 1 Front Side Plate: Qty 2...
- Page 8 Main Rack Parts This rack kit is typically shipped in 3 separate boxes...
- Page 9 HSLD Wind 65 × 13 × 3 in Contains wind fairing pieces, hardware bag, and bulb seal: Box Size: Fairing Box Note: Bulb seal not shown...
- Page 10 HSLD Wind Hardware required for wind fairing assembly, typically shipped in wind fairing box Fairing Hardware...
- Page 11 HSLD All remaining pieces required to assemble and install your roof rack (Typical Box: 10 × 6 × 4 in) Hardware...
- Page 12 HSLD Rack Brackets required for bolting to van roof rails and 8020 side rails Bracket Quantity 8 Total...
- Page 13 HSLD Rack Hardware required for bolting brackets to van roof rails, and brackets to 8020 side rails Bracket Hardware Quantity 4 Total...
- Page 14 HSLD Side Hardware required for assembling side rails Rail Hardware Quantity 2 Total...
- Page 15 HSLD Solar Hardware required for solar panel spacing Panel Hardware Quantity 2 Total...
- Page 16 HSLD Cross Cross bar hardware kit Hardware Quantity 2 Total...
- Page 17 HSLD Cross Cross bar hardware kit Hardware...
- Page 18 End Cap End cap hardware kit Hardware...
- Page 19 HSLD Side Side plate splice hardware kit Plate Hardware...
- Page 20 Contains extrusion, side plates, and cross bars: Box Size: 8” x 8” x 91” Long Main Rack Box...
- Page 21 FORD HSLD 8020 CROSS BAR HARDWARE KIT...
- Page 22 Step 1: Layout all parts on the floor of your workspace Clear your work area, and layout all parts Make notes of hardware types, locations, and quantities as needed Note: This image is of the Explorsit Life Kit, the Ford Transit HSLD kit does not include the AC or Fan Cross Bars but instead the rear 8020 cross bar...
- Page 23 Step 2: Bolt 8020 rails to side plates Place the front and rear 8020 pieces on the ground Slide 5 x SS T-nuts into the top slot of the rear 8020, and slide Qty 4 x SS T-nuts into the front piece of 8020 Slide the T-nuts to the dimensions provided below Carefully place the side rail assembly on top of the 8020, align the back of the rear side plate with the end of the rear 8020 Insert the bolts into the t-nuts, and tighten to 132 in-lbs (14.9 N-m)
- Page 24 Step 3: Join the front and rear side plates 5/16-18 S.S. 5/16” S.S. Washer Nylock Nut Join the front and rear side plates using 2 Front Side Plate Splice Plate of the splice plates Tighten the bolts to 132 in-lbs (14.9 N-m) Splice plate holes Front Side Plate 5/16-18 x 1”...
-
Page 25: Side View
Step 4: Bolt rack brackets to 8020 rails Place the side rail assembly on its back Slide 8 x SS T-nuts into the upward facing slot and slide down to their approximate bracket locations (see next page) Loosely bolt rack brackets to the 8020 rail Slide the rack brackets down to the locations marked by notches in the front side rail These positions should be close, but brackets may need to be loosened and adjusted during installation to the roof Snug up the bolts securing the rack bracket to the 8020 rail... - Page 26 Step 4: Bolt rack brackets to 8020 rails (cont.) The notches pre-cut into the Front Side Plate and Rear Side Plate can be used to quickly position the Rack Brackets in their approximate locations. Position each bracket in-between the cut notches. The dimensions on the following page can also be used to verify the correct positions.
- Page 27 Step 4: Bolt rack brackets to 8020 rails (cont.) Positioning the rack brackets to the position below should get the brackets close to their final location when the side rail assembly is placed on the roof of the van Dimensions are to top leading edge of each bracket Measure from...
- Page 28 Step 5: Assemble Passenger Side Rail NOTE: The passenger side rail assembly is a mirror image of the driver side. Ensure you flip the orientation of the parts so that you do not make a 2 driver side rail assembly Repeat steps 2 through 4 to make the passenger side rail assembly Back of Rack Front of Rack...
- Page 29 Step 6: Assemble Wind Fairing End Caps Warning: Top and bottom end cap brackets look very similar. Bottom wind fairing end cap bracket has a round relief cut out on one side to help identify it Wind Fairing Driver End cap brackets should be installed with the tab with the Top W.F.
- Page 30 Step 7: Bolt wind fairing to end caps Hardware holding end cap brackets to the end cap still slightly loose Wind Fairing Driver Wind Fairing Loosely bolt the wind fairing to the wind fairing end cap assemblies Side End Cap **Tighten the hardware carefully.
- Page 31 Step 8: Remove caps from van roof Note: If the rack installation is being completed outside, before starting this step make sure you have plenty of time to get the rack installed, and to let the dicor set up before exposure to rain or water Identify the rack bracket mounting locations Carefully remove the rack mounting hole covers at the rack bracket locations...
- Page 32 Step 9: Check van threaded insert alignment Ford does a lot right, but unless you are lucky, you will be evaluating Ford’s Material removed using tin snips manufacturing process during these next steps. Using the M8 bolt provided, check the alignment of the van threaded insert by screwing it in by hand ***Not all holes will be aligned so do not force it The threaded insert is at a slight angle, so make sure when you...
- Page 33 Finally, Lets Get the Rack On Your Van! Congrats! You made it and are now ready to install your roof rack onto your van! I hope that your van was perfect and that you didn’t have to open any holes, but for those of you that opened up a bunch of them congrats on getting it done!
- Page 34 Step 10: Install the rack side rail assemblies This step should be completed with 2 people using 2 ladders Place one M8 bolt and large OD sealing washer at each rack bracket location Lift the driver side rail assembly up and onto the roof **Use rags to protect the roof if you need to lay the rail assembly onto the van Install the M8 bolt into the first roof rack bracket, leave just loose enough so the bracket can be wiggled forwards or backwards on its slot...
- Page 35 Step 10: Install the rack side rail assemblies (cont.) This step should be completed with 2 people using 2 ladders Confirm side rail front to back alignment Tighten the bolts to 14 ft-lbs (18.9 N-m) once cross bars and wind fairing have been used to set rail to rail spacing Confirm that driver side and passenger side rails are extending the same amount from the front of the rack bracket.
- Page 36 Step 11: Install rack wind fairing This step should be completed with 2 people using 2 ladders Tip: Use rags as needed to protect the van if you need to sit the wind fairing on the van roof Warning: Take extra precautions to not drop the wind fairing onto the wind shield, and down the front of the van Note: The slots in the side plate allow for forward / backward adjustment of the wind fairing, as well as gives the ability to adjust the angle of the wind...
- Page 37 Step 12: Set side rail to side rail spacing This step should be completed with 2 people using 2 ladders Install 3 to 4 of the standard cross bars along the length of the rack Do not use the cross bars for around the fan or AC unit At a minimum place one towards the front, one towards the Center Rack middle, and one towards the back...
- Page 38 Step 13: Dicor rack brackets sealing to roof Which Dicor: We typically use self Each rack bracket already has a rubber gasket on the bottom, and the bolt secures the bracket to the leveling Dicor, but van using a sealing washer which should keep most water out. That being said, we always Dicor the since the van roof is rack brackets to ensure no water can get into your van and we recommend that you do the same at an angle, some...
- Page 39 Step 14: Install solar panels to cross bars Bolt your solar panels to your cross bars 200W Rich Solar Panel Install the ¼” spacers between the cross bar and the bottom of the solar panel Center solar panels on cross bars before tightening hardware Tighten the bolts to 75.2 in-lbs (8.48 N-m) **Below: Cut away view of the solar panel showing hardware installation Standard Cross Bars...
- Page 40 Step 15: Install solar panel This step should be completed with 2 people using 2 ladders Install your solar panel assemblies in an order that makes sense for your rack Do not bolt down the panel assemblies until all panels are on the roof For the ExPlorist life rack using solar panel assemblies that go around the fan and AC units, we recommend installing those first, since it’s a close fit around those units.
- Page 41 Step 15: Install solar panel (cont.) This step should be completed with 2 people using 2 ladders Slide all required t-nuts for all solar panels into the top channel of the 8020. Each solar panel assembly gets 2 x t- nuts per side rail Place the T-nuts in the general area that the solar panel will be installed Carefully lift the solar panel assembly onto the rack, this should be done with 2 people to prevent damage to the...
- Page 42 Step 16: Assemble 15 Series 8020 Cross Bar **USE BLUE LOCTITE 242 DURING THIS ASSEMBLY PROCESS. BEFORE STARTING ASSEMBLY, INSERT ANY ADDITIONAL T-NUTS INTO ANY 8020 SLOTS AS INSTALLING THEM LATER MAY BE DIFFICULT OR REQUIRE DISASSEMBLY BOLT CORNER BRACKETS TO 8020 CROSS BAR AS SHOWN POSITION 8020 CROSS BAR AS DESIRED ON HSLD ROOF RACK RAILS, INSERT T-NUTS INTO TOP OF 8020 SIDE RAILS BOLT 8020 CROSS BAR TO THE TOP OF THE 8020 SIDE RAILS USING T-NUTS AND BOLTS TORQUE TO 180 IN-LBS (15 FT-LBS)
- Page 43 All purchasers and users of products manufactured by Unaka Gear Co. agree to hold harmless and indemnify Unaka Gear Co from any and all claims arising from their use. Failure to receive notice of any limitations or the limitations contained in this disclaimer shall not serve...
Need help?
Do you have a question about the 1003-MK56-00 and is the answer not in the manual?
Questions and answers