Table of Contents
Advertisement
Available languages
Available languages
Quick Links
Bedienungsanleitung
Sport-Thieme Laufband „T600"
Vielen Dank!
Vielen Dank, dass Sie sich für ein Sport-Thieme Produkt entschieden haben! Damit Sie viel Freude an diesem Produkt haben und die
Sicherheit gewährleistet ist, sollten Sie diese Anleitung vor dem Gebrauch zunächst vollständig durchlesen. Bewahren Sie die Anlei-
tung gut auf. Für Fragen und Wünsche stehen wir Ihnen gerne zur Verfügung.
Sport-Thieme GmbH
Tel. 05357 18181
·
Fax 05357 18190
·
38367 Grasleben
·
info@sport-thieme.de
Art.-Nr. 347 2109
·
sport-thieme.de
Advertisement
Table of Contents

Related Manuals for Sport-thieme T600


Summary of Contents for Sport-thieme T600
- Page 1 Vielen Dank! Vielen Dank, dass Sie sich für ein Sport-Thieme Produkt entschieden haben! Damit Sie viel Freude an diesem Produkt haben und die Sicherheit gewährleistet ist, sollten Sie diese Anleitung vor dem Gebrauch zunächst vollständig durchlesen. Bewahren Sie die Anlei- tung gut auf.
-
Page 2: Wichtige Empfehlungen Und Sicherheitshinweise
Bedienungsanleitung zu Art.-Nr. 347 2109 Wichtige Empfehlungen und Sicherheitshinweise 1. Das Gerät genau nach der Montageanleitung aufbauen und nur die, für den Aufbau des Gerätes beigefügten und in der Stückliste aufgeführten, gerätespezifischen Einzelteile verwenden. Vor dem eigentlichen Aufbau die Vollständigkeit der Lieferung anhand des Lieferscheins und die Vollständigkeit des Lieferumfanges anhand der Montageschritte grob kontrollieren. - Page 3 Bedienungsanleitung zu Art.-Nr. 347 2109 Wichtige Empfehlungen und Sicherheitshinweise 16. Dieses Produkt darf am Ende seiner Lebensdauer nicht über den normalen Haushaltsabfall entsorgt werden, sondern muss an einem Sammelpunkt für das Recycling von elektrischen und elektronischen Geräten abgegeben werden. Das Symbol auf dem Pro- dukt, der Gebrauchsanleitung oder der Verpackung weist darauf hin.
- Page 4 Bedienungsanleitung zu Art.-Nr. 347 2109 Explosionszeichnung...
- Page 5 Bedienungsanleitung zu Art.-Nr. 347 2109 Tabelle zur Explosionszeichnung Position Beschreibung Spezifikation Menge Sockelrahmen Steigungsmotorrahmen Standpfosten links Standpfosten rechts Computerrahmen Bildschirmrahmen Feststehende Motorplatte Seitenschienenführung be- schichtet Ende der Platte beschichtet Kappe links Ф 36 × Ф 20 × Ф 11 × 70 Kappe rechts Hülse Ф...
- Page 6 Bedienungsanleitung zu Art.-Nr. 347 2109 Innensechskantschraube M10×70×20 Innensechskantschraube M10×40 Innensechskantschraube M8×40×20 Motor Sicherheitsschlüssel fester Sitz Sicherheitsschlüssel-Druck- stück Sicherheits-Schlüsselanhänger Druckfeder φ11.8×φ0.8×24 Fußpolster Ф 74×86×M12 Radachse Ф 19×60×M6 Ф 71 ×t48×Ф 19,2 t1.2×φ31 Äußere Abdeckung Zylinderkissen φ30×30×M8×8 Filter Kommunikationsdraht 1 L-1200 mm Kommunikationsdraht 2 L-1700 mm Kommunikationsdraht 3...
- Page 7 Bedienungsanleitung zu Art.-Nr. 347 2109 Außenhülle 6841EA Endabdeckung PU-Armlehnenschutz - links PU-Armlehnenschutz - rechts IPAD-Halter Seitenschiene 1430 Zylinderkissen φ30×30×M8×8 Ф 71×t48×Ф19,2 Band 3×100 Magnetring φ35Xφ22×t15.0 Filter Stromanschlusskabel L-450 mm/1,5 mm2/ Schwarz Stromanschlusskabel L-450 mm/1,5 mm2/Rot Stromanschlusskabel L-450 mm/1,5 mm2/Rot Stromanschlusskabel L-200 mm/1,5 mm2/ Schwarz Draht (Erdung)
- Page 8 Bedienungsanleitung zu Art.-Nr. 347 2109 48-8 PCB-Tastenplatine 48-9 Tasten-Overlay 48-10 CE-Teile Vollgewindebolzen M4×10 Magnetring Induktivität ERP-Teile ERP-Stromversorgungs-Ener- giesparkarte Kommunikationsdraht, L-800 mm/1,5 mm2/ (Rot) Kommunikationsdraht, L-800 mm/1,5 mm2/ (Schwarz) ERP-Anschlusskabel L=500 Kreuzschlitzschraube M4×16...
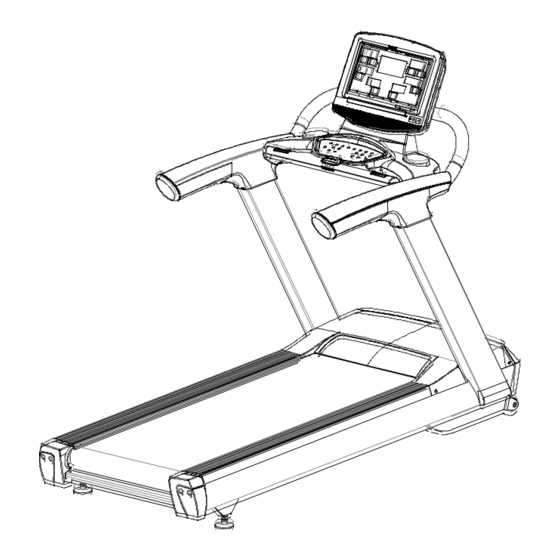
- Page 9 Bedienungsanleitung zu Art.-Nr. 347 2109 Struktur des Laufbands Sicherheitsschlüssel Konsole Griff Standpfosten Laufmatte Motorabdeckung Hintere Schiene Steigungsrahmen Seitenschiene Steigungsmotorrahmen TECHNISCHE INFORMATIONEN Abmessung - klappbar 2120*900*1590 Laufzone 1550*560 Geschwindigkeit 1,0-22,0 km/h Steigung 0-15 % Wir behalten uns das recht vor, das produkt ohne vorherige ankündigung zu ändern.
- Page 10 Bedienungsanleitung zu Art.-Nr. 347 2109 Kartoninhalt A Hauptteil B Standpfosten C Konsolenrahmen D Display E Schraubenbeutel F Siliziumöl G Handbuch...
- Page 11 Bedienungsanleitung zu Art.-Nr. 347 2109 Liste der Metallteile im Beutel Allen C.K.S. Halbgewindeschraube Allen C.K.S. Halbgewindeschraube Sechskantkopf-Vollzahnschraube (M8*40*20) 2 Stk. (M8*15) 4 Stück (M8x20) 4 St. T-förmiger Sechskantschlüssel Ф 12 Unterlegscheibe x2 Stück Mutter x 2 Stück Kreuzschlitzschlüssel 13-14 off ener Schraubenschlüssel 17-19 off ener Schraubenschlüssel...
- Page 12 Bedienungsanleitung zu Art.-Nr. 347 2109 Hauptteile Motorabdeckung Hintere Abdeckung Motorriemen Motor Laufmatte Laufdeck Steigungsmotor Hintere Walze Vordere Walze Seitenschiene...
- Page 13 Bedienungsanleitung zu Art.-Nr. 347 2109 Montageanleitung Schritt 1: Nehmen Sie das Gerät aus dem Karton und stellen Sie es auf den fl achen Boden (wie abgebildet). Entfernen Sie die 4 Schrauben der oberen Motorabdeckung und nehmen Sie dann die obere Motorabdeckung ab. Schritt 2: Verbinden Sie die Kommunikationska- bel (im rechten Pfosten) gut mit der Hauptma- schine.
- Page 14 Bedienungsanleitung zu Art.-Nr. 347 2109 Schritt 4: Verbinden Sie die Kommunikations- drähte von Konsole und Konsolenrahmen, setzen Sie die Konsole in den Konsolenrahmen ein und befestigen Sie sie mit 2 Stück M8*40*20 Schrauben an der Unterseite. Schritt 5: Befestigen Sie alle oben genannten Schrauben, bringen Sie die obere Motorabde- ckung wieder in der Position des Hauptrahmens an, befestigen Sie die obere Motorabdeckung...
- Page 15 Bedienungsanleitung zu Art.-Nr. 347 2109 Allgemeine Fitnesstipps Aufwärmen Wärmen Sie sich vor jeder Übung mindestens 5 bis 10 Minuten lang auf. Atmen Achten Sie darauf, dass Sie beim Sport regelmäßig, richtig und ruhig atmen. Trainingshäufi gkeit Sie sollten 48 Stunden Ruhezeit für die gleichen Muskeln einhalten. Belastung Führen Sie die Übungen entsprechend Ihrer eigenen Kondition durch und steigern Sie so Schritt für Schritt Ihre Trainingskraft.
- Page 16 Bedienungsanleitung zu Art.-Nr. 347 2109 Gebrauchsanweisung für die Konsole Anleitung für das LED-Fenster • Fenster „DISTANZ“: numerische Streckenanzeige. • Fenster „KALORIEN“: Anzeige des numerischen Kalorienwerts. • Fenster „ZEIT“: Zeigt die Zeit als numerischen Wert an. • „STEIGUNG“-Fenster: Anzeige des numerischen Steigungswertes.
- Page 17 Bedienungsanleitung zu Art.-Nr. 347 2109 Programm/Startanweisungen: A: Beschreibung des Programms: • Ein manuelles Programm P0: Normaler Modus, Zeit-Countdown-, Distanz-Countdown-, Kalorien-Countdown-Modus. • 36 Einstellprogramme: P01, P02, P03, P04, P05,..., P36; • Drei benutzerdefinierte Programme U1~U3; B: Startanweisungen: • Stecken Sie den Sicherheitsschlüssel in die Position des Sicherheitsschlüssels auf dem Bedienfeld, die Konsole zeigt 2 Sekunden lang an und ruft dann das manuelle Programm auf.
- Page 18 Bedienungsanleitung zu Art.-Nr. 347 2109 Programm-Modus P1-P36“ ist das Systemeinstellungsprogramm. Es ist nur für den Zeit-Countdown-Modus geeignet. Im Einstellmodus zeigt das Zeitfenster die Uhrzeit an und blinkt. Drücken Sie „+“ oder „-“, um den eingestellten Wert zu ändern. Drücken Sie „MODE“, um auf den Standardwert zurückzusetzen.
- Page 19 Bedienungsanleitung zu Art.-Nr. 347 2109 Funktion des Sicherheitsschlüssels: Der Sicherheitsschlüssel besteht aus einem Tastschalter, einer Klammer und einer Nylonschnur und verfügt über eine Sicherheits- funktion für die Notabschaltung. In jedem Zustand kann der Sicherheitsschlüssel abgezogen werden, und das Zeitfenster zeigt „---“ mit 3 Summtönen. Wenn der Motor in diesem Moment läuft, wird der sofort gestoppt und die Bedienung der Konsolentastatur unterbunden.
- Page 20 Bedienungsanleitung zu Art.-Nr. 347 2109 Programmtabelle Angehängte Programmtabelle: Jedes Programmsegment ist in 10 Segmente unterteilt, und die Laufzeit der einzelnen Programmsegmente ist gleichmäßig verteilt. Nachfolgend ist das Bewegungsdiagramm von 36 Programmen dargestellt. Programm-Segment Geschwindigkeit Steigung Geschwindigkeit Steigung Geschwindigkeit Steigung Geschwindigkeit Steigung Geschwindigkeit Steigung...
- Page 21 Bedienungsanleitung zu Art.-Nr. 347 2109 Geschwindigkeit Steigung Geschwindigkeit Steigung Geschwindigkeit Steigung Geschwindigkeit Steigung Geschwindigkeit Steigung Geschwindigkeit Steigung Geschwindigkeit Steigung Geschwindigkeit Steigung Geschwindigkeit Steigung Geschwindigkeit Steigung Geschwindigkeit Steigung Geschwindigkeit Steigung Geschwindigkeit Steigung Geschwindigkeit Steigung Geschwindigkeit Steigung Geschwindigkeit Steigung Geschwindigkeit Steigung...
- Page 22 Bedienungsanleitung zu Art.-Nr. 347 2109 ERP-Konvertierungsfunktion: 1. Wenn das System standardmäßig im ERP-Modus gestartet wird, geht es etwa ab 4:30 Uhr in den Ruhezustand über, wenn das Lauf- band nicht benutzt wird, um Strom zu sparen. Es kann durch Drücken einer beliebigen Taste aktiviert werden. 2.
- Page 23 Bedienungsanleitung zu Art.-Nr. 347 2109 Das Laufband bewegen 1. Bevor Sie das Laufband bewegen, sollten Sie sich vergewissern, dass der Sockelrahmen am niedrigsten Punkt steht, der Schalter ausgeschaltet und der Netzstecker aus der Steckdose gezogen ist. 2. Dann können Sie das Ende des Laufbands mit zwei Händen anheben und nach vorne oder hinten an die richtige Stelle bringen.
- Page 24 Bedienungsanleitung zu Art.-Nr. 347 2109 Wartung des Laufbands Eine ordnungsgemäße Wartung ist sehr wichtig, um einen einwandfreien und funktionsfähigen Zustand des Laufbandes zu gewährleisten. Unsachgemäße Wartung kann zu Schäden am Laufband führen oder die Lebensdauer des Produkts verkürzen. Alle Teile des Laufbandes müssen regelmäßig überprüft und festgezogen werden. Abgenutzte Teile müssen sofort ersetzt werden.
- Page 25 Bedienungsanleitung zu Art.-Nr. 347 2109 Straffen Lockern Lockern Straffen Im Uhrzeigersinn drehen, um Gegen den Uhrzeigersinn drehen, die Spannung der Laufmatte um die Spannung des laufenden zu erhöhen Riemens zu verringern Schraube Justierschraube Motor Vordere Walze Riemen Anmerkung: Eine Fehlausrichtung der Laufmatte löst keinen Garantiefall aus und muss frühzeitig geprüft und korrigiert werden, da die Laufmatte sonst stark beschädigt wird.
- Page 26 Thanks for purchasing this product .The product will help you keep fitter ,healthier and better in a very easy way . Sport-Thieme GmbH · D-38367 Grasleben · sport-thieme.com Tel. +49 53 57 181 543 · Fax +49 53 57 181 921 · info@sport-thieme.com...
-
Page 27: Use Guide
Owner‘s Manual for Prod. code 347 2109 USE GUIDE • Always connect the appliance to a socket with a grounded circuit and no other appliances connected to it. It is recommended not to use any extension cords. • Ensure the treadmill stable on the ground before use. •... - Page 28 Owner‘s Manual for Prod. code 347 2109 IMAPPROPRIATE USER Following patients under treatment need to get use of the treadmill after approval of professional doctor. • The person with backache or used to get hurt in the leg ,waist ,neck . •...
-
Page 29: Exploded Drawing
Owner‘s Manual for Prod. code 347 2109 EXPLODED DRAWING... - Page 30 Owner‘s Manual for Prod. code 347 2109 EXPLODED DRAWING CHART 6841EA Item Description Specification base frame Incline motor frame upright post left upright post right computer frame screen frame Motor fixed plate Side rail guider in coated End of plate in coated Cap left Φ36×Φ20×Φ11×70 Cap right...
- Page 31 Owner‘s Manual for Prod. code 347 2109 Foot pad Φ74×86×M12 Wheel axle Φ19×60×M6 Wheel Φ71×t48×Φ19.2 Outer cover t1.2×φ31 Cylinder cushion pad φ30×30×M8×8 filter Communication wire 1 L-1200mm Communication wire 2 L-1700mm Communication wire 3 Φ74×86×M12 Side rail guide block Communication wire 2 L-800mm Fuse sseat with wire L-1100mm...
- Page 32 Owner‘s Manual for Prod. code 347 2109 Power connection wire L-450mm/1.5mm2/Red Power connection wire L-200mm/1.5mm2/Black Wire (grounding) L-150mm/1.5mm2 Wheel axle Φ19×60×M6 13-14wrench t4.0×28×145 Tapper feet pad φ50×φ41×26×M8×27 Inner hexagon bolt M6×15 Outside cover t1.2×φ31 L-200mm/2.5mm2/Ф5 Wire (groundin Power connection wire L-100mm/1.5mm2Red 17-19 wrench t5.0×32×150...
-
Page 33: Treadmill Structure
Owner‘s Manual for Prod. code 347 2109 TREADMILL STRUCTURE Safety key Console Handle bar upright post Running belt Motor cover Rear rail Incline frame Side trail Incline motor frame TECHNICAL INFOMATION Foldable Dimension 2120*900*1590 Running Area 1550*560 Speed 1.0-22.0km/h Incline 0-15% WE RESERVE THE RIGHT TO AMEND THE PRODUCT WITHOUT PRIOR NOTICE. -
Page 34: Carton Contents
Owner‘s Manual for Prod. code 347 2109 CARTON CONTENTS A Main Body B Upright Posts C Console frame D Display E Screws bag F Silicon Oil G Manual... - Page 35 Owner‘s Manual for Prod. code 347 2109 HARDWARE BAG LIST Allen C.K.S. half thread screw Allen C.K.S. half thread screw Hexagon head full tooth bolt (M8*40*20) 2 pcs. (M8*15) 4pcs (M8x20) 4pcs T shape spanner Φ12 Flat washer x2pcs nut x 2pcs Cross open spanner 13-14 open spanner 17-19 open spanner...
-
Page 36: Main Parts
Owner‘s Manual for Prod. code 347 2109 Main Parts Motor Cover Rear Cover Motor Belt Moto Running belt Running deck Incline motor Rear Roller Front Roller Side rail... -
Page 37: Assembly Instruction
Owner‘s Manual for Prod. code 347 2109 ASSEMBLY INSTRUCTION Step 1: Take out the machine from box and put it on the fl at fl oor (As shown) . Remove 4pcs screws from upper motor cover, then remove the upper motor cover. Step 2: Connect communication wires (inside the right upright post) well with the main ma- chine .Put the circular shaft of lower upright... - Page 38 Owner‘s Manual for Prod. code 347 2109 Step 4: Connect communication wires of con- sole and console frame, insert the console into the console frame, then fi x with 2 pcs M8*40*20screws at the bottom. Step 5: Fasten all the above screws, install the upper motor cover back to the position of the main frame, refi x the upper motor cover with the screws removed before, then the assembly...
-
Page 39: General Fitness Tips
Owner‘s Manual for Prod. code 347 2109 GENERAL FITNESS TIPS Warm-Up Do some warm-up for at least 5 to 10 minutes before every exercise. Breathe Make sure you breathe regularly ,properly and calmly when exercising. Exercise Frequency It should have 48 hours of rest for the same musles. Load Do exercise as per your own condition ,can enhance exercise force step by step .In the beginning ,it’s normal to get aching pain of muscles.This... - Page 40 Owner‘s Manual for Prod. code 347 2109 CONSOLE USE INSTRUCTION Console function Instruction LED window instruction • “DISTANCE” window: Display the distance numerical value. • • “CALORIES” window: Display the calories numerical value. • • “TIME” window: Display the time numerical value. •...
- Page 41 Owner‘s Manual for Prod. code 347 2109 Manual mode: How to enter the manual program: • A: Turn on the power switch and go directly to the normal mode in the manual program. • B: In the stop state, press the program key to enter the normal mode in the manual program. Three setting functions in the manual program: time setting, distance setting, calorie setting;...
- Page 42 Owner‘s Manual for Prod. code 347 2109 Input parameter display and setting range: Parameter Catego Remarks Default Value Setting range 1= male Family name(-1-) 1(male) 1—2 2= female Age(-2-) 25 years old 10—99 years old Height(-3-) 170 CM 100—200 CM Weight(-4-) 70KG 20—150KG...
- Page 43 Owner‘s Manual for Prod. code 347 2109 Segment Program Speed Slope Speed Slope Speed Slope Speed Slope Speed Slope Speed Slope Speed Slope Speed Slope Speed Slope Speed Slope Speed Slope Speed Slope Speed Slope Speed Slope Speed Slope Speed Slope Speed Slope...
- Page 44 Owner‘s Manual for Prod. code 347 2109 Speed Slope Speed Slope Speed Slope Speed Slope Speed Slope Speed Slope Speed Slope Speed Slope Speed Slope Speed Slope Speed Slope Speed Slope Speed Slope Speed Slope Speed Slope Speed Slope...
- Page 45 Owner‘s Manual for Prod. code 347 2109 ERP conversion function: a) If the system starts up in ERP Mode by default, it will enter into sleep state at about 4:30 without operating the treadmill, saving power consumption, and press any key to wake up the system. b) In standby mode, long press mode key for 3 seconds to display “2222”...
- Page 46 Owner‘s Manual for Prod. code 347 2109 TREADMILL MOVEMENT 1.Before moving the treadmill ,you should make sure base frame is at its lowest point ,switch off , and power plug out of the socket . 2.Then, you can lift up the treadmill end with two hands to forward or backward to right place.
-
Page 47: Treadmill Maintenance
Owner‘s Manual for Prod. code 347 2109 TREADMILL MAINTENANCE Proper maintenance is very important to ensure a faultless and operational condition of the treadmill. Improper maintenance can cause damage to the treadmill or shorten the life of the product. All parts of the treadmill must be checked and tightened regularly. Worn out parts must be replaced immediately. - Page 48 Owner‘s Manual for Prod. code 347 2109 loose tight tight loose Adjusting Screw Screw Motor Front Roller Belt Note: Running belt misalignment is not warranted and need early check and correction ,otherwise the running belt will be damaged badly . The running belt and wheel groove need regular cleaning...
- Page 49 Merci d’avoir fait l’acquisition de ce produit. Il vous aidera à améliorer votre forme physique et votre santé de façon très simple. Sport-Thieme GmbH · D-38367 Grasleben · sport-thieme.com Tel. +49 53 57 181 543 · Fax +49 53 57 181 921 · info@sport-thieme.com...
-
Page 50: Notice D'utilisation
Notice d‘utilisation pour le code produit 347 2109 GUIDE DE L’UTILISATEUR • Branchez toujours l’appareil sur une prise de courant avec mise à la terre et n’alimentant pas d’autres appareils électriques. Il est recommandé de ne pas utiliser de rallonge. •... - Page 51 Notice d‘utilisation pour le code produit 347 2109 PERSONNES NE DEVANT PAS UTLISER LE TAPIS DE COURSE Si vous suivez un traitement médical, n’utilisez le tapis de source qu’après avoir reçu l’approbation d’un médecin. Cela concerne notamment les personnes souffrant de l’un des troubles suivants : •...
-
Page 52: Vue Éclatée
Notice d‘utilisation pour le code produit 347 2109 VUE ÉCLATÉE... -
Page 53: Liste Des Pièces
Notice d‘utilisation pour le code produit 347 2109 LISTE DES PIÈCES N° Description Spécifications QTÉ Châssis principal Châssis du moteur d‘inclinaison Montant vertical gauche Montant vertical droit Cadre console Cadre écran Plaque fixe moteur Guide rail latéral Extrémité plaque Embout (gauche) Ф... - Page 54 Notice d‘utilisation pour le code produit 347 2109 Essieu roue Ф 19×60×M6 Roue Ф 71 ×t48×Ф 19.2 Revêtement extérieur t1.2×φ31 Coussin cylindrique φ30×30×M8×8 Filtre Câble de communication 1 L-1 200 mm Câble de communication 2 L-1 700 mm Câble de communication 3 Ф...
- Page 55 Notice d‘utilisation pour le code produit 347 2109 Câble de connexion électrique L-200 mm/1.5mm2/Noir Fil de terre L-150 mm/1,5mm2 Essieu roue Ф 19×60×M6 Clé plate 13-14 t4.0×28×145 Patin pied φ50×φ41×26×M8×27 Boulon hexagonal intérieur M6x15 Couvercle extérieur t1.2×φ31 Fil de terre L-200 mm/2.5mm2/Ф5 Câble de connexion électrique L-100mm/1.5mm2/Rouge...
-
Page 56: Informations Techniques
Notice d‘utilisation pour le code produit 347 2109 PRÉSENTATION DU TAPIS DE COURSE Clé de sécurité Console Guidon Montant vertical Cache moteur Bande de course Rail arrière Châssis d’inclinaison Rail latéral Châssis moteur d’inclinaison INFORMATIONS TECHNIQUES Dimensions (appareil plié) 2120*900*1590 Zone de course 1550*560 Vitesse... -
Page 57: Contenu Du Colis
Notice d‘utilisation pour le code produit 347 2109 CONTENU DU COLIS A Plateforme principale B Montants verticaux C Cadre de la console D Écran E Sachet avec vis et outils F Huile de silicone G Manuel... - Page 58 Notice d‘utilisation pour le code produit 347 2109 LISTE DES VIS ET OUTILS Vis Allen C.K.S. demi-fi letage Vis Allen C.K.S. demi-fi letage Boulon à tête hexagonale, (M8*40*20) 2 pcs. (M8*15) 4 pcs entièrement fi leté (M8x20) 4 pcs Clé en T Ф...
-
Page 59: Pièces Principales
Notice d‘utilisation pour le code produit 347 2109 Pièces principales Cache du moteur Cache arrière Courroie du moteur Moteur Bande de course Plateforme Moteur d’inclinaison Rouleau arrière Rouleau avant Rail latéral... -
Page 60: Instructions De Montage
Notice d‘utilisation pour le code produit 347 2109 INSTRUCTIONS DE MONTAGE Étape 1 : sortez l’appareil de son carton et posez-le sur un sol plat (comme indiqué sur l’illustration). Dévissez les 4 vis du cache supérieur du moteur, et retirez ensuite le cache. Étape 2 : connectez les câbles de commu- nication (à... - Page 61 Notice d‘utilisation pour le code produit 347 2109 Étape 4 : connectez les fi ls de communica- tion de la console et du cadre de la con- sole. Insérez la console dans le cadre de la console, puis fi xez-la en bas à l’aide de 2 vis M8*40*20.
- Page 62 Notice d‘utilisation pour le code produit 347 2109 Conseils généraux de mise en forme 1. Échauff ement Respirez normalement (sans retenir votre respiration) pendant 5 à 10 minutes avant chaque échauff ement. 2. Respiration Pour reprendre votre souffl e, inspirez par le nez et expirez par la bouche. Respiration et mouvements doivent être coordonnés.
- Page 63 Notice d‘utilisation pour le code produit 347 2109 AFFICHAGE CONSOLE Fonctions de la console Affi chage écran LED • Fenêtre « DISTANCE » : affi che la valeur numérique de la distance. • Fenêtre « CALORIES » : affi che la valeur numérique des calories.
- Page 64 Notice d‘utilisation pour le code produit 347 2109 Instructions programme/démarrage : A: Description du programme : • Programme manuel P0 : mode normal, compte à rebours Temps, compte à rebours Distance, compte à rebours Calories. • 36 programmes de réglage : P01, P02, P03, P04, P05, ... P36 ; •...
- Page 65 Notice d‘utilisation pour le code produit 347 2109 FONCTION IMC L’IMC (indice de masse corporelle) est une mesure qui permet d’évaluer si le poids d’une personne est adapté à sa taille. L’IMC peut être calculé pour les hommes comme pour les femmes et, associé à d’autres indicateurs de santé, il fournit aux personnes les bases nécessaires à...
- Page 66 Notice d‘utilisation pour le code produit 347 2109 Fonction de la clé de sécurité : La clé de sécurité comprend un interrupteur tactile, un clip permettant de la fixer sur vos vêtements et un cordon en nylon. Elle est également dotée d’un dispositif d’arrêt d’urgence. •...
- Page 67 Notice d‘utilisation pour le code produit 347 2109 Segment Programme Vitesse Inclinaison Vitesse Inclinaison Vitesse Inclinaison Vitesse Inclinaison Vitesse Inclinaison Vitesse Inclinaison Vitesse Inclinaison Vitesse Inclinaison Vitesse Inclinaison Vitesse Inclinaison Vitesse Inclinaison Vitesse Inclinaison Vitesse Inclinaison Vitesse Inclinaison Vitesse Inclinaison Vitesse Inclinaison Vitesse...
- Page 68 Notice d‘utilisation pour le code produit 347 2109 Vitesse Inclinaison Vitesse Inclinaison Vitesse Inclinaison Vitesse Inclinaison Vitesse Inclinaison Vitesse Inclinaison Vitesse Inclinaison Vitesse Inclinaison Vitesse Inclinaison Vitesse Inclinaison Vitesse Inclinaison Vitesse Inclinaison Vitesse Inclinaison Vitesse Inclinaison Vitesse Inclinaison Vitesse Inclinaison...
- Page 69 Notice d‘utilisation pour le code produit 347 2109 Fonction ERP : • Si le système démarre par défaut en mode ERP, il se met alors en veille vers 4h30 (si vous ne faites pas fonctionner le tapis de course entre temps). Cela permet d’économiser de l’énergie, et il suffit d’appuyer sur n’importe quelle touche pour le réactiver. •...
-
Page 70: Mise À La Terre
Notice d‘utilisation pour le code produit 347 2109 COMMENT DÉPLACER LE TAPIS DU COURSE Avant de déplacer votre tapis, assurez-vous que le châssis principal est à son point le plus bas, que l‘interrupteur est éteint et que la fi che d‘alimentation est débranchée. - Page 71 Notice d‘utilisation pour le code produit 347 2109 ENTRETIEN DU TAPIS DE COURSE Entretenir votre tapis de course de manière adéquate est essentiel pour garantir un état de fonctionnement irréprochable. Un mauvais entretien peut occasionner des dommages ou réduire la durée de vie du produit. Toutes les pièces du tapis doivent être vérifi ées et resserrées régulièrement.
- Page 72 Notice d‘utilisation pour le code produit 347 2109 desserré serré serré desserré Tournez la clé dans le sens des Tournez la clé dans le sens inverse des aiguilles d’une montre pour augmenter aiguilles d’une montre pour diminuer la tension de la bande la tension de la bande Vis de réglage Moteur...
- Page 73 Dank u voor de aankoop van dit product. Het product helpt u om op een eenvoudige manier fitter, gezonder en beter te worden. Sport-Thieme GmbH · D-38367 Grasleben · sport-thieme.com Tel. +49 53 57 181 543 · Fax +49 53 57 181 921 · info@sport-thieme.com...
- Page 74 Gebruiksaanwijzing voor item nr. 347 2109 GEBRUIKSAANWIJZING • Sluit het apparaat altijd aan op een geaard stopcontact waar geen andere apparaten op zijn aangesloten. Het wordt aanbevolen om geen verlengsnoeren te gebruiken. • Zorg ervoor dat de loopband voor gebruik stabiel op de grond staat. •...
- Page 75 Gebruiksaanwijzing voor item nr. 347 2109 ONGESCHIKTE GEBRUIKERS Gebruikers die onder behandeling zijn, mogen de loopband gebruiken na goedkeuring van een professionele arts. Gebruik de loopband niet in de volgende gevallen: • De gebruiker heeft rugpijn of heeft pijn in zijn been, middel of nek. •...
- Page 76 Gebruiksaanwijzing voor item nr. 347 2109 EXPLOSIETEKENING...
- Page 77 Gebruiksaanwijzing voor item nr. 347 2109 TABEL EXPLOSIETEKENING Item Beschrijving Specificatie Aant. basisframe frame hellingmotor staander links staander rechts computerframe frame scherm Motorbevestigingsplaat Gecoate zijgeleiding Einde van de plaat gecoat Dop links Ф...
- Page 78 Gebruiksaanwijzing voor item nr. 347 2109 Buitenafdekking t1.2×φ31 Cilinderkussen φ30 × 30 × M8 × 8 filter Communicatiekabel 1 L-1200 mm Communicatiekabel 2 L-1700 mm Communicatiekabel 3 Ф 74 × 86 × M12 Zijgeleiderblok Communicatiekabel 2 L-800 mm Zekeringhouder met kabel L-1100 mm Scheepsschakelaar L-800 mm...
- Page 79 Gebruiksaanwijzing voor item nr. 347 2109 Steeksleutel 13-14 t4.0×28×145 Voetzool φ50×φ41×26×M8×27 Inbusbout M6 x 15 Buitenafdekking t1.2×φ31 Draad (aarde) L-200 mm/2,5 mm2/Ф5 Kabel voor stroomaansluiting L-100 mm/1,5 mm2/rood Steeksleutel 17-19 t5.0×32×150 Consoledeel 6841EA consoleset, zelftappende schroef, ST4#16(1018/HV550) Behuizing bovenste console 48-1 Nauwsluitende veiligheidssleutel 48-2...
-
Page 80: Technische Informatie
Gebruiksaanwijzing voor item nr. 347 2109 Veiligheidssleutel console Handgreep staander Motorafdekking Loopband Achterste rail Hellingframe Zijrail Frame hellingmotor TECHNISCHE INFORMATIE Maten ingeklapt 2120*900*1590 Loopgedeelte 1550*560 Snelheid 1,0 - 22,0 km/u Hellinghoek 0 - 15% Wij behouden ons het recht voor om het product zonder voorafgaande kennisgeving te wijzigen. -
Page 81: Inhoud Doos
Gebruiksaanwijzing voor item nr. 347 2109 INHOUD DOOS A Hoofdgedeelte B Staanders C Consoleframe D Display E Zakje schroeven F Siliconenolie G Handleiding... - Page 82 Gebruiksaanwijzing voor item nr. 347 2109 LIJST ZAKJE HARDWARE Inbusbout halfdraadschroef Inbusbout halfdraadschroef Zeskantkop voldraadbout (M8 x (M8*40*20) 2 st. (M8*15) 4 st. 20) 4 st. T-sleutel Ф 12 platte sluitring x 2 st. moer x 2 st. Kruissteeksleutel Steeksleutel 13-14 Steeksleutel 17-19...
-
Page 83: Belangrijkste Onderdelen
Gebruiksaanwijzing voor item nr. 347 2109 Belangrijkste onderdelen Motorafdekking Achterafdekking Motorsnaar Motor Loopband Loopdek Hellingmotor Achterste rol Voorste rol Zijrail... - Page 84 Gebruiksaanwijzing voor item nr. 347 2109 MONTAGEINSTRUCTIE Stap 1: Haal het apparaat uit de doos en zet het op een vlakke vloer (zoals afgebeeld). Verwijder 4 schroeven van de bovenste motor- afdekking en verwijder vervolgens de bovenste motorafdekking. Stap 2: Sluit de communicatiedraden (in de rechter staander) goed aan op de hoofdmachine.
- Page 85 Gebruiksaanwijzing voor item nr. 347 2109 Stap 4: Sluit de communicatiedraden van de console en het consoleframe aan, plaats de console in het consoleframe en bevestig dit op de onderzijde met 2 schroeven M8*40*20. Stap 5: Draai alle bovenstaande schroeven vast, plaats de bovenste motor motorafdekking terug op de positie van het hoofdframe en bevestig de bovenste motorafdekking opnieuw met de...
-
Page 86: Algemene Fitnesstips
Gebruiksaanwijzing voor item nr. 347 2109 ALGEMENE FITNESSTIPS Opwarmen Doe voor elke oefening minstens 5 tot 10 minuten aan warming-up. Adem Zorg ervoor dat u tijdens het oefenen regelmatig, goed en rustig ademt. Oefenfrequentie Dezelfde spieren moeten tussen oefeningen 48 uur rust hebben. Belasting Voer oefeningen volgens uw eigen conditie uit, zodat u stap voor stap uw oefenkracht kunt verbeteren. - Page 87 Gebruiksaanwijzing voor item nr. 347 2109 GEBRUIKSAANWIJZING CONSOLE Instructie consolefunctie Instructie LED-venster • Venster „DISTANCE“: Toont de waarde van de afstand • „Venster „CALORIES“: Toont de waarde van de calorieën • Venster „TIME“: Toont de waarde van de tijd. • Venster „INCLINE“: Toont de waarde van de helling.
- Page 88 Gebruiksaanwijzing voor item nr. 347 2109 Handmatige modus. Hoe opent u het handmatige programma: • Zet de aan/uit-schakelaar aan en ga in het handmatige programma direct naar de normale modus. • Druk in de stopstatus op de programmaknop om naar de normale modus te gaan in het handmatige programma. Er zijn drie instelfuncties in het handmatige programma: tijdinstelling, afstandsinstelling, calorie-instelling;...
- Page 89 Gebruiksaanwijzing voor item nr. 347 2109 Weergave en instelbereik van invoerparameters: Parameter Categorie Standaardwaarde Instelbereik Opmerkingen 1= man Achternaam (-1-) 1 (man) 1—2 2= vrouw Leeftijd (-2-) 25 jaar oud 10 - 99 jaar oud Lengte (-3-) 170 cm 100 - 200 cm Gewicht (-4-) 70 KG 20 - 150 kg...
- Page 90 Gebruiksaanwijzing voor item nr. 347 2109 Segmentprogramma Speed Slope Speed Slope Speed Slope Speed Slope Speed Slope Speed Slope Speed Slope Speed Slope Speed Slope Speed Slope Speed Slope Speed Slope Speed Slope Speed Slope Speed Slope Speed Slope Speed Slope Speed Slope...
- Page 91 Gebruiksaanwijzing voor item nr. 347 2109 Speed Slope Speed Slope Speed Slope Speed Slope Speed Slope Speed Slope Speed Slope Speed Slope Speed Slope Speed Slope Speed Slope Speed Slope Speed Slope Speed Slope Speed Slope ERP-conversiefunctie: Als het systeem standaard in de ERP-modus opstart, zal het na ongeveer 4:30 uur in de slaapstand gaan zonder de loopband te bedienen, waardoor stroom wordt bespaard;...
- Page 92 Gebruiksaanwijzing voor item nr. 347 2109 Vaak voorkomende problemen oplossen Code Betekenis Oplossing • Frequentieomvormer niet Controleer of de connector los zit en of de draad al dan niet beschadigd is. aangesloten op console • De frequentieomvormer kan defect zijn. Controleer en vervang de frequentieomvormer.
- Page 93 Gebruiksaanwijzing voor item nr. 347 2109 LOOPBANDBEWEGING 1. Voordat u de loopband verplaatst, moet u ervoor zorgen dat het basisframe op het laagste punt staat, dat het is uitgeschakeld en dat de stekker uit het stopcontact is getrokken. 2. Daarna kunt u het uiteinde van de loopband met twee handen optillen om deze naar voren of naar achteren op de juiste plaats te zetten.
- Page 94 Gebruiksaanwijzing voor item nr. 347 2109 ONDERHOUD LOOPBAND Goed onderhoud is erg belangrijk om een foutloze en operationele staat van de loopband te garanderen. Onjuist onderhoud kan schade aan de loopband veroorzaken of de levensduur van het product verkorten. Alle onderdelen van de loopband moeten regelmatig worden gecontroleerd en vastgedraaid.
- Page 95 Gebruiksaanwijzing voor item nr. 347 2109 strakker losser losser strakker Draai rechtsom om de spanning van de Draai linksom om de spanning van loopband te verhogen de loopband te verlagen Schroef Stelschroe Motor Voorste rol Band Opmerking: een verkeerde uitlijning van de loopband is niet gegarandeerd en moet vroegtijdig worden gecontroleerd en gecorrigeerd, anders raakt de loopband ernstig beschadigd.
Need help?
Do you have a question about the T600 and is the answer not in the manual?
Questions and answers