Advertisement
Document number: 2201382
Last Modified: 2023.07.05
MONTERINGSANVISNING
ASSEMBLY INSTRUCTIONS
EINBAUHINWEISE
ASENNUSOHJEET
TYP MVP 992
P/N 1869200
250W / 230VAC
SVENSKA
ENGLISH
DEUTSCH
SUOMI
Calix AB, PO-Box 5026, SE-630 05 Eskilstuna, Sweden Phone: +46 (0)16-10 80 00,
Fax: +46 (0)16 13 22 45
E-mail: info@calix.se, E-mail: teknik@calix.se, Internet:
www.calix.se
Advertisement
Table of Contents

Related Manuals for Calix MVP 992


Summary of Contents for Calix MVP 992
- Page 1 ASSEMBLY INSTRUCTIONS EINBAUHINWEISE ASENNUSOHJEET TYP MVP 992 P/N 1869200 250W / 230VAC SVENSKA ENGLISH DEUTSCH SUOMI Calix AB, PO-Box 5026, SE-630 05 Eskilstuna, Sweden Phone: +46 (0)16-10 80 00, Fax: +46 (0)16 13 22 45 E-mail: info@calix.se, E-mail: teknik@calix.se, Internet: www.calix.se...
- Page 2 • Calix disclaims all liability where the product is not installed in accordance with the installation instructions or in any way modified. • Calix products that are installed in the vehicle must be carried out in a professi- onal manner. In the case of uncertainty regarding the installation, contact your Calix dealer.
- Page 3 Anwendungen erfolgt auf eigene Gefahr und wird nicht von der Gewährleistung abgedeckt. • Calix lehnt jede Haftung ab, wenn das Produkt nicht gemäß der Installationsan- leitung installiert oder in irgendeiner Weise verändert wurde. • In ein Fahrzeug eingebaute Calix-Produkte müssen von einer autorisierten Werkstatt eingebaut oder fachmännisch ausgeführt werden.
- Page 4 Document number: 2201382 Last Modified: 2023.07.05 AUDI Q2 35 TDI 150 QUATTRO 2021- DTUA FORD Tourneo Connect III 2.0 122 EcoBlue AWD 2022- DTRC SKODA Kodiaq 2.0 TDI 150 4x4 2022- DTS VOLKSWAGEN Caddy 2.0 TDI 122 4M 2021- DTR T-Roc 2.0 TDI 150 4Motion 2021- DTS...
- Page 5 Document number: 2201382 Last Modified: 2023.07.05 Installations område. Demontera skyddet under motorn. Värmaren monteras på baksidan av motorn. Installation area. Remove the cover under the engine. The heater should be installed on the back of the engine. Installationsbereich. Entfernen Sie die Abdeckung unter dem Motor.
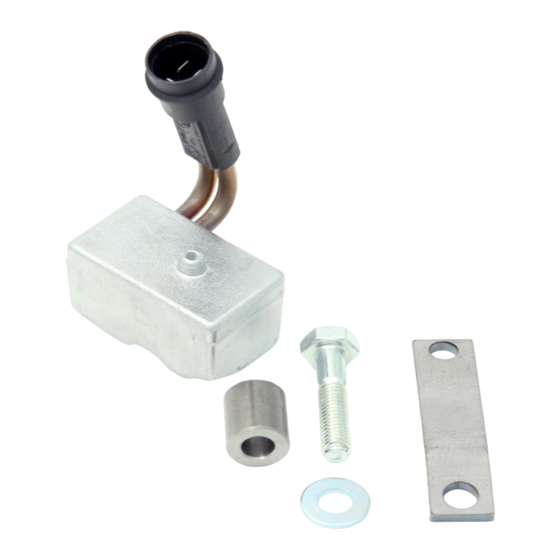
- Page 6 2201113 Document number: 2201382 Last Modified: 2023.07.05 Applicera den värmeledande pas- tan i ett jämnt skikt över den del av vämarkroppen som är i kontakt med motorn. Placera värmaren på motorn och spänn fast värmaren med bifogde monteringsdetaljer. Spread the heatconducting com- pound evenly over the part of the heater wich is in contact with the engine.
- Page 7 2201113 Document number: 2201382 Last Modified: 2023.07.05 Installations område. Demontera skyddet under motorn. Värmaren monteras på baksidan av motorn. Installation area. Remove the cover under the engine. The heater should be installed on the back of the engine. Installationsbereich. Entfernen Sie die Abdeckung unter dem Motor.
- Page 8 2201113 Document number: 2201382 Last Modified: 2023.07.05 Applicera den värmeledande pas- tan i ett jämnt skikt över den del av vämarkroppen som är i kontakt med motorn. Placera värmaren på motorn och spänn fast värmaren med bifogde monteringsdetaljer. Spread the heatconducting com- pound evenly over the part of the heater wich is in contact with the engine.
Need help?
Do you have a question about the MVP 992 and is the answer not in the manual?
Questions and answers