Table of Contents
Advertisement
Quick Links
QUICK START GUIDE
Maestro
™
Copyright 2024 by FlexRadio, Inc. All Rights Reserved. FlexRadio, Inc., 4616 W. Howard Lane, Ste. 8-860, Austin, TX 78728 USA
FlexRadio ® is a registered trademark and Maestro™ and SmartSDR™ are trademarks of FlexRadio, Inc. in the United States of America and other countries/regions. Other brand
or product names are trademarks of their respective holders. This product incorporates copyright protection technology that is protected by method claims of certain U.S. patents and
other intellectual property rights. Reverse engineering and/or disassembly is prohibited. Maestro QSG Ver.5, 02/2024. DOC-0073
Advertisement
Table of Contents

Related Manuals for FlexRadio Maestro

Summary of Contents for FlexRadio Maestro
- Page 1 Copyright 2024 by FlexRadio, Inc. All Rights Reserved. FlexRadio, Inc., 4616 W. Howard Lane, Ste. 8-860, Austin, TX 78728 USA FlexRadio ® is a registered trademark and Maestro™ and SmartSDR™ are trademarks of FlexRadio, Inc. in the United States of America and other countries/regions. Other brand or product names are trademarks of their respective holders.
- Page 2 Thank you for purchasing the Maestro Control Console for the FLEX-6000 Series radios from FlexRadio Systems. This Quick Need Assistance? Start Guide (QSG) will walk you through the steps for setting If you encounter any issues installing or operating your Maestro, up and operating your Maestro control console.
- Page 3 IMPORTANT NOTICE - READ BEFORE OPERATING THIS If you have any questions due to misunderstanding, translation UNIT errors and the like, please refer to the Maestro User Manual and/or the FLEX-6000 Signature Series Hardware Manual WARNING! and SmartSDR Software Manual first.
- Page 4 This may cause fire or electric shock. Δ - Do not operate this unit in areas of extreme humidity or ! - Never place the Maestro on an unstable surface where it may expose to rain, snow, or any liquids.
-
Page 5: Getting Started
- Do not leave the Maestro unit in an insecure place to avoid • One (1) FlexRadio Maestro device use by unauthorized persons. -
Page 6: Making The Connections
Back Panel Connections A microphone and headphone combo with a TRRS CTIA- 1.) Ethernet - If you plan to connect your Maestro to your FLEX- wired connector inserted in the HDST Combo Mic and 6000 Signature Series radio via a wired connection, plug one... - Page 7 Maestro. Connect the key to the Tip and Sleeve, and leave the Ring unconnected. If the intent is to connect your radio to Maestro via WiFi, then the wired Ethernet connection is not necessary and a WiFi con-...
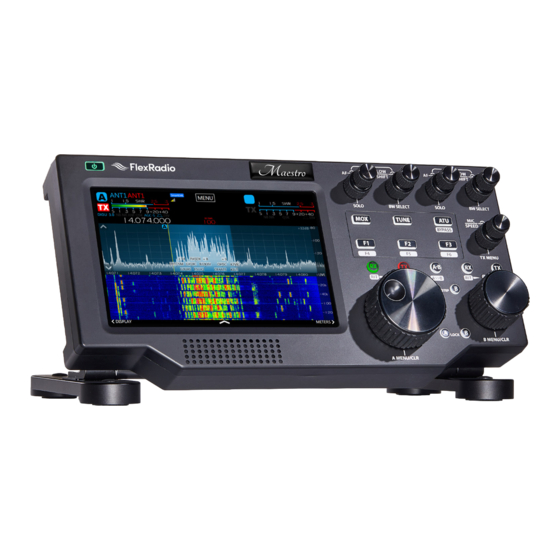
- Page 8 GETTING TO KNOW YOUR FLEX Microphone level, key speed, transmitter power and TX menu multi- MAESTRO function control The following is a description of the FLEX Maestro front and Function keys, 1 through 6 rear panel controls and connectors. VFO A Receiver enable button...
- Page 9 MAESTRO QUICK START GUIDE, VER. 5.0, 02/15/2024...
- Page 10 Maestro Rear & Side Panel Ethernet port, RJ-45, 100/1000 twisted pair External Display Port Battery Compartment Release Tab Battery Compartment Morse (CW) Key socket, 1/8" TRS connector Powered Speakers, 1/8" inch TRS connector Line Out, 1/8" inch TRS connector Push-To-Talk, 1/8" TS or TRS plug wired as TS Microphone &...
- Page 11 MAESTRO QUICK START GUIDE, VER. 5.0, 02/15/2024...
- Page 12 4.0 USING MAESTRO The Maestro welcome screen will appear on start-up. This USING MAESTRO screen can take several seconds to appear. Step 1. Starting Maestro for the First Time Turn on your FLEX-6000 series radio. Do NOT start SmartSDR if it is available. Don't be concerned with the CAT and DAX applications at this time.
- Page 13 The Select a Version screen appears. Available versions of the Maestro software are listed. Tap on a version to select it. If the selected version has not been loaded into Maestro, a download and installation will take place. Please note - if Maestro is not connected to the Internet, only the factory installed version of the software will be available.
- Page 14 Step 2. Operating Your FLEX-6000 Transceiver with Maestro provides two VFOs, labeled A and B. The A VFO is Maestro controlled by the left-most audio and RX filter controls, and by the larger Tuning knob and its associated RX, TX, Step and Lock The Maestro display will initially show one High Definition buttons on the Maestro front panel.
- Page 15 Tapping the frequency display to bring up the respective speed knob. The TX Menu will appear on the Maestro screen. VFO Menu, then enter the frequency using the 10-digit Tap or slide the controls to make adjustments, then press the keypad.
-
Page 16: Battery Cautions
4. Replace battery cover. It is recommended that prior to using your battery pack with your Maestro device that you read the manufacturer's instruction manual for use included in your battery shipment. These smart battery packs are off the shelf batteries and adhere to worldwide certifications and approvals. - Page 17 Maestro when not using for long periods of time so as not to run down the battery. To charge a battery pack that is not inserted in the Maestro, use the optional charger that can be purchased through FlexRadio or other on-line retailers.
-
Page 18: Fcc Information
Press [MENU] on the main Maestro touch screen display. receiver • Connect the equipment into an outlet on a ciruit different Press the [MAESTRO] tab on the left side of the Menu from that to which the receiver is connected display. •... - Page 19 Dispose of the device at RoHS: EN 50581: 2012 your local collection points for electronic equipment! Austin, Texas, USA, February 15, 2024 Person Responsible: Matt Youngblood (Signature on file) President & CEO FlexRadio Systems MAESTRO QUICK START GUIDE, VER. 5.0, 02/15/2024...
- Page 20 FlexRadio, Inc. - U.S.A 4616 W. Howard Lane, Ste. 8-860 Austin, TX 78728 U.S.A. Phone: 512-535-4713 Email: hams@flexradio.com www.flexradio.com...
Need help?
Do you have a question about the Maestro and is the answer not in the manual?
Questions and answers