urmet domus 1054 Installation And User Manual
Hide thumbs
Also See for 1054:
- Manual (4 pages) ,
- Quick start manual (4 pages) ,
- Installation, configuration and user manual (16 pages)

Related Manuals for urmet domus 1054


Summary of Contents for urmet domus 1054
- Page 1 Mod. 1054 DS1054-211 LBT21358 WIFI THERMOSTAT Ref. 1054/101 Interactive Links AAAAAAAAAAAA INSTALLATION AND USER MANUAL...
-
Page 2: Table Of Contents
Interactive Links The document contains INTERACTIVE LINKS for faster and more efficient consultation. CONTENTS 1. GENERAL DESCRIPTION ......................... 3 1.1 MAIN FEATURES ..........................3 2. DESCRIPTION OF COMPONENTS ......................3 3. INSTALLATION ............................4 3.1 WARNINGS FOR THE INSTALLER ....................4 3.2 INSTALLATION MODE ........................ -
Page 3: General Description
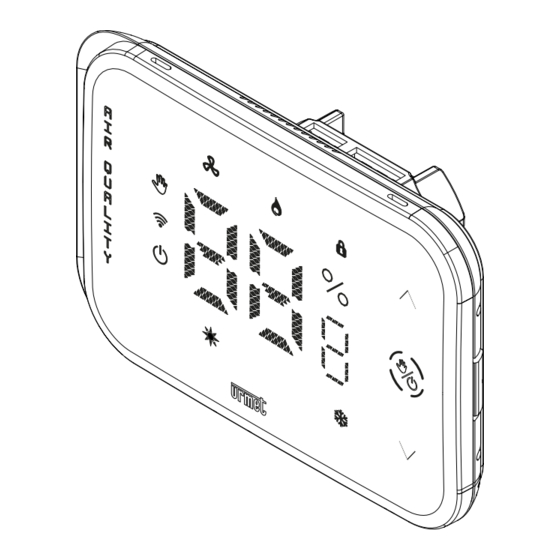
GENERAL DESCRIPTION The Layout The 1054/101 is the new WiFi thermostat with a modern, minimalist design, suitable for room temperature control in both heating and cooling mode. To configure the device, it is necessary to use the free UrmetON App available for Android and IOS. -
Page 4: Installation
7. Status icon Heating active 8. Key lock function active 9. Temperature Increase button (Manual program only): Short touch: temperature increase by 0.2°C • Long touch: temperature increase by 1°C • 10. Key for Reset to factory settings of the device 11. -
Page 5: Installation Mode
Installation modes The thermostat is designed for installation in flush mounting boxes Mod. 502 and 503 It is possible to install the product on the wall after fitting an external box (not supplied). Release the thermostat from the fixing base (17) by pressing the button (19) on the back. Connect the system conductors to the terminal blocks. -
Page 6: Description Of Terminals
Power the system from the mains; the device switches on in configuration mode. Only the measured temperature is visible on the display. Description of terminals RIGHT TERMINAL BLOCK 110 - 260 Vac (N) Neutral for power supply 110 - 260 Vac (L) Phase for power supply LEFT TERMINAL BLOCK Normally open relay output contact... -
Page 7: Pairing Of The Thermostat With A Smartphone
Example of connection with zone valve. 110÷260V~ - 50/60Hz The cables used must comply with IEC 60332-1-2 if they have a cross-section of 0.5 mm² or more, or with IEC 60332-2-2 if they have a cross-section of less than 0.5 mm². PAIRING OF THE THERMOSTAT WITH A SMARTPHONE When switched on for the first time, the thermostat is in the “Configuration”... - Page 8 In order to use the app, you need to create a Cloud account or log in with an account that is already registered on the Urmet Cloud (e.g. because it was previously created with the Urmet Secure app). Below is the meaning of the various fields and buttons: It allows the device to be used by logging in with an Account already registered on the cloud.
-
Page 9: Create A New Account (Register)
4.1.1 Create a new account or register If you do not have an Urmet Cloud account, you can register by filling in the required data. On the screen displayed, enter the desired first and last name (e.g. Mario Rossi) and indicate the nationality. Then press the “Continue“... - Page 10 In order to complete registration, the boxes for acknowledgement of Terms of Use, and Privacy must be ticked. Then press the “Stop recording“ button to conclude the registration phase. DS1054-211...
- Page 11 To activate the account, click on the validation link in the e-mail received at the mailbox indicated during registration. Once registration is complete, you can start using the planned functionalities. DS1054-211...
-
Page 12: Use An Existing Account (Sign In)
4.1.2 Use an existing account (Login) If the user already has an Urmet Cloud Account he can log in directly by pressing the "Login" button after entering his credentials. • User name (E-mail) • Password The Homepage is displayed. If the user has already created apartments via the Urmet Secure app, these will also be displayed on the Urmet ON app. -
Page 13: User Account
User account You can view/edit the profile of the account with which you are logged into the UrmetON app. Press the icon or press the button and from the side menu select “My Profile“. The following screen appears on the display of the smartphone. The following parameters can be displayed in this screen: DS1054-211... - Page 14 • By pressing the icon, an image can be inserted into the user profile. Select whether to use an image in the device's memory or take a snapshot. • Display the first name, last name, email address and nationality entered during account creation. Press the “Terms of Use“...
- Page 15 WARNING: changing the password will affect access to all Urmet Apps used with the same account. Press the “Delete Account“ button to delete the account with which you are logged into the app. • ATTENTION! Deleting the account will result in the deletion of all data entered when creating the account on the Urmet Cloud and the deletion of all apartments created through the app with their associated devices.
-
Page 16: Thermostat Wifi Pairing And Configuration
Thermostat WiFi pairing and configuration Below are the steps for pairing the thermostat with the smartphone and the procedure for configuring the device's WiFi. Press the “Add Apartment” button to add an apartment in which to place a device. Alternatively, select a apartment that already exists because it was created with another Urmet app. - Page 17 Press the “Add Device“ button to start the QR Code reader application. Remove the thermostat from the fixing base (17) and scan the QR code on the back of the device. Replace the device on the fixing base and wait for it to switch on. After scanning, the following screen appears where you can select the apartment where you want to associate the device.
- Page 18 Next, you need to activate WiFi on your smartphone, and access the “URMXXXXXXXXXXXXX“ network (e.g. URMT3E6C39E579071084) created by the device. After logging on to the thermostat network, the following settings screen appears. DS1054-211...
- Page 19 To function, the device must be connected to a WiFi network with Internet connectivity. It is essential to choose from the “WiFi SSID“ drop-down menu the network to which the device is to be connected. The list of proposed WiFi networks is generated by the thermostat. If the WiFi network to connect to is not listed, it means that this network is incompatible or out of coverage.
- Page 20 11. After configuration, you are redirected to the homepage. DS1054-211...
-
Page 21: My Apartments
My apartments The main screen (dasboard) displays all the devices associated with the apartments linked to the account with which you are logged in. Device Name Apartment name If you wish to create a new apartment by associating a new thermostat or associate a new thermostat with an existing apartment, follow the procedure below. - Page 22 The following side menu is displayed, click on “My apartments“. The following screen appears with all the apartments created. To add a new apartment press the icon above the words “Add apartment“. DS1054-211...
- Page 23 Enter the name of the place (Apartment) and press the “Save“ button. Select the apartment in which you want to associate a new thermostat. In the following example, the apartment “Office“ was selected. DS1054-211...
- Page 24 The following screen is displayed in which all devices associated with the apartment are shown, in this apartment the device “Thermostat“ was previously associated. above the words “Add Device“. For the configuration of a To add a new device, press the icon "THERMOSTAT WIFI PAIRING AND CONFIGURATION".
-
Page 25: Modifing Or Deleting Apartments Or Devices
4.4.1 Modifying or deleting apartments or devices It is possible to edit or delete a apartment or a device associated with a apartment via the UrmetON app. Comply with the instructions below: On the homepage, press the button in the top right-hand corner. The following side menu is displayed, click on “My apartments“. - Page 26 Scroll from right to left the box of the apartment you wish to edit. In this example, the apartment “Office“ was selected. 10. A scroll bar appears with the following icons: DS1054-211...
- Page 27 • By pressing the icon, it is possible to rename the name of the apartment assigned during creation. • By pressing the icon, the selected apartment can be deleted. When the apartment is deleted, any devices associated with it are automatically deleted. 11.
-
Page 28: Suggestions
Suggestions The UrmetON app has a dedicated section for sharing with the development team any reports on operation or suggestions on use. To access the "Suggestions" page on the Homepage, press the button at the top right. The following side menu is displayed, click on “Suggestions?“. DS1054-211... - Page 29 The following screen appears on the display of the smartphone. In the "Your email" box is the e-mail with which you registered for the Urmet Cloud. If necessary, it is possible to change the e-mail address. In the “Report“ box, you can enter a report on the functioning of the app or a possible suggestion for improving its use.
-
Page 30: Information
Information To access the UrmetON app information page, press the button at the top right of the homepage. The following side menu is displayed, press on “Information“. DS1054-211... - Page 31 The following screen with the link to the Urmet website and the UrmetON app version appears on the smartphone display. DS1054-211...
-
Page 32: Log Out
Log out To log out with the account you used to access the UrmetON app, press the button at the top right of the homepage. The following side menu is displayed, click on “Log out“. DS1054-211... -
Page 33: Operation Of The Thermostat
OPERATION OF THE THERMOSTAT Thermostat user interface On the UrmetON app homepage, select thermostat to display the device's user interface. In this example, the “Office thermostat“ device associated with the “Office“ apartment was selected. The user interface of the thermostat is displayed. The various meanings of the buttons and icons are described below: Name assigned to the thermostat during configuration. -
Page 34: Indoor Air Quality Indicator
(INDOOR AIR QUALITY-IAQ). Air quality indicator Temperature (°C) detected in the room by the thermostat. (TEMPERATURE AND HUMIDITY Temperature and humidity history detected by the thermostat HISTORY). Temperatures set for the automatic program (TEMPERATURE). (OFF MODE) or key for deactivating the mode Key for activating the off mode MANUAL PROGRAM) or the automatic program... - Page 35 Total volatile organic compounds Total Volatile Organic Compounds “tVOC“ include many different chemical compounds that are characterised by high volatility, i.e. they are able to change from the solid to the vapour state and pollute the air we breathe. In the office (furniture, textiles, wall coverings, photocopiers and the like), and in the home (stoves, smoke, cooking food and the mere presence of people) can raise tCOV values above the maximum tolerable level.
-
Page 36: Temperature And Humidity History
recommended as the air quality is in any case unhealthy due to the high presence of VOCs. There is no precise limit for CO . Various international legislations have imposed exposure limits between 800ppm and 1500ppm. 5.3 Temperature and humidity history By pressing the following icon you can view the history of all temperatures and humidity percentages measured by the thermostat. -
Page 37: Off Mode
Off mode In off-mode, the thermostat does not make any adjustments, but continues to display the temperature and humidity percentage measured in the room. ACTIVATION VIA URMETON APP To activate the off mode, press the button in the user interface displayed on the smartphone. Activation of the mode is confirmed by the words “Off mode activated“... - Page 38 1B. If the “Touch screen“ parameter is disabled in the configuration menu (refer to chap. Screen"), "Touch on the thermostat press the side button, the button icon lights up and the operating program and mode with which the device is configured is displayed(in this example: program "Automatic (AUt)" and operating mode "Winter"...
-
Page 39: Automatic Program
Automatic program The automatic program allows the thermostat to adjust the temperature using one of the 3 reference temperatures T1, T2 and T3 as a setpoint, depending on the day and time. The automatic program is set by default on the device. On the app, the user interface shows the temperature values used in each time slot for the current day. - Page 40 TEMPERATURE CONTROL VIA URMETON APP To adjust the temperature, press the buttons in the app's user interface. Each press of either button changes the temperature by 0.5°C TEMPERATURE CONTROL VIA THERMOSTAT 1A. If the “Touch screen“ parameter is enabled in the configuration menu (for more details refer to Chap. Screen"), on the thermostat press the button "Touch once,the button icon lights up...
- Page 41 1B. If the “Touch screen“ parameter is disabled in the configuration menu (refer to chap. Screen"), "Touch on the thermostat press the side button, the button icon lights up and the operating program and mode with which the device is configured isdisplayed(in this example: program "Manual" (MAn) and operating mode "Summer"...
-
Page 42: Switching From Automatic To Manual Program And Vice Versa
Switching from automatic to manual program and vice versa It is possible to switch from the automatic to the manual program and vice versa, either via the app or the thermostat. VIA URMETON APP In the user interface on the app, press the button to switch from the automatic to the manual program. - Page 43 To switch between manual and automatic programs, press the button in the device's user interface. VIA THERMOSTAT 1A. If the “Touch screen“ parameter is enabled in the configuration menu (refer to chap. Screen"), "Touch on the thermostat press the button once, the button icon lights up and the operating program and mode with which the device is configured isdisplayed(in this example: program "Automatic (AUt)"...
- Page 44 1B. If the “Touch screen“ parameter is disabled in the configuration menu (refer to chap. Screen"), "Touch on the thermostat press the side button, the button icon lights up and the operating program and mode with which the device is configured is displayed(in this example: program "Automatic (AUt)" and operating mode "Winter"...
-
Page 45: Display Of Measured Temperature Or Humidity
Display of measured temperature or humidity The display of the thermostat shows the detected temperature (default display) or the degree of humidity in the room. On the thermostat, press the side button once, the button icon lights up and the operating program and mode with which the device is configured is displayed (in this example: program "Manual"(MAn) and operating mode "Summer"... -
Page 46: Thermostat Configuration
THERMOSTAT CONFIGURATION Via the UrmetON app, the device can be configured. To access the configuration menu, press the button on the thermostat's user interface. The screen with the configuration menu appears, and by scrolling down the page you can view all configurable parameters. -
Page 47: Temperature
The following configuration parameters can be configured via the configuration menu. • Temperature Antifreeze Thermal differential Temperature correction • Mode Timed manual • Miscellaneous Lock pin Manual brightness Indication LED Touch Screen • Firmware • Temperature • Programming Temperature 6.1.1 Antifreeze it is possible to set a safety temperature called “Antifreeze Temperature“. -
Page 48: Thermal Differential
After selecting the desired value, press the “Save“ button, the configured value is saved. The configuration menu is displayed, where other device parameters can be configured. If no further configuration is desired, press the “Save Changes“ button at the bottom of the configuration menu to send the new configuration to the thermostat. - Page 49 To configure the “Thermal differential“ parameter, press on the icon where the degrees for the parameter are displayed. The following screen appears where you can configure the temperature. The parameter can be configured from a minimum of 0.2°C to a maximum of 2.0°C. After selecting the desired value, press the “Save“...
-
Page 50: Temperature Correction
6.1.3 Temperature correction The “Temperature correction“ parameter is useful in cases where there is a distorted temperature measurement in the room due to disturbing elements such as heaters, chillers and similar devices. Below is an example of use with the following configuration values. - MEASURED TEMPERATURE = 20.0°C - TEMPERATURE CORRECTION = 2.5°C - ACTUAL TEMPERATURE = 22.5°C... -
Page 51: Mode
Mode 6.2.1 Timed manual The “Timed manual“ parameter allows the Manual program to be activated (refer to chap. MANUAL PROGRAM) for a specific period of time. To enable the “Timed manual“ parameter, press on the relevant green box to the left of the parameter. Then press on the icon where the time indicator for the parameter is displayed. -
Page 52: Miscellaneous
The parameter can be configured from a minimum of 15 minutes to a maximum of 16 hours and 45 minutes. After selecting the desired value, press the “Save“ button, the configured value is saved. The configuration menu is displayed, where other device parameters can be configured. If no further configuration is desired, press the “Save Changes“... - Page 53 The digital keyboard of the smartphone is displayed, enter 3 digits and press the dial key. The pin is saved and the keyboard closes. The configuration menu is displayed, where other device parameters can be configured. If no further configuration is desired, press the “Save Changes“ button at the bottom of the configuration menu to send the new configuration to the thermostat.
- Page 54 On the display, the first digit displayed starts flashing. Press the button to enter the first number that makes up the unlocking PIN. After entering the first digit, press to confirm the selection and move on to the second digit. Repeat the number selection operation for the second and third digits as well.
-
Page 55: Manual Brightness
6.3.2 Manual brightness The “Manual brightness“ parameter allows you to set a customised brightness on the thermostat display. By default, the parameter is disabled as the brightness of the thermostat display is self-adjusting according to the changing brightness of the room in which it is positioned. To enable the “Manual brightness“... -
Page 56: Led Indicators
The parameter can be configured from a minimum of 0% (minimum brightness ) to a maximum of 100% (maximum brightness). After selecting the desired value, press the “Save“ button, the configured value is saved. The configuration menu is displayed, where other device parameters can be configured. If no further configuration is desired, press the “Save Changes“... -
Page 57: Touch Screen
6.3.4 Touch screen The “Touch screen“ parameter enables or disables the buttons on the thermostat display. The function is useful, for example, when you want to clean the device or to prevent inappropriate use by children or to avoid unintentional pressure on the thermostat. To configure the “Touch screen“... -
Page 58: Firmware
Firmware In the "Firmware" section it is possible to view the firmware version present on the device and possibly upgrade to the latest version available on the Urmet Cloud. If “Updated“ is displayed, this means that the device has the latest firmware version available. If, on the other hand, the word “Update“... -
Page 59: Temperature
Upon completion of the update, the device performs a reboot and after a few seconds returns to normal operation. The new firmware version of the thermostat will be visible on the app in the appropriate section. During the entire update procedure, it is very important to avoid switching off the device or disconnecting it from the network, in order to avoid even irreversible damage to the device. - Page 60 WINTER MODE To carry out the configuration, press on the following icon relating to the parameter (T1 or T2 or T3) you wish to configure. The following screen appears where you can select the temperature to be configured. In winter mode, temperatures T1,T2 and T3 are distinguished as follows: •...
- Page 61 In the Winter operating mode, if the measured temperature is lower than the temperature configured as setpoint (in this example T1), also taking into account any configured temperature differential, the load is activated by switching the relay (e.g. activation of any heating system). On the app and on the device display, the relevant icons light up as an indication.
- Page 62 In the summer operating mode, if the measured temperature is higher than the temperature configured as setpoint (in this example T3), also evaluating any configured temperature differential, the load is activated by switching the relay (e.g. activation of any air conditioning system). On the app and on the device display, the relevant icons light up as an indication.
-
Page 63: Programming
After the configuration has been made, press the “Save“ button, the selected mode is saved. Press to return to the parameter configuration menu. Programming The “Programming“ section allows you to program the temperature of the day for all days of the week. To carry out programming, the setpoint reference temperatures T1, T2 and T3 must have been configured (for all information on temperature configuration, please refer to chap. - Page 64 Press on the relevant boxes to select the start time(blue box) and end time (red box) of the program. DS1054-211...
- Page 65 Then select the temperature(T1 or T2 or T3) to be set for the previously selected time slot. In the following example in the time slot 11:30 a.m. - 5:30 p.m. the temperature T2 was selected as the setpoint. After the configuration has been made, press the “Save“ button, the configuration is saved. By scrolling through the time indicators, the temperatures set on the selected day can be displayed.
- Page 66 In the following example on Monday, the temperature T2 (18.0°) was configured as the setpoint in the time slot 9:30 am - 11:30 am, then the temperature T1 (20.0°) was configured in the time slot 12:00 pm - 5:30 pm, and finally the temperature T3 (16.0°) was configured at other times of the day.
- Page 67 Press the “Duplicate Programming“ button to select the days on which the programming is to be duplicated. Select the days on which you wish to duplicate the schedule. in the example below, the days “Tuesday“ to “Friday“ are selected. DS1054-211...
-
Page 68: Default Values
Several days can be selected at the same time to which the programming applies. Press the “Save“ button to duplicate the schedule to the selected days, the following screen is displayed to confirm the completion of duplication. Default values The thermostat is factory-configured with the following settings: Active program Automatic Winter... -
Page 69: Reset To Device Factory Parameters
RESET TO DEVICE FACTORY PARAMETERS To reset the device to its factory settings (including disconnection from the WiFi network), it is necessary to press, with a pointed object, the relevant button on the right side of the device and simultaneously hold down the centre button(Temperature or Humidity display selection button) for about 3 seconds. -
Page 70: Troubleshooting
TROUBLESHOOTING Solutions to the most common problems in using the device are described below. PROBLEM SOLUTION Press the RESTART button on the thermostat, the display shows During pairing, there is no communication between the “RST“. Deactivate and reactivate the network on the smartphone PAIRING AND CONFIGURATION OF THE WIFI smartphone/tablet and the and then repeat the... - Page 71 DS1054-211...
- Page 72 DS1054-211 LBT21358 URMET S.p.A. Technical area 10154 TORINO (ITALY) customer service +39 011.23.39.810 VIA BOLOGNA 188/C http://www.urmet.com Phone +39 011.24.00.000 (AUT. ANS.) e-mail: sclak.support@urmet.com +39 011.24.00.300 - 323...
Need help?
Do you have a question about the 1054 and is the answer not in the manual?
Questions and answers