
Subscribe to Our Youtube Channel
Related Manuals for Binatone BAC-201

Summary of Contents for Binatone BAC-201
- Page 1 Model: BAC-201 Operation and Installation Manual Air Cooler Please read this manual in details before operation. The maintenance work must be done by authorized service center.
- Page 2 This has long been the underlying philosophy which has built Binatone into the leading international brand name today. We recommend that before you buy any Air Cooler, you first look at Binatone products. Critically compare their ergonomic designs, features, quality, aesthetics and of course their prices with any other brand.
-
Page 3: Safety Precautions
Safety Precautions To reduce the risks of fire hazard, electric shock or personal injury, make sure that the following clauses are followed. 1. Please strictly abide by the instructions in this manual during installation. 2. This electric appliance is not applicable for the people who are not in good health, sense or mental ability or lack of experience and knowledge (including children), except that they use such appliance under the monitoring or guidance by the person who is responsible for their safety. -
Page 4: Parts Information
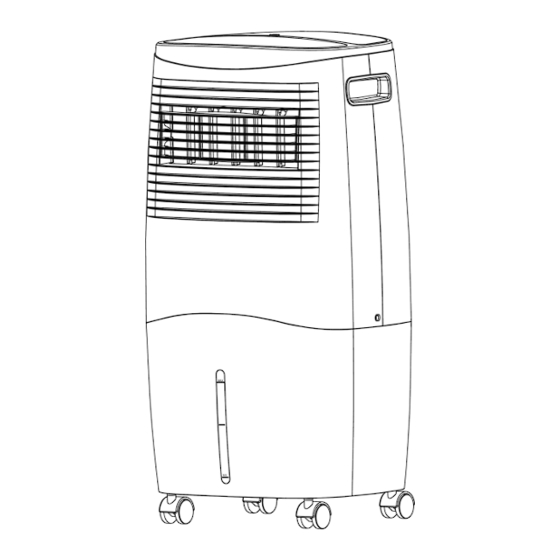
Parts Information Back View Control Flip panel Handle hole Vertical swing blades Horizontal swing blades Rear net curtain Winding holder Main body Water tank Power line Plug of water tank Water level indicator Ice bag window Remote Control Rear trundle Notes: the key functions of remote control are the Front same with those of control panel of machine head. - Page 5 Instructions for Installation 2. Take out the main body from the water tank and inject clean water into the water tank ( use the water without fragrance, essential oil, detergent or other additive ) . Please don’t surpass the max. water level indicatrix during water injection ( MAX marker on the water tank ) as well as lower than the min.
- Page 6 Instructions for Usage Press this button to start air cooler. The indicator light is ON Red light ON 2. Press “ON/OFF” button to start air cooler and 1. Please connect the air cooler into the 220-240 press the button again to close it . When the air V AC 50Hz power source and start the power cooler starts up , it is in the highest speed level switch.
- Page 7 Instructions for Usage Timer button OSC button 5. Press timer button to se t the automatic shut 6. Press OSC button and the “OSC” indicator down time (1 hour, 2 hours, 4 hours or 8 hours) light will be ON and the vertical swing blades and the corresponding indicator light will be ON.
- Page 8 Instructions for Usage Long press the button to start sleep mode Purple light is ON 9. When the air cooler is started , long press 10. The rear net of air cooler must be correctly speed button for above 3s, the air cooler will enter assembled on the main body ;...
- Page 9 Instructions for Usage If the water in water tank is lower than the min. water level indicatrix Indicator light of cooler will flicker 13. If the water in water tank is lower than the min. 14. If the air cooler will not be used for a long water level indicatrix , the humidification function time, please pull off the plug from the socket.
-
Page 10: Instructions For Cleaning And Maintenance
Instructions for Cleaning and Maintenance 1. Make sure that the plug is pulled out from the socket. Please make sure that the air cooler is completely stopped before cleaning. 2. Don’t clean the air cooler with grinding sponge, scouring pad or hard brush. 3. - Page 11 Les grands volumes de production et le réseau de distribution mondial de la société Binatone qui englobe 75 pays, nous permettent d’offrir aux clients des articles de très hautes qualités d’utilisation aux prix très attractifs. En fait, c’est l’idée maîtresse de notre philosophie de production qui a permis à...
-
Page 12: Précautions De Sécurité
Précautions de sécurité Pour réduire les risques d'incendie, d'électrocution ou de blessures, assurez-vous que les clauses suivantes sont suivies. 1. S'il vous plaît strictement respecter les instructions de ce manuel lors de l'installation. 2. Cet appareil électrique n'est pas applicable pour les personnes qui ne sont pas en bonne santé, le sens ou la capacité... -
Page 13: Instructions Pour L'installation
Informations sur les pièces Vue arrière Contrôle Panneau de commande Flip panneau Trou de poignée Lames à oscillation verticale Lames oscillantes horizontales Rideau Filet arrière humide Support d'enroulement Corps principal Réservoir d'eau Ligne électrique Bouchon d'eau réservoir Niveau d'eau indicateur fenêtre Sac de glace Télécommande... -
Page 14: Instructions D'utilisation
Instructions pour l'installation 2. Sortez le corps principal du réservoir d'eau et injectez de l'eau propre dans le réservoir d'eau (utiliser l'eau sans parfum, huile essentielle, détergent ou autre additif) . S'il vous plaît ne pas dépasser le maximum . niveau d'eau indicatrice pendant l'injection d'eau ( marqueur MAX sur le réservoir d'eau ) ainsi que plus bas que le min . - Page 15 Instructions d'utilisation Appuyez sur ce bouton pour commencer le témoin s'allume Lumière rouge ON 2. Appuyez sur le bouton "ON / OFF" pour 1. Veuillez connecter le refroidisseur d'air dans le démarrer le refroidisseur d'air et appuyez sur le bouton à nouveau pour le fermer. Quand le 220 - 240V AC Source d'alimentation 50Hz et démarrer l'interrupteur d'alimentation.
- Page 16 Instructions d'utilisation Bouton de la Minuterie Bouton d’OSC 5. Appuyez sur le bouton de la minuterie pour 6. Appuyez sur le bouton OSC et le voyant "OSC" régler l'arrêt automatique temps ( 1 heure , sera sur et les lames de swing verticales 2 heures , 4 heures ou 8 heures) et le voyant commencent à...
- Page 17 Instructions d'utilisation Appuyez longuement sur le bouton pour démarrer le mode veille lumière violette ON 9. Lorsque le refroidisseur d'air est démarré, 10. Le filet arrière du refroidisseur d'air doit être appuyez longuement le bouton de vitesse pour ci- correctement monté sur le corps principal; sinon dessus 3s, le refroidisseur d'air sera entré...
- Page 18 Instructions d'utilisation Si l'eau dans réservoir d'eau est inférieur à la min. niveau d'eau indicatrice Voyant lumineux de refroidisseur scintille 13. Si l'eau dans le réservoir d'eau est inférieure 14. Si le refroidisseur d'air ne sera pas utilisé à la min. Indicateur de niveau d'eau, la fonction pendant une longue période, débranchez la fiche d'humidification ne peut pas fonctionner.
- Page 19 Instructions pour le nettoyage et la maintenance 1. Assurez-vous que la fiche est retirée de la prise. Veuillez-vous assurer que le refroidisseur d'air est complètement arrêté avant de le nettoyer. 2. Ne nettoyez pas le refroidisseur d'air avec une éponge de meulage, un tampon à récurer ou une brosse dure. 3.
Need help?
Do you have a question about the BAC-201 and is the answer not in the manual?
Questions and answers