
Related Manuals for Chison ECO 3 EXPERT


Summary of Contents for Chison ECO 3 EXPERT
- Page 1 Ultrasound Diagnostic System ECO 3 EXPERT Instruction Manual V3.0 Mar. 1 , 2022 57-00414-01 CHISON Medical Technologies Co., Ltd. We reserve the rights to make changes to this manual without prior notice...
- Page 2 Device Directive 93/42/EEC. Accessories without the CE mark are not guaranteed to meet the Essential Requirements of the Medical Device Directive. This manual is a reference for the ECO 3 EXPERT. Please verify that you are using the latest revision of this document. If you need the latest revision, contact your distributor.
- Page 3 The users shall fully understand and master the devices before operating. The users shall have got the qualification, and shall comply with the local laws and regulations, the local religion and customs, etc. 7. The System modified or repaired by people other than CHISON’s qualified service...
- Page 4 9. This manual contains warnings regarding foreseeable potential dangers, but user shall always be alert to dangers other than those indicated as well. CHISON shall not be liable for damage or loss that results from negligence or from ignoring the precautions and operating instructions described in this operation manual.
- Page 5 ECO 3 EXPERT Ultrasound Diagnostic System manager can reach it at any time. 18. LCD display screen may have some dark or light dots, it is normal for the LCD. It does not mean that LCD screen is defective CAUTION: It is prohibited to use the device for fetal sex examination, except for necessary medical needs.
-
Page 6: Table Of Contents
ECO 3 EXPERT Ultrasound Diagnostic System Content Chapter 1 Introduction ............................1 1.1 System Overview ..........................1 1.2 Contact Information ..........................1 Chapter 2 System Safety ............................. 2 2.1 Safety Overview ............................ 2 2.2 Electrical Safety ............................ 3 2.3 Label ................................ 6 2.4 Patient Environmental Devices ...................... - Page 7 ECO 3 EXPERT Ultrasound Diagnostic System 5.6 B Image Adjustment .......................... 45 5.7 B Image Menu Adjustment ....................... 47 5.8 PW Image Adjustment ........................51 5.9 Full Screen Show ..........................53 5.10 Edit Comment ........................... 53 5.11 Set Body Mark ........................... 55 5.12 Set the Direction of Arrow ......................
- Page 8 ECO 3 EXPERT Ultrasound Diagnostic System 6.18 M Mode Cardiac Measurement ..................... 81 6.19 M Urology Measurement ........................ 83 6.20 M Small Parts Measurement ......................83 6.21 M Pediatric Measurement ......................83 6.22 PW mode measurement methods ....................83 6.23 PW Fast Measurement ........................84 6.24 PW Genearl Measurement ......................
- Page 9 ECO 3 EXPERT Ultrasound Diagnostic System 9.1 General Description ......................... 121 9.2 Care and Maintenance ........................121 9.3 Probe Operation Instructions ......................133 9.4 Service Responsibility ........................136 Appendix A: The Information of EC Representative ..............137 Appendix B: Acoustic Output Report Table ..................138 Appendix C: Guidance and Manufacturer’s Declaration ..............
-
Page 10: Chapter 1 Introduction
ECO 3 EXPERT Ultrasound Diagnostic System Chapter 1 Introduction This manual contains necessary information for safe system operation. Read and understand all instructions in this manual before operating the system. Always keep this manual with the equipment, and periodically review the procedures for operation and safety precautions. -
Page 11: Chapter 2 System Safety
ECO 3 EXPERT Ultrasound Diagnostic System Chapter 2 System Safety 2.1 Safety Overview This section discusses measures to ensure the safety of both the operator and patient. To ensure the safety of both operator and patient, please read the relevant details in this chapter carefully before operating this system. -
Page 12: Electrical Safety
ECO 3 EXPERT Ultrasound Diagnostic System Do not continuously scan the same part of a patient or expose the patient to prolonged scanning; otherwise it may harm the patient. When using the system for ultrasound testing, use only qualified ultrasound gel that complies with system standards. - Page 13 ECO 3 EXPERT Ultrasound Diagnostic System Parts of probe likely to come into contact with operator or patient meet the requirements of drip-proof equipment (IPX1) Parts of probe intended to be immersed in normal use meet the requirements of watertight equipment (IPX7) ...
- Page 14 Locate the equipment as far away as possible from other electronic equipment. Be sure to use only the cables provided by or designated by CHISON. Connect these cables following the installation procedures (e.g. wire power cables separately from signal cables).
-
Page 15: Label
ECO 3 EXPERT Ultrasound Diagnostic System 2.3 Label Real panel label 2.3.1 Warning Symbols WASTE ELECTRICAL This mark indicates that this product ELECTRONIC EQUIPMENT (WEEE): This contains limited amount hazardous substances in the Chinese Standard GB/T symbol is used for Environment Protection, it 26572-2011 "Limited... - Page 16 ECO 3 EXPERT Ultrasound Diagnostic System Caution, consult accompanying Do not use the following devices near this documents. equipment: cellular phone, radio receiver, and This symbol advises the reader to consult the mobile radio transmitter, radio controlled toy, etc. accompanying documents for important safety...
-
Page 17: Patient Environmental Devices
The Patient Environmental devices shown above are specified to be suitable for use within the PATIENT ENVIRONMENT. CAUTION: DO NOT connect any probes or accessories without approval by CHISON within the PATIENT ENVIRONMENT. DO NOT touch patient and devices without IEC/EN 60601-1 approval to avoid the leakage current risk within the PATIENT ENVIRONMENT. - Page 18 ECO 3 EXPERT Ultrasound Diagnostic System below: IEC standard or equivalent standards appropriate to devices. The devices shall be connected to PROTECTIVE EARTH (GROUND). CAUTION: Unsafe operation or malfunction may result. Use only the accessories, options and supplies approved or recommended in these instructions for use.
-
Page 19: Biological Safety
CHISON authorized engineer has checked the system and confirm the effectiveness and safety of the system and probes. - Page 20 ECO 3 EXPERT Ultrasound Diagnostic System recognized efficacy for medical diagnosis, including use during human pregnancy, the American Institute of Ultrasound in Medicine herein addresses the clinical safety of such use: There are no confirmed biological effects on patients or instrument operators caused by exposures from present diagnostic ultrasound instruments.
-
Page 21: Scanning Patients And Education
ECO 3 EXPERT Ultrasound Diagnostic System 2.6 Scanning Patients and Education Track-3 or IEC60601-2-37 output display standard allows users to share the responsibility for the safe use of this ultrasound system. Follow these usage guidelines for safe operation: In order to maintain proper cleanliness of the probes, always clean them between patients. - Page 22 ECO 3 EXPERT Ultrasound Diagnostic System continuous scanning. Do not use endo-cavitary probes if there is noticeable self heating of the probe when operating in the air. Although applicable to any probe, take particular care during trans- vaginal exams during the first eight weeks of gestation.
- Page 23 ECO 3 EXPERT Ultrasound Diagnostic System Maximum recommended exposure times for an embryo or fetus Non-diagnostic use of ultrasound equipment is not generally recommended. Examples of non-diagnostic uses of ultrasound equipment include repeated scans for operator training, equipment demonstration using normal subjects, and the production of souvenir pictures or videos of a fetus.
- Page 24 ECO 3 EXPERT Ultrasound Diagnostic System acoustic output indices, MI and TI. The MI describes the likelihood of cavitations, and the TI offers the predicted maximum temperature rise in tissue as a result of the diagnostic examination. In general, a temperature increase of 2.5° C must be present consistently at one spot for 2 hours to cause fetal abnormalities.
- Page 25 ECO 3 EXPERT Ultrasound Diagnostic System Distance Frequency (MHz) (cm) 0.7586 0.4365 0.2512 0.1259 0.7080 0.3548 0.1778 0.0750 0.6607 0.2884 0.1259 0.0447 0.6166 0.2344 0.0891 0.0266 0.5754 0.1903 0.0631 0.0158 I’=I*RF Where I’ is the intensity in soft tissue, I is the time-averaged intensity measured in water.
- Page 26 ECO 3 EXPERT Ultrasound Diagnostic System tissue temperature by 1° C (Wdeg), TI = W.3/Wdeg. Three TIs corresponding to soft tissue (TIS) for abdominal; bone (TIB) for fetal and neonatal cephalic; and cranial bone (TIC) for pediatric and adult cephalic, have been developed for applications in different exams.
- Page 27 ECO 3 EXPERT Ultrasound Diagnostic System Display and Report Located on the upper middle section of the system display monitor, the acoustic output display provides the operator with real-time indication of acoustic levels being generated by the system. For Scan Only display and report MI, and start from 0.4 if maximum MI >...
-
Page 28: Battery Handling Instructions
ECO 3 EXPERT Ultrasound Diagnostic System used before attempting to adjust the Acoustic Output control or any control that can affect Acoustic Output. Use the minimum necessary acoustic output to get the best diagnostic image or measurement during an examination. Begin the exam with the probe that provides an optimum focal depth and penetration. - Page 29 ECO 3 EXPERT Ultrasound Diagnostic System batteries of different capacity, type or brand. Do not use the battery if it gives off an odor, generates heat, becomes discolored or deformed, or appears abnormal in any way. If the battery is in use or being recharged, remove it from the device or charger immediately and discontinue use.
-
Page 30: Chapter 3 System Introduction
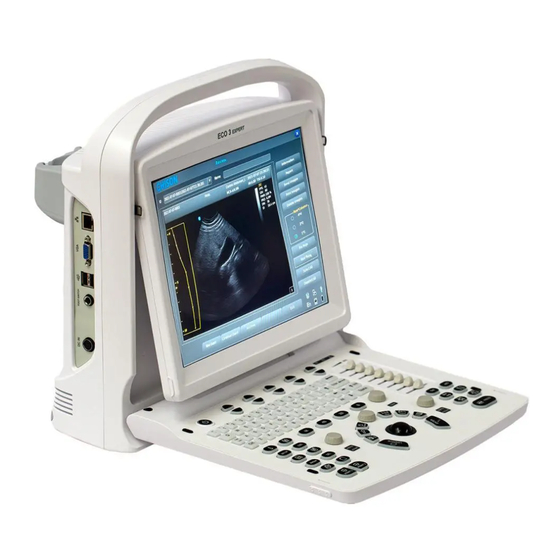
ECO 3 EXPERT Ultrasound Diagnostic System Chapter 3 System Introduction 3.1 Console View Fig. 3-1 Console View 3.2 Physical Specification Dimensions of main unit (approx.): 335mm(Length)×155mm(Width)×350mm(Height) Net weight of main unit (approx.): 6.5kg Page 21 / 191... -
Page 31: System View In Different Views
ECO 3 EXPERT Ultrasound Diagnostic System 3.3 System View in Different Views Fig. 3-2 System Front View Fig. 3-3 System Side View 1. Ethernet 2. VGA 3.USB 4.FOOT SWITCH 5.DC IN Fig. 3-4 Console Overview 1. Probe Holder 2.Probe 3.Keyboard... -
Page 32: Function Introduction
ECO 3 EXPERT Ultrasound Diagnostic System Fig. 3-5 System Rear View 1. Probe 2.USB 3. REMOTE 4. VIDEO OUT 5.Battery Holder 6. Probe Holder 3.4 Function Introduction 1. Possess B, 2B, 4B, B/M, M, PW display mode, M, B/M mode possess 4 kinds of scan velocity;... - Page 33 ECO 3 EXPERT Ultrasound Diagnostic System analysis; 10. Cine loop storage 256frames real time image; 11. Screen rotation function make you adjust screen angle according to users' requirement 0~30° ; 12. Output standard PAL or NTSC video signal and VGA signal;...
-
Page 34: Installation Procedures
ECO 3 EXPERT Ultrasound Diagnostic System Peripherals VGA output for external monitor VIDEO output for B&W video printer LAN port output LAN for DICOM and image review station USB 2.0 for flash drive Foot switch AC/DC adapter: MDS-060AAS19 B Input: 100-250V~1.5-0.75A, 50-60Hz Output: 19V 3.16A... - Page 35 ECO 3 EXPERT Ultrasound Diagnostic System Subject to vibration Near heat generators High humidity NOTE: This equipment generates, uses and can radiate radio frequency energy. The equipment may cause radio frequency interference to other medical and non-medical devices and radio communications.
- Page 36 ECO 3 EXPERT Ultrasound Diagnostic System Grounding Before connecting the power cable, connect the attached ground protection cable from Equipotentiality terminal on system rear panel to a specialized grounding device. NOTE: Please follow the outlined power requirements. Only use power cables that meet the system guidelines—failure to follow these procedures may produce system damage.
- Page 37 ECO 3 EXPERT Ultrasound Diagnostic System CAUTION: Leave enough free space from the back of the system; otherwise, with the increasing of the temperature inside the unit, malfunction may occur. 3.5.1.5 System Positioning & Transporting Moving the System When moving or transporting the system, take the precautions described below to ensure maximum safety for personnel, the system and other equipment.
- Page 38 ECO 3 EXPERT Ultrasound Diagnostic System Ensure that the transporting vehicle can bear the weight of system plus the passengers. Secure the system firmly with straps or as directed within the vehicle to prevent movement during transport. Any movement, coupled with the weight of the system, could cause it to break loose.
- Page 39 ECO 3 EXPERT Ultrasound Diagnostic System 3.5.3 Probe Installation CAUTION: Please only use the probes provided by manufacturer for this model, other types of probes are not allowed to use with this system! Otherwise it may cause the damage to the system and the probe.
- Page 40 ECO 3 EXPERT Ultrasound Diagnostic System side to video signal output port in the rear side. 3. Connect the printer line to print control port in the printer rear side, and connect the other side to the print control port in the unit rear side.
-
Page 41: Chapter 4 Control Panel
ECO 3 EXPERT Ultrasound Diagnostic System Chapter 4 Control Panel 4.1 Alphanumeric Keyboard Fig. 4-1 Alphanumeric Keyboard The alphanumeric keys are used for inputting patient number, name, character and figure etc. 4.2 Function Keys/Knob 4.2.1 SWITCH Turn on or off the device 4.2.2 PATIENT... - Page 42 ECO 3 EXPERT Ultrasound Diagnostic System 4.2.4 SETUP Press this key to get in or out the system setting page. 4.2.5 END Press END key to finish the exam. 4.2.6 BODY MARK Press this key to enter into body mark working status, select the body mark and confirm the probe scanning position on the screen.
- Page 43 ECO 3 EXPERT Ultrasound Diagnostic System 4.2.10 Print PRINT1: Print the screen image by video printer connected to the system. PRINT2: Print the report by printer connected to the system (Only report page works). Or print the image in the scanning page; or print the image in the review page.
-
Page 44: Central Control
ECO 3 EXPERT Ultrasound Diagnostic System 4.3 Central Control 1. UPDATE 2.EXIT 3.Cursor 4.Change 5.MENU 6. Dist 7.Trace 8.Calc 9.ENTER 10.Trackball 4.3.1 ENTER This multifunction key is work with trackball. The function switches with the unit status. Such as, set the cursor position, body mark position, comment position, toggle trackball function, selected the menu, and confirm the input. -
Page 45: The Key Of Image Mode
ECO 3 EXPERT Ultrasound Diagnostic System 4.3.6 Dist Press this key to enter into distance measurement. 4.3.7 Trace Press this key to enter into trace measurement, and press [UPDATE] to change between trace and ellipse. 4.3.8 Calc Press this key to enter into measurement software package. -
Page 46: Control Of Image
ECO 3 EXPERT Ultrasound Diagnostic System Press this key to enter into 4B mode. 4.4.4 M Press this key to change the mode between B/M and M. 4.5 Control of Image 4.5.1 THI Press this key to open or close the THI function. - Page 47 ECO 3 EXPERT Ultrasound Diagnostic System 4.5.6 Up and Down Invert Press this key to invert the image from up and down. 4.5.7 STC STC can be used for adjusting gain compensation in different image depth. 4.5.8 GAIN Rotate the knob to adjust the gain of B mode and M mode.
- Page 48 ECO 3 EXPERT Ultrasound Diagnostic System Left-to-Right of the up row: hard disk, cable network, USB. Hard disk: press this icon to show the capacity of disc to used save data or USB flash disk in current system Cable network: show the present situation of cable network; press this icon to show the IP address of current system.
-
Page 49: Chapter 5 Operation And Exam Mode
ECO 3 EXPERT Ultrasound Diagnostic System Chapter 5 Operation and Exam Mode This chapter mainly describes the process of the normal operation of the device, including the preparation before examination, how to get the image, optimize the image, add comments, body mark and so on. -
Page 50: Patient Data Entry
ECO 3 EXPERT Ultrasound Diagnostic System NOTE: The system has been set clinical application preset before leaving factory, each probe has its own preset. The detailed operation steps of the clinical application preset of the probe, please refer to the preset section. -
Page 51: Image Interface Display
ECO 3 EXPERT Ultrasound Diagnostic System 1. Move the Trackball to the position of inputting character, then input patient information by character keyboard. 2. Use the Trackball and the [ENTER] key to switch between different input options: ID, patient name, doctor's name, birthday (It can be automatically calculated when input age), age (It can be automatically calculated when input birthday), gender. -
Page 52: Display Mode
ECO 3 EXPERT Ultrasound Diagnostic System 5.5 Display Mode Display Mode: B, 2B, 4B, M, B/M, they can be shifted by the mode key. 5.5.1 B Mode Press [B] Mode key, and display the single B Mode image, B Mode is the basic mode for two-dimensional scanning and diagnosis. - Page 53 ECO 3 EXPERT Ultrasound Diagnostic System Sample Volume. The X axis represents time while the Y axis represents velocity in either a forward or reverse direction. PW Doppler is typically used for displaying the speed, direction, and spectral content of blood flow at selected anatomical sites.
-
Page 54: B Image Adjustment
ECO 3 EXPERT Ultrasound Diagnostic System [UPDATE] key for second time to toggle back to 2D update and deactivate the Spectral Doppler. Doppler mode Scanning Hints: The best Doppler data will be got when the scanning direction is parallel to the direction of the blood flow;... - Page 55 ECO 3 EXPERT Ultrasound Diagnostic System second line key of [Frequency] to decrease the frequency. 5.6.2 Dynamic Dynamic range is used for adjusting the contrast resolution of B mode image and mode image, compressing or enlarging the display range of gray scale.
-
Page 56: B Image Menu Adjustment
ECO 3 EXPERT Ultrasound Diagnostic System 5.6.10 Angle Change the angle of sampling line of sampling gate in PW mode. Press [ANGLE/ZOOM] confirm the light of ANGLE on, the sampling line rotates with the direction. 5.6.11 ANGLE/ZOOM Press [ANGLE/ZOOM] knob until the indicator of [ANGLE] is lit, and the angle of sample gate will rotate with the rotation direction. - Page 57 ECO 3 EXPERT Ultrasound Diagnostic System Rotate [MENU] knob or press [Cursor] key to display the cursor ,and move the sample box to the corresponding function, press [MENU] knob to update the function, then rotate [MENU] knob to adjust the function, press [MENU] again to exit the function.
- Page 58 ECO 3 EXPERT Ultrasound Diagnostic System Move the cursor to [Edge] selection to adjust, and the range is 0~7. 5.7.7 Acoustic Power Acoustic power means the acoustic power transmitting from the probe. At the real-time status, Move the cursor to [Acoustic power] selection to adjust, and the range is 0~15.
- Page 59 ECO 3 EXPERT Ultrasound Diagnostic System 5.7.9.2 MB Through opening MB to improve image quality. Press [MENU] to turn on or turn off the MB function. 5.7.9.3 Trapezoidal Mode Press [MENU] to turn on or turn off the trapezoidal function. This function is activated by linear probes.
-
Page 60: Pw Image Adjustment
ECO 3 EXPERT Ultrasound Diagnostic System 5.8 PW Image Adjustment D Menu Adjustment in PW mode: Click [Change] key or [MENU] knob to display the menu. 5.8.1 Steering Angle Adjust Steering Angle. Activate [Steering Angle] and rotate [MENU] to adjust Steering Angle, adjustment range -10/-5/0/5/10. - Page 61 ECO 3 EXPERT Ultrasound Diagnostic System 5.8.7 Pixel Ratio Adjust Pixel Ratio. Activate [Pixel Ratio] and rotate [MENU] to adjust Pixel Ratio, adjustment range from 0~7. 5.8.8 Color Map Change type of color map. Activate [Color map] and rotate [MENU] to adjust D color map, adjustment range from 0~8.
-
Page 62: Full Screen Show
ECO 3 EXPERT Ultrasound Diagnostic System 5.8.15 Speed arameter control key Press p on [Speed] to adjust speed, adjustment range from 0~2. 5.8.16 Baseline Adjust the position of baseline. arameter control key Press p on [Baseline] to adjust the position of baseline, adjustment range from 0~6. - Page 63 ECO 3 EXPERT Ultrasound Diagnostic System NOTE: If you need to custom the default comments, refer to the preset section. 5.10.2 Input Characters Operation: 1. Press button, then system will go into the comment process. 2. Move the cursor to the position where need to comments.
-
Page 64: Set Body Mark
ECO 3 EXPERT Ultrasound Diagnostic System 2. Press [BACKSPACE] to delete unnecessary characters; 3. Press [ENTER] to confirm; 5.10.8 Delete Comments 5.10.8.1 Delete Characters In comment status, activate the comment that need to be deleted, then press the [ENTER], it will display "|"... -
Page 65: Set The Direction Of Arrow
ECO 3 EXPERT Ultrasound Diagnostic System 2. Select the body mark that you need. 3. Move trackball after adding the body mark image and then adjust the position of probe. Rotate [MENU] or [ANGLE] knob can adjust the probe direction. Press Enter- key to confirm when adjustment was finished. - Page 66 ECO 3 EXPERT Ultrasound Diagnostic System Cine loop indicate diagram 5.13.2 Manual Loop Press [FREEZE] to freeze image, pop cine playback bar, at this time, move cursor to play by hand; Trackball rolling to the right, the loop play with ascending order side by side. Or press [Next/Pre] to play.
-
Page 67: Image Browse
ECO 3 EXPERT Ultrasound Diagnostic System 5.14 Image Browse Press to enter image information browsing interface. Press [ENTER] to any function in the image. ID: ID of Current patient. Name: Current patient’s name. Information: Enter into current patient’s information interface. -
Page 68: Archive Management
ECO 3 EXPERT Ultrasound Diagnostic System Archive: Open up archive management interface; Cancel: Turn off image browsing interface; 5.15 Archive Management Archive management can search for patient’s information which has been stored in system. Press [Archive] to archive management interface, all process can be opened up by moving cursor. -
Page 69: Report
ECO 3 EXPERT Ultrasound Diagnostic System Storage/Print (Need to activate the DICOM); Delete Exam: Delete selected examination information; Patient View: Change display mode of information; Expand All: Select Patient View, it will display sub-directory; Collapse All: Exit sub-directory;... -
Page 70: Dicom
ECO 3 EXPERT Ultrasound Diagnostic System Report Title: Report options, different kinds of report can choose, such as Normal, OB/GYN etc. Hosp: Display the hospital name. Abdomen Report: Display the kind of report. Patient Name: Display the patient name. - Page 71 ECO 3 EXPERT Ultrasound Diagnostic System ID: input ID or some characters, fuzzy query needs server; Search By: select term, ID or name; ID: display the ID of patients; Name: display the names of patients; BirthDate: display the birth date of patients;...
- Page 72 ECO 3 EXPERT Ultrasound Diagnostic System Select DICOM Storage in left, choose DICOM server and press Export button to DICOM storage. Enter Task Sequence and watch or edit DICOM process. 5.17.3 DICOM Print DICOM Print operation is the same as DICOM storage.
-
Page 73: Chapter 6 Measurement And Calculation
ECO 3 EXPERT Ultrasound Diagnostic System Chapter 6 Measurement and Calculation Main content of this chapter: Normal calculation and measurement on B mode image and M mode image, OB calculation and Urology measurement etc., system can enter into corresponding measurement mode depend on current exam mode, and enter into the corresponding report depend on the measurement mode. -
Page 74: B Mode General Measurement Methods
ECO 3 EXPERT Ultrasound Diagnostic System 6.1.3 [UPDATE] 1. Before the measurement, press [UPDATE] to change the measurement method, such as ellipse, trace. The changeable measurement item has “< >”. 2. During the measurement, [UPDATE] is used to switch the start point and end point, long axis and short axis when the measurement is not finished. - Page 75 ECO 3 EXPERT Ultrasound Diagnostic System 4. Move the cursor to the end-point, press [ENTER] again to complete the measurement. 5. After the measurement, the result will display in the measurement results area. 6. Repeat the steps from 1 to 4 to start next “distance” measurement. Press [DEL] to delete all the measurements.
- Page 76 ECO 3 EXPERT Ultrasound Diagnostic System 2. Move the “+”icon by cursor, Press [ENTER] to fix the point and the cursor can be moved to the next position. 3. Make the cursor tracing along the edge of required area, the traced line can be not closed.
-
Page 77: B Fast Measurement
ECO 3 EXPERT Ultrasound Diagnostic System The vertical axis represents the distribution ratio of each gray scale. The value shown on the top of vertical axis represents the percentage of the maximally distributed gray in the whole gray distribution. 6.2.5 Profile Cross-section Diagram is used to measure the gray distribution of the ultrasound signals in the vertical or horizontal direction on a certain profile (section). -
Page 78: B General Measurement
ECO 3 EXPERT Ultrasound Diagnostic System Meas. Meas. Method/ Submenu Unit Comment Menu Meas. Formula Area cm Refer to Ellipse Ellipse and trace. Area area/circle Circle cm and trace meas. Refer Volume distance Meas. D means: Depth V = (1straight line) Formula: (π/6)×D3... -
Page 79: Abd Measurement
ECO 3 EXPERT Ultrasound Diagnostic System Meas. Meas. Method/ Submenu Unit Comment Menu Meas. Formula Refer to ellipse Volume meas. A: Long Axis V = (1Ellipse) Formula: B: Short Axis (π/6)×A×B2 Refer Volume distance Meas. D1: the longer distance V =... - Page 80 ECO 3 EXPERT Ultrasound Diagnostic System Meas. Meas. Method/ Submenu Unit Comment Menu Meas. Formula Refer distance Meas. Refer GB wall distance Meas. Refer Liver Length distance Meas. Refer Height distance Meas. Refer Width distance Meas. Refer distance Meas. D1: Length of Normal...
-
Page 81: Ob Measurement
ECO 3 EXPERT Ultrasound Diagnostic System Meas. Meas. Method/ Submenu Unit Comment Menu Meas. Formula Refer distance Meas. D1: Length of Normal StD% Formula: D2: Length of Stenosis ((D1-D2)÷ D1)×1 Refer to ellipse Meas. A1: Area of Normal StA% Formula: A2: Area of Stenosis ((A1-A2)÷... - Page 82 ECO 3 EXPERT Ultrasound Diagnostic System Meas. Submenu Unit Meas. Method Comment Menu Formula to choose: CFEF, Refer to ellipse and Campbell, Hadlock, AC<Ellipse> trace Meas. Hansmann, Korean, Merz, Shinozuka Formula to choose: Bessis, CFEF, Campbell, Chitty, Refer to distance...
- Page 83 ECO 3 EXPERT Ultrasound Diagnostic System Meas. Submenu Unit Meas. Method Comment Menu Refer to distance Meas. Refer to distance Meas. Refer to distance Meas. Refer to distance Formula: OOD Meas. Refer to distance Meas. Refer to distance Meas. Refer to distance...
-
Page 84: Pediatric Measurement
ECO 3 EXPERT Ultrasound Diagnostic System 6.6.2 EDD (estimated date of delivery) Estimation 6.6.2.1 Calculating EDD by LMP (Last menstrual period) 1. In the new patient OB page, update the LMP input box. 2. Choose the LMP from the date dialog box or input the LMP date directly. -
Page 85: Gyn Measurement
ECO 3 EXPERT Ultrasound Diagnostic System 2. Click on the line image region, and appear one line with"+" .Move the line to the target measurement region. 3. Rotate [MENU] knob to adjust the line angle, press [ENTER] key to fix the line. -
Page 86: Small Parts Measurement
ECO 3 EXPERT Ultrasound Diagnostic System Meas. Submenu Unit Meas. Method Comment Menu UT_W Refer to distance Meas. UT_H Refer to distance Meas. L: Cervix _L Refer to distance Meas. Cervix Vol. H: Cervix _H Formula: V=(π/6)×L×H×W W: Cervix _W ENDO Refer to distance Meas. -
Page 87: Urology Measurement
ECO 3 EXPERT Ultrasound Diagnostic System 6.11 Urology Measurement Normally urology measurements are performed in B and 2B mode. Freeze the required image under Urology examination, then press [Calc] to enter into Urology measurement status. Meas. Meas. Method/ Submenu Unit... -
Page 88: Normal Measurement In M, B/M Mode
ECO 3 EXPERT Ultrasound Diagnostic System Meas. Meas. Method/ Submenu Unit Comment Menu Meas. Formula Left ventricular parameter at end diastole: Refer to distance LV long-axis SL; Single Meas. LV short-axis SD; Plane Formula: V= Left ventricular parameter (π/6)×L×D2 at end systole: LV long-axis DL;... - Page 89 ECO 3 EXPERT Ultrasound Diagnostic System 3. Press [UPDATE] to active the two short lines in turns and dragon them to change the distance between them. The measurement result will be displayed on the result area. 6.13.2 Time Measurement steps: 1.
-
Page 90: General Measurement In M Mode
ECO 3 EXPERT Ultrasound Diagnostic System second measurement result will cover the first one. The measurement result area will list all the measurement values. 6.14 General Measurement in M mode At real-time status, press [B/M] key twice to enter M mode, press [Calc] to enter into M mode cardiology measurement status. - Page 91 ECO 3 EXPERT Ultrasound Diagnostic System Meas. Meas. Method/ Submenu Unit Comment Menu Meas. Formula Refer to M distance LVSd Interventricular Septum Meas. Refer to M distance Left Ventricular Diameter at LVIDd Meas. diastole Refer to M distance Left Ventricular Diameter at LVID Meas.
-
Page 92: M Urology Measurement
ECO 3 EXPERT Ultrasound Diagnostic System Meas. Meas. Method/ Submenu Unit Comment Menu Meas. Formula Refer EF Velocity cm/s Meas. EPSS MV E Amp MV A Amp Refer AC Velocity cm/s Mitral Valve Meas. peak/E Refer to M distance peak Meas. -
Page 93: Pw Fast Measurement
ECO 3 EXPERT Ultrasound Diagnostic System 6.22.1 Velocity Refer to velocity of M mode general measurement. 6.22.2 Time Refer to time of M mode general measurement. 6.22.3 HR Refer to HR of M mode general measurement. 6.22.4 Auto Trace Measurement step: 1. -
Page 94: Pw Genearl Measurement
ECO 3 EXPERT Ultrasound Diagnostic System Meas. Method/ Meas. Menu Submenu Unit Meas. Formula Formula: Pressure(d) mmHg Pressure=4×Vd×Vd/10000 Formula:SD=Vs/Vd Formula:SD=(Vs-Vd)/Vs Time Refer to M time meas. Single wave Refer to M HR meas. Time Refer to M time meas. cm/s Refer to M speed meas. - Page 95 ECO 3 EXPERT Ultrasound Diagnostic System Meas. Meas. Method/ Submenu Unit Comment Menu Meas. Formula Trace/Manu Formula: Pressure(Vs) mmHg al Trace Pressure=4×Vs×Vs/10000 cm/s Refer to M speed meas. Formula: Pressure(Vd) mmHg Pressure=4×Vd×Vd/10000 VMean cm/s Refer to M speed meas. Formula: Pressure(VMea =...
-
Page 96: Pw Abdomen Measurement
ECO 3 EXPERT Ultrasound Diagnostic System 6.25 PW Abdomen Measurement Refer to PW general measurement. 6.26 PW OB Measurement Press [Calc] to enter PW measurement in PW OB mode. Or press the corresponding parameter control key to switch the OB measurement item. -
Page 97: Pw Gyn Measurement
ECO 3 EXPERT Ultrasound Diagnostic System 6.27 PW GYN Measurement Press [Calc] to enter PW measurement in PW GYN mode. Or press the corresponding parameter control key to switch the GYN measurement item. Meas. Method/ Meas. Menu Submenu Unit Comment Meas. - Page 98 ECO 3 EXPERT Ultrasound Diagnostic System Meas. Method/ Meas. Menu Submenu Unit Meas. Formula Time Refer to M time meas. HR(Single wave) Formula: 0.785* Diam* Diam*|TVI| Formula: l/min SV*HR(Single wave)/1000 Diam Refer to B distance meas. Area Refer to B trace meas.
- Page 99 ECO 3 EXPERT Ultrasound Diagnostic System Meas. Method/ Meas. Menu Submenu Unit Meas. Formula Formula: = AR PHT Pressure mmHg Pressure 4×VPeak×VPeak/10000 AR PHT Slope cm/s AR PHT AR PHT Area Formula:220/ AV PHT EPeak cm/s Refer to M speed meas.
- Page 100 ECO 3 EXPERT Ultrasound Diagnostic System Meas. Method/ Meas. Menu Submenu Unit Meas. Formula R-R interval MR Vmax cm/s Refer to M speed meas. Formula: = MR Vmax Pressure mmHg Pressure 4×Vmax×Vmax/10000 MR TVI TV Manual Trace Vs cm/s Refer to M speed meas.
- Page 101 ECO 3 EXPERT Ultrasound Diagnostic System Meas. Method/ Meas. Menu Submenu Unit Meas. Formula PV Trace Vs cm/s Refer to M speed meas. Formula: PV Trace PPG mmHg PPG=4×Vs×Vs/10000 PV Trace VMean cm/s Refer to M speed meas. Formula: =...
-
Page 102: Pw Vascular Measurement
ECO 3 EXPERT Ultrasound Diagnostic System 6.29 PW Vascular Measurement Press [Calc] to enter PW measurement in PW vascular mode. Or press the corresponding parameter control key to switch the vascular measurement item. Meas. Method/ Meas. Menu Submenu Unit Meas. Formula cm/s Refer to M speed meas. -
Page 103: Chapter 7 Preset
ECO 3 EXPERT Ultrasound Diagnostic System Chapter 7 Preset This chapter introduces the operation to make settings of the system through preset menu at preset mode. Preset function is used to set up working environment and status, parameters of each examination mode. - Page 104 ECO 3 EXPERT Ultrasound Diagnostic System Function Setting method Function description name Set up the hospital name which is shown at top left Hospital, corner of “General Setting” dialog box, 20 Input freely Department characters Max can be input. Set up the system date (calendar format), select...
- Page 105 ECO 3 EXPERT Ultrasound Diagnostic System Function name Setting method Function description Set the content which screen picture contain: only Screen Type Select the need type picture, image and patient information, full screen. Cine Frames Select the parameter Set the default frame or time when saving the film.
-
Page 106: Measurement
ECO 3 EXPERT Ultrasound Diagnostic System Image mode: including image full screen, biopsy, chroma, etc. Print: including video print, pc print etc. Measurement: including GS, CR, BPD, HC, AC, etc. Other: including arrow, archive. 7.2 Measurement Measurement includes general measurement setting and measurement formula setting. - Page 107 ECO 3 EXPERT Ultrasound Diagnostic System Measure Result: the color of the result font is alternative, including yellow/white/orange/green. Follicle: ways to measure follicle, you can choose two distances and three distances. Heart Rate: select heart rate cycle, optional range is 1 cycle~6 cycles.
- Page 108 ECO 3 EXPERT Ultrasound Diagnostic System Remove: remove selected measurement term or item. Cut: select to cut the measurement option you want to paste. Paste: paste the measurement option you have cut. Folder Edit content description Display names of all items that is displayed name in...
- Page 109 ECO 3 EXPERT Ultrasound Diagnostic System Built-in code, user don’t need modify Unique Name Check the required item and it will display on the Display In Menu measurement menu. The item without checking will not display on the measurement menu.
- Page 110 ECO 3 EXPERT Ultrasound Diagnostic System Built-in code, user don’t need modify Unique Name Select available measurement tool type B distance (B line),area/circumference(ellipse, trace), M Tool Type/Tool distance(M vertical line), time(M horizontal line), M slope(M slant) Needed measurement operation of specific measurement...
- Page 111 ECO 3 EXPERT Ultrasound Diagnostic System The name of built-in selected measurement menu, user don’t need modify while display order according to the Var Name names Built-in code, user don’t need modify Unique Name Needed measurement operation of specific measurement...
- Page 112 ECO 3 EXPERT Ultrasound Diagnostic System Function: built-in formula, number input and some parameters that system needs such as BSA, SPSA etc. Cancel: cancel editing formula and close the interface. OK: save edited operation and close the interface.
- Page 113 ECO 3 EXPERT Ultrasound Diagnostic System Measure Item: OB Measurement Item. GA Tables: Gestational list for the current measuring project. Growth Table: Growth table for the current measuring. Fetal Weight: Fetal Weight calculation formula. EFW Equation: Fetal weight calculation for the current measuring.
-
Page 114: Comment
ECO 3 EXPERT Ultrasound Diagnostic System 7.3 Comment 7.3.1 Comment Library The annotation database of the system is classified as: Abdomen, OB, GYN, Cardiac, Small part, Pathological change Annotation can be made by inputting characters from the soft keyboard or recalling the terms saved in annotation database. - Page 115 ECO 3 EXPERT Ultrasound Diagnostic System 4. Alter name of current annotation status list in [Current Type Name] input box, press [ENTER] on the [Rename] button, then rename the selected annotation status name. NOTE: Factory Settings comments cannot be deleted or renamed.
-
Page 116: Body Marks
ECO 3 EXPERT Ultrasound Diagnostic System 2. Activate needed abbreviation and full name via [ENTER] and alter via keyboard. 3. Press [ENTER] on [Modify] button, modify the annotation in both source and user-selected status. 7.3.2.4 Delete comment in library Operation: Select needed annotation in source status, press [ENTER] on [Delete from Lib] button then the annotation deleted. -
Page 117: Exam Mode
ECO 3 EXPERT Ultrasound Diagnostic System 7.4.1.1 Edit body marks library Operation: 1. Press [ENTER] on [Edit BodyMark Type], pop edit box. 2. Input name into the new created body marks box, Move the cursor to the [Create] button then press [ENTER], then the new body marks will be created and appear in selected body marks list. - Page 118 ECO 3 EXPERT Ultrasound Diagnostic System corresponding control button to turn on or off the function. Preset: Display the current preset. Rename: Rename the current preset. Load Preset: Load the preset displayed. Save: Save the current preset.
- Page 119 ECO 3 EXPERT Ultrasound Diagnostic System Probe: select needed probe and ExamMode fit for it. ExamMode Lib: show all existed Exam modes. ExamMode Selected: show Exam modes in probe column. >: import selected Exam modes from ExamModeLib column to ExamMode Selected column.
- Page 120 ECO 3 EXPERT Ultrasound Diagnostic System ExamMode: show all existed Exam modes in system. Comment: double press [ENTER] to activate widget box, can choose existed annotation status name. After setting, the default of the Exam mode is user-selected.
-
Page 121: Report
ECO 3 EXPERT Ultrasound Diagnostic System Status After Freeze: options for status after freezing. Status After Real Time saving Cine Frames: whether unfreezing upon save or not. 7.6 Report Users can set the layout and diagnostic template for report according to the requirement. - Page 122 ECO 3 EXPERT Ultrasound Diagnostic System 7.6.1 Layout Setting Report Name: display the report type , select the report which you need to set . Report Margin: set the left, right, top and bottom space for the report margin.
- Page 123 ECO 3 EXPERT Ultrasound Diagnostic System UP/Down (on the bottom of fields): adjust the displayed order in report for selected contents in fields. 7.6.2 Diagnostic Template setting Template: show the content of all the template. Name: show the name of the template you have selected.
-
Page 124: Dicom
ECO 3 EXPERT Ultrasound Diagnostic System description you have selected. Delete: delete the content in the template or in the description you have selected. Save: after you complete the setting, select this option to save all the modification. - Page 125 ECO 3 EXPERT Ultrasound Diagnostic System Verify: Press verify button and display whether DICOM setting is correct or not. Add: add DICOM function and pop up setting dialog. Edit: edit information of DIOM function. Delete: delete the existed DICOM function.
-
Page 126: Net Work
ECO 3 EXPERT Ultrasound Diagnostic System corresponding requirements; Compression Ratio: after selecting the JPEG as the compression mode, choose the appropriate compression ratio; Max Framerate: check this option, select proper feamerate according to the requirement. Tips: choosing the DICOM Print type must be before relative print setting. - Page 127 [OK] key to save and exit. Full Screen Show: refer to DICOM. 7.9.4 Installment setting Input relevant key to open trial function and the detail please contact CHISON Company. 7.9.5 Video VGA Choose the video data: NTSC, PAL-M, and PAL-D.
-
Page 128: Chapter 8 System Maintenance
3. When it is necessary to clean the probe connector and peripheral instrument, please contact Sales office contact customer service or agent of CHISON. Any self-cleaning may result in malfunction or degrading the function of device. - Page 129 ECO 3 EXPERT Ultrasound Diagnostic System no image to restart Launch power, gain or STC Control launch power , control errors gain or STC control LED display character Not connect to probe or the Make sure of right menu but no scan image...
-
Page 130: Chapter 9 Probes
ECO 3 EXPERT Ultrasound Diagnostic System Chapter 9 Probes 9.1 General Description Cable Stress Relief Handle Binding line Transducer Scanhead (Lens) Fig. 9-1 Convex Probe Overview The probes provide high spatial and contrast ultrasound imaging of frequencies from 2.0MHz to 11.0MHz. - Page 131 ECO 3 EXPERT Ultrasound Diagnostic System for any damage that would allow liquid to enter the probe. If any damage is suspected, do not use the probe until it has been inspected and repaired/replaced by an authorized Service Representative. NOTE: Keep a log of all probe maintenance, along with a picture of any probe malfunction.
- Page 132 ECO 3 EXPERT Ultrasound Diagnostic System probe. CAUTION: 1. Take extra care when handling the lens face of the Ultrasound transducer. The lens face is especially sensitive and can easily be damaged by rough handling. NEVER use excessive force when cleaning the lens face.
- Page 133 ECO 3 EXPERT Ultrasound Diagnostic System Disinfecting procedure: 1. Obey the cleaning procedure to clean the probe totally. 2. Prepare and retreat the disinfection solution according to the instruction of manufacturer. 3. Put the insertion region of probe into disinfection solution, the inserting depth can’t exceed insertion region.
- Page 134 ECO 3 EXPERT Ultrasound Diagnostic System CAUTION: These transducers are not designed to withstand heat sterilization methods. Exposure to temperatures in excess of 60 º C will cause permanent damage. The transducers are not designed to be totally submerged in fluid, as permanent damage will result if the entire transducer is submerged.
- Page 135 ECO 3 EXPERT Ultrasound Diagnostic System Solution Origin Qualified Use Active Ingredients Quaternary ammonium Aihujia Environmental Surface Wipes Wiping chlorides Quaternary ammonium WIP'ANIO Wiping chlorides Sani-Cloth Bleach Germicidal Wipes Wiping Sodium hypochlorite MetriCide OPA Plus Soaking Orthophthalal-aldehyde CIDEX OPA Soaking...
- Page 136 Before inserting the connector into the probe port, inspect the probe connector pins. If a pin is bent, DO NOT use the probe until it has been inspected and repaired/replaced by a CHISON Service Representative.
- Page 137 ECO 3 EXPERT Ultrasound Diagnostic System FDA March 29, 1991 "Medical Alert on Latex Products". Protective sheaths may be required to minimize disease transmission. Probe sheaths are available for use with all clinical situations where infection is a concern. Use of legally marketed, sterile probe sheaths is strongly recommended for endo-cavitary procedures.
- Page 138 CAUTION: Please do not use any gel or other materials which are not provided by CHISON. Un-authorized gel, lubricants and other materials may corrode probes and other parts of the device, for example the keyboard.
- Page 139 ECO 3 EXPERT Ultrasound Diagnostic System damage: Methanol, ethanol, isopropanol, or any other alcohol-based product. Mineral oil Iodine Lotions Lanolin Aloe Vera Olive Oil Methyl or Ethyl Parabens (para hydroxybenzoic acid) Dimethyl silicone 9.2.4.3 Planned and Special Maintenance...
- Page 140 ECO 3 EXPERT Ultrasound Diagnostic System package are protected from any risk. 9.2.4.4 AIUM Outlines Cleaning the Endocavitary Transducer Guidelines for Cleaning and Preparing Endocavitary Ultrasound Transducers between Patients from AIUM Approved June 4, 2003 The purpose of this document is to provide guidance regarding the cleaning and disinfection of transvaginal and transrectal ultrasound probes.
- Page 141 ECO 3 EXPERT Ultrasound Diagnostic System fungi, and some bacterial spores. Low-Level Disinfection - Destruction of most bacteria, some viruses and some fungi. Low-level disinfection will not necessarily inactivate Mycobacterium Tuberculosis or bacterial spores. 9.2.4.5 Aspetic Tchnique For the protection of the patient and the health care worker, all endocavitary examinations should be performed with the operator properly gloved throughout the procedure.
-
Page 142: Probe Operation Instructions
ECO 3 EXPERT Ultrasound Diagnostic System Sterilization and Disinfection of Medical Devices: General Principles. Centers for Disease Control, Division of Healthcare Quality Promotion. http://www.cdc.gov/ncidod/hip/sterile/sterilgp.htm (5-2003). ODE Device Evaluation Information--FDA Cleared Sterilants and High Level Disinfectants with General Claims for Processing Reusable Medical and Dental Devices, March 2003. - Page 143 ECO 3 EXPERT Ultrasound Diagnostic System suggests that the user identify these patients and be prepared to treat allergic reactions promptly before scanning. Only water-solvable solutions or gel can be used. Petroleum or mineral oil-based materials may harm the cover.
- Page 144 ECO 3 EXPERT Ultrasound Diagnostic System You can clean the transvaginal and transrectal probes to remove all coupling gel by wiping with a soft cloth and rinsing with flowing water. Then wash the probe with mild soap in lukewarm water.
-
Page 145: Service Responsibility
If users install, use and maintain the system fully according to CHISON’s installation manual, operation manual and service manual, then CHISON ECO main unit has a life time of 5 years and CHISON ECO probes have life time of 5 years after ex-work. -
Page 146: Appendix A: The Information Of Ec Representative
ECO 3 EXPERT Ultrasound Diagnostic System Appendix A: The Information of EC Representative Shanghai International Holding Corp.GmbH (Europe) Add: Eiffestrasse 80,20537 Hamburg,Germany Tel: 0049-40-2513175 Fax:0049-40-255726 E-mail: antonsissi@hotmail.com shholding@hotmail.com Page 137 / 191... -
Page 147: Appendix B: Acoustic Output Report Table
ECO 3 EXPERT Ultrasound Diagnostic System Appendix B: Acoustic Output Report Table Transducer Model: C3-A Operating Mode: B Index label Below Below surface surface surface surface – Maximum index value 0.50 0.10 0.10 Index component value 0.10 0.10 0.08 0.10 at Z 0.92... - Page 148 ECO 3 EXPERT Ultrasound Diagnostic System Transducer Model: C3-A Operating Mode: THI-B Index label Below Below surface surface surface surface – Maximum index value 0.50 0.10 0.10 Index component value 0.10 0.10 0.09 0.10 at Z 0.94 r,α – 2.01 2.01...
- Page 149 ECO 3 EXPERT Ultrasound Diagnostic System Transducer Model: C3-A Operating Mode: Below Below Index label surfac surfac surfac surfac – Maximum index value 0.40 0.20 0.30 Index component value 0.14 0.20 0.25 0.30 at Z 0.66 r,α – 24.00 24.00 3.45...
- Page 150 ECO 3 EXPERT Ultrasound Diagnostic System data in the column related to MI. NOTE 6 The depths z and z apply to NON-SCANNING MODES, while the depths pii,α and z apply to SCANNING MODES. sii,α Transducer Model: C3-A Operating Mode:...
- Page 151 ECO 3 EXPERT Ultrasound Diagnostic System NOTE 5 If the requirements of 201.12.4.2b) are met, it is not required to enter any data in the column related to MI. NOTE 6 The depths z and z apply to NON-SCANNING MODES, while the depths pii,α...
- Page 152 ECO 3 EXPERT Ultrasound Diagnostic System related to TIS, TIB or TIC. NOTE 5 If the requirements of 201.12.4.2b) are met, it is not required to enter any data in the column related to MI. NOTE 6 The depths z...
- Page 153 ECO 3 EXPERT Ultrasound Diagnostic System related to TIS, TIB or TIC. NOTE 5 If the requirements of 201.12.4.2b) are met, it is not required to enter any data in the column related to MI. NOTE 6 The depths z...
- Page 154 ECO 3 EXPERT Ultrasound Diagnostic System NOTE 4 If the requirements of 201.12.4.2a) are met, it is not required to enter any data in the columns related to TIS, TIB or TIC. NOTE 5 If the requirements of 201.12.4.2b) are met, it is not required to enter any data in the column related to MI.
- Page 155 ECO 3 EXPERT Ultrasound Diagnostic System NOTE 4 If the requirements of 201.12.4.2a) are met, it is not required to enter any data in the columns related to TIS, TIB or TIC. NOTE 5 If the requirements of 201.12.4.2b) are met, it is not required to enter any data in the column related to MI.
- Page 156 ECO 3 EXPERT Ultrasound Diagnostic System NOTE 4 If the requirements of 201.12.4.2a) are met, it is not required to enter any data in the columns related to TIS, TIB or TIC. NOTE 5 If the requirements of 201.12.4.2b) are met, it is not required to enter any data in the column related to MI.
- Page 157 ECO 3 EXPERT Ultrasound Diagnostic System NOTE 4 If the requirements of 201.12.4.2a) are met, it is not required to enter any data in the columns related to TIS, TIB or TIC. NOTE 5 If the requirements of 201.12.4.2b) are met, it is not required to enter any data in the column related to MI.
- Page 158 ECO 3 EXPERT Ultrasound Diagnostic System NOTE 4 If the requirements of 201.12.4.2a) are met, it is not required to enter any data in the columns related to TIS, TIB or TIC. NOTE 5 If the requirements of 201.12.4.2b) are met, it is not required to enter any data in the column related to MI.
- Page 159 ECO 3 EXPERT Ultrasound Diagnostic System NOTE 4 If the requirements of 201.12.4.2a) are met, it is not required to enter any data in the columns related to TIS, TIB or TIC. NOTE 5 If the requirements of 201.12.4.2b) are met, it is not required to enter any data in the column related to MI.
- Page 160 ECO 3 EXPERT Ultrasound Diagnostic System NOTE 4 If the requirements of 201.12.4.2a) are met, it is not required to enter any data in the columns related to TIS, TIB or TIC. NOTE 5 If the requirements of 201.12.4.2b) are met, it is not required to enter any data in the column related to MI.
- Page 161 ECO 3 EXPERT Ultrasound Diagnostic System NOTE 4 If the requirements of 201.12.4.2a) are met, it is not required to enter any data in the columns related to TIS, TIB or TIC. NOTE 5 If the requirements of 201.12.4.2b) are met, it is not required to enter any data in the column related to MI.
- Page 162 ECO 3 EXPERT Ultrasound Diagnostic System NOTE 4 If the requirements of 201.12.4.2a) are met, it is not required to enter any data in the columns related to TIS, TIB or TIC. NOTE 5 If the requirements of 201.12.4.2b) are met, it is not required to enter any data in the column related to MI.
- Page 163 ECO 3 EXPERT Ultrasound Diagnostic System NOTE 4 If the requirements of 201.12.4.2a) are met, it is not required to enter any data in the columns related to TIS, TIB or TIC. NOTE 5 If the requirements of 201.12.4.2b) are met, it is not required to enter any data in the column related to MI.
- Page 164 ECO 3 EXPERT Ultrasound Diagnostic System NOTE 4 If the requirements of 201.12.4.2a) are met, it is not required to enter any data in the columns related to TIS, TIB or TIC. NOTE 5 If the requirements of 201.12.4.2b) are met, it is not required to enter any data in the column related to MI.
- Page 165 ECO 3 EXPERT Ultrasound Diagnostic System NOTE 4 If the requirements of 201.12.4.2a) are met, it is not required to enter any data in the columns related to TIS, TIB or TIC. NOTE 5 If the requirements of 201.12.4.2b) are met, it is not required to enter any data in the column related to MI.
- Page 166 ECO 3 EXPERT Ultrasound Diagnostic System NOTE 4 If the requirements of 201.12.4.2a) are met, it is not required to enter any data in the columns related to TIS, TIB or TIC. NOTE 5 If the requirements of 201.12.4.2b) are met, it is not required to enter any data in the column related to MI.
- Page 167 ECO 3 EXPERT Ultrasound Diagnostic System transcranial or neonatal cephalic uses. NOTE 4 If the requirements of 201.12.4.2a) are met, it is not required to enter any data in the columns related to TIS, TIB or TIC. NOTE 5 If the requirements of 201.12.4.2b) are met, it is not required to enter any data in the column related to MI.
- Page 168 ECO 3 EXPERT Ultrasound Diagnostic System NOTE 3 Information need not be provided regarding TIC for any TRANSDUCER ASSEMBLY not intended for transcranial or neonatal cephalic uses. NOTE 4 If the requirements of 201.12.4.2a) are met, it is not required to enter any data in the columns related to TIS, TIB or TIC.
- Page 169 ECO 3 EXPERT Ultrasound Diagnostic System NOTE 3 Information need not be provided regarding TIC for any TRANSDUCER ASSEMBLY not intended for transcranial or neonatal cephalic uses. NOTE 4 If the requirements of 201.12.4.2a) are met, it is not required to enter any data in the columns related to TIS, TIB or TIC.
- Page 170 ECO 3 EXPERT Ultrasound Diagnostic System NOTE 3 Information need not be provided regarding TIC for any TRANSDUCER ASSEMBLY not intended for transcranial or neonatal cephalic uses. NOTE 4 If the requirements of 201.12.4.2a) are met, it is not required to enter any data in the columns related to TIS, TIB or TIC.
- Page 171 ECO 3 EXPERT Ultrasound Diagnostic System TIS or TIB. NOTE 3 Information need not be provided regarding TIC for any TRANSDUCER ASSEMBLY not intended for transcranial or neonatal cephalic uses. NOTE 4 If the requirements of 201.12.4.2a) are met, it is not required to enter any data in the columns related to TIS, TIB or TIC.
- Page 172 ECO 3 EXPERT Ultrasound Diagnostic System TIS or TIB. NOTE 3 Information need not be provided regarding TIC for any TRANSDUCER ASSEMBLY not intended for transcranial or neonatal cephalic uses. NOTE 4 If the requirements of 201.12.4.2a) are met, it is not required to enter any data in the columns related to TIS, TIB or TIC.
- Page 173 ECO 3 EXPERT Ultrasound Diagnostic System TIS or TIB. NOTE 3 Information need not be provided regarding TIC for any TRANSDUCER ASSEMBLY not intended for transcranial or neonatal cephalic uses. NOTE 4 If the requirements of 201.12.4.2a) are met, it is not required to enter any data in the columns related to TIS, TIB or TIC.
- Page 174 ECO 3 EXPERT Ultrasound Diagnostic System TIS or TIB. NOTE 3 Information need not be provided regarding TIC for any TRANSDUCER ASSEMBLY not intended for transcranial or neonatal cephalic uses. NOTE 4 If the requirements of 201.12.4.2a) are met, it is not required to enter any data in the columns related to TIS, TIB or TIC.
- Page 175 ECO 3 EXPERT Ultrasound Diagnostic System TIS or TIB. NOTE 3 Information need not be provided regarding TIC for any TRANSDUCER ASSEMBLY not intended for transcranial or neonatal cephalic uses. NOTE 4 If the requirements of 201.12.4.2a) are met, it is not required to enter any data in the columns related to TIS, TIB or TIC.
- Page 176 ECO 3 EXPERT Ultrasound Diagnostic System TIS or TIB. NOTE 3 Information need not be provided regarding TIC for any TRANSDUCER ASSEMBLY not intended for transcranial or neonatal cephalic uses. NOTE 4 If the requirements of 201.12.4.2a) are met, it is not required to enter any data in the columns related to TIS, TIB or TIC.
- Page 177 ECO 3 EXPERT Ultrasound Diagnostic System TIS or TIB. NOTE 3 Information need not be provided regarding TIC for any TRANSDUCER ASSEMBLY not intended for transcranial or neonatal cephalic uses. NOTE 4 If the requirements of 201.12.4.2a) are met, it is not required to enter any data in the columns related to TIS, TIB or TIC.
- Page 178 ECO 3 EXPERT Ultrasound Diagnostic System TIS or TIB. NOTE 3 Information need not be provided regarding TIC for any TRANSDUCER ASSEMBLY not intended for transcranial or neonatal cephalic uses. NOTE 4 If the requirements of 201.12.4.2a) are met, it is not required to enter any data in the columns related to TIS, TIB or TIC.
- Page 179 ECO 3 EXPERT Ultrasound Diagnostic System TIS or TIB. NOTE 3 Information need not be provided regarding TIC for any TRANSDUCER ASSEMBLY not intended for transcranial or neonatal cephalic uses. NOTE 4 If the requirements of 201.12.4.2a) are met, it is not required to enter any data in the columns related to TIS, TIB or TIC.
- Page 180 ECO 3 EXPERT Ultrasound Diagnostic System TIS or TIB. NOTE 3 Information need not be provided regarding TIC for any TRANSDUCER ASSEMBLY not intended for transcranial or neonatal cephalic uses. NOTE 4 If the requirements of 201.12.4.2a) are met, it is not required to enter any data in the columns related to TIS, TIB or TIC.
- Page 181 ECO 3 EXPERT Ultrasound Diagnostic System TIS or TIB. NOTE 3 Information need not be provided regarding TIC for any TRANSDUCER ASSEMBLY not intended for transcranial or neonatal cephalic uses. NOTE 4 If the requirements of 201.12.4.2a) are met, it is not required to enter any data in the columns related to TIS, TIB or TIC.
- Page 182 ECO 3 EXPERT Ultrasound Diagnostic System TIS or TIB. NOTE 3 Information need not be provided regarding TIC for any TRANSDUCER ASSEMBLY not intended for transcranial or neonatal cephalic uses. NOTE 4 If the requirements of 201.12.4.2a) are met, it is not required to enter any data in the columns related to TIS, TIB or TIC.
- Page 183 ECO 3 EXPERT Ultrasound Diagnostic System NOTE 3 Information need not be provided regarding TIC for any TRANSDUCER ASSEMBLY not intended for transcranial or neonatal cephalic uses. NOTE 4 If the requirements of 201.12.4.2a) are met, it is not required to enter any data in the columns related to TIS, TIB or TIC.
- Page 184 ECO 3 EXPERT Ultrasound Diagnostic System NOTE 3 Information need not be provided regarding TIC for any TRANSDUCER ASSEMBLY not intended for transcranial or neonatal cephalic uses. NOTE 4 If the requirements of 201.12.4.2a) are met, it is not required to enter any data in the columns related to TIS, TIB or TIC.
- Page 185 ECO 3 EXPERT Ultrasound Diagnostic System TIS or TIB. NOTE 3 Information need not be provided regarding TIC for any TRANSDUCER ASSEMBLY not intended for transcranial or neonatal cephalic uses. NOTE 4 If the requirements of 201.12.4.2a) are met, it is not required to enter any data in the columns related to TIS, TIB or TIC.
- Page 186 ECO 3 EXPERT Ultrasound Diagnostic System TIS or TIB. NOTE 3 Information need not be provided regarding TIC for any TRANSDUCER ASSEMBLY not intended for transcranial or neonatal cephalic uses. NOTE 4 If the requirements of 201.12.4.2a) are met, it is not required to enter any data in the columns related to TIS, TIB or TIC.
- Page 187 ECO 3 EXPERT Ultrasound Diagnostic System NOTE 3 Information need not be provided regarding TIC for any TRANSDUCER ASSEMBLY not intended for transcranial or neonatal cephalic uses. NOTE 4 If the requirements of 201.12.4.2a) are met, it is not required to enter any data in the columns related to TIS, TIB or TIC.
-
Page 188: Appendix C: Guidance And Manufacturer's Declaration
1. Guidance and manufacturer’s declaration – electromagnetic emissions The ECO 3 EXPERT is intended for use in the electromagnetic environment specified below. The customer or the user of the ECO 3 EXPERT should assure that it is used in such an environment. - Page 189 3 Guidance and manufacturer’s declaration – electromagnetic immunity The ECO 3 EXPERT is intended for use in the electromagnetic environment specified below. The customer or the user of the ECO 3 EXPERT should assure that it is used in such an environment.
- Page 190 RF transmitters, an electromagnetic site survey should be considered. If the measured field strength in the location in which the ECO 3 EXPERT is used exceeds the applicable RF compliance level above, the ECO 3 EXPERT should be observed to verify normal operation.
- Page 191 ECO 3 EXPERT Ultrasound Diagnostic System as recommended below, according to the maximum output power of the communications equipment. Rated maximum Separation distance according to frequency of transmitter output power of transmitter 0,01 0,12 0,12 0,23 0,38 0,38 0,73 For transmitters rated at a maximum output power not listed above, the recommended...
-
Page 192: Appendix D: Measurement Results Summary
ECO 3 EXPERT Ultrasound Diagnostic System Appendix D: Measurement Results Summary Measurement Useful Range Accuracy Distance Full Screen <± 5% Circumference: Full Screen <± 5% trace method, ellipse method Area: Full Screen <± 10% trace method, ellipse method Volume Full screen <±... -
Page 193: Appendix E: Display Accuracy And Acoustic Measurement Uncertainties
ECO 3 EXPERT Ultrasound Diagnostic System Appendix E: Display Accuracy and Acoustic Measurement Uncertainties According to IEC60601-2-37 and NEMA UD-3 2004, the display accuracy and acoustic measurement uncertainties are summarized in the table below. Display accuracy of MI is ± 20%, and TI is ± 40% or <0.1, if MI, TI below 0.5. -
Page 194: Appendix F: Transducer Maximum Surface Temperature
The calculation of the expanded uncertainty is based on the ISO Guide tout ye Expression of uncertainty in measurement. Three transducer samples have been tested and the confidence coefficient is at 95%, the value of t.975 is 4.30. The measurement data were obtained under the test conditions employed at CHISON. Maximum surface Transducer model temperature(℃) -
Page 195: Appendix G: Procedures Of Setting Network Sharing
ECO 3 EXPERT Ultrasound Diagnostic System Appendix G: Procedures of Setting Network Sharing For Windows set up, set up a shared document 1. Choose the file you want to share, as the “test” file. 2. Right click this file, choose “properties”, and click “share”. - Page 196 ECO 3 EXPERT Ultrasound Diagnostic System 5. If the windows have not set the code, then turn off the password protected sharing is necessary. instructions as the image shows. a) Click “network and sharing center” in the sharing properties. b) In the network and sharing center interface, choose “public”, in the password protected sharing, choose turn off password protected sharing.
- Page 197 ECO 3 EXPERT Ultrasound Diagnostic System Set up in system IP set up 1. First, confirm the service address of shared files, you can get the IP address in windows interface. In windows “start”-“run” type in “cmd” and enter, then type in “ ipconfig” and enter, you can see the IP address of local service.
- Page 198 ECO 3 EXPERT Ultrasound Diagnostic System 3. Choose net “storage” interface, type in service name, IP address, user name, password and the name of shared files, click “add” to add a network storage, you can choose the export route. As shown in the picture.
- Page 199 ECO 3 EXPERT Ultrasound Diagnostic System Ping: test if the IP is connected or not. Clear: clear all the IP address, user name, password and names of shared file Update: update the content to the chosen item. Delete: delete the chosen service item.
- Page 200 ECO 3 EXPERT Ultrasound Diagnostic System 2. Configure Net Printer Operation: a) Input name and IP Address which has installed printer equipment. b) Choose [Ping] to confirm whether the net connect normally. c) Select PPD File and press [Add], the net connecting information can be saved on the Printer List.
- Page 201 CHISON CHISON Medical Technologies Co., Ltd. No.3 Changjiang South Road, Xinwu District, Wuxi, 214028 Jiangsu, P.R. China...
Need help?
Do you have a question about the ECO 3 EXPERT and is the answer not in the manual?
Questions and answers