AstroAI GL-1402A - 250PSI Digital Tire Inflator with Tire Pressure Gauge Manual
- User manual (27 pages)
Advertisement
INTRODUCTION
Thank you for purchasing the AstroAl 250 PSI Inflator Tire Pressure Gauge.
Inflate tires without having to continually check and adjust the pressure. We hope you enjoy your new Inflator Tire Pressure Gauge.
If you have any questions or concerns about your new product, you are welcome to contact us with your question via support@astroai.com
 Please fully read and understand the instructions in this manual before using this product and keep it for future reference.

- Read and follow these instructions before use.
- Do not use the product for unintended purposes.
- Do not use this product if it is defective.
- Keep this product out of children's reach.
- Do not expose this product to rain or water.
- Keep this product away from fire, corrosive liquids and magnetic materials.
- The product is only compatible with Schrader Valves.
- Do not exceed the maximum pressure of the device.
- Remove the battery if not in use for extended periods of time.
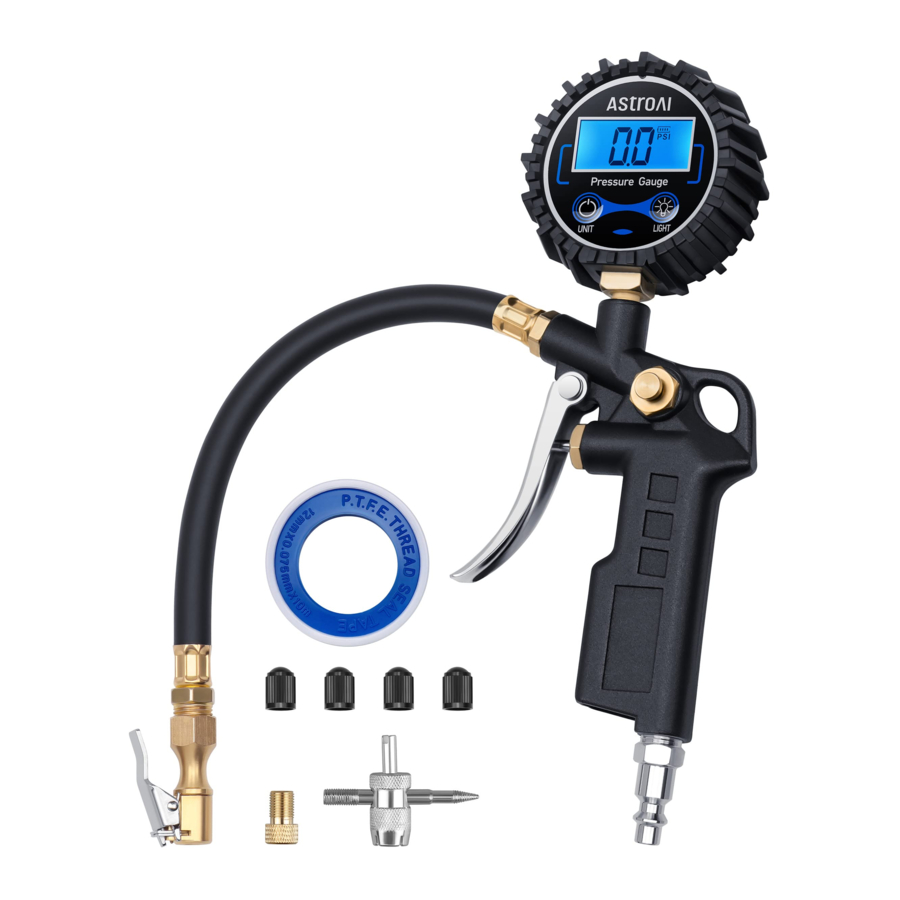
DIAGRAM

- Rubber Hose
- Digital Gauge Display
- Light Button
- Power / Unit Button
- Interchangeable Brass Chucks
- Air Bleed Valve / Reset Button
- '¼' NPT Steel Threaded Female Connectors
- Battery Compartment
- Valve Trigger
- Valve Caps
- Valve Core Tool
- Thread Seal Tape Roll
OPERATION INSTRUCTIONS
CHECKING TIRE PRESSURE
- Connect the inflator gauge to an air compressor using the quick-connect air fitting.
![]()
- Turn the inflator gauge on by pressing the Power / Unit button. Press it again to select the unit you would like to measure in. Press the Air Bleed Valve / Reset button to ensure the gauge is set to zero.
![]()
- Use the chuck to connect to the tire valve by pressing the tire's valve stem into the mouth of the chuck. The twist-on chuck will screw into the threads of the tire's valve stem. For the locking chuck, press the trigger while placing it onto the valve stem and release it once there is a strong seal. It should lock into place.
![]()
- Fill by pressing the valve trigger until the desired pressure is reached.
![]()


NOTE: While filling the tire, the pressure reading will not indicate the exact pressure of the tire. To check on the tire's current pressure, release the valve trigger and the display will instantaneously show the tire's pressure.
- Release excess air by using the Air Bleed Valve / Reset button. If the tire's pressure is higher than the desired level, press the Air Bleed Valve to decrease the pressure.
![]()
NOTE: While bleeding air from the tire, the pressure reading will not indicate the exact pressure of the tire. To check on the tire's current pressure, release the Air Bleed Valve and the display will instantaneously show the tire's pressure. - The gauge will automatically shut off 20-60 seconds after use. The gauge can be manually turned off by holding the Power/ Unit button down for more than three seconds
![]() .
.

 .
.- The inflator gauge can be used to check tire pressure without connecting to an air compressor.
- Use one of the interchangeable air chucks to connect the inflator to the tire's valve stem. Press the air chuck tight to prevent air leakage.
- Press the Power/Unit button to turn on the tire inflator gauge, press it again to choose the desired unit.
NOTE: What to do if air leaks through the chuck?
- Connect the chuck to the tire valve and press hard to get a good seal.
- Rotate the chuck clockwise 180°-360° to stop the air from leaking.
CHANGING THE BATTERY
- Locate the battery compartment on the back of the tire pressure gauge and remove the back cover.
![]()
- Locate the 2 x AAA batteries, remove them, and replace them with new batteries. Ensure the batteries are placed in the correct direction, matching polarity with the indicated diagrams.
![]()


SPECIFICATIONS
| Inflation Range Accuracy Display Resolution Display Type Measurement Units Compatibility | 0-250 PSI ±1% 0.1 PSI Backlit LCD PSI, kPa, bar, kg/cm² NPT Air Compressor Connectors |
TROUBLESHOOTING
Air Leaking Solution
- It is normal for air to leak slightly when the chuck is connected and removed from the tire valve.
- Check if there is a strong seal between the chuck and tire valve.
- Adjust the angle between the air chuck and tire valve.
- Check all the connection points of the air compressor, inflator, quick-connect fitting, air chuck, and tire valve stem. All connections should not leak; threads may require Teflon tape for a complete seal.
- Contact us for help.
Inaccurate Reading Solution
- Adjust the angle between the air chuck and the tire valve to ensure a strong seal.
- Small reading differences between gauges are normal. For large discrepancies, please contact us for help.
Slow Inflation
Solution: It takes approximately 2 minutes to inflate a normal car tire from 0 to 35 PSI. If it takes longer to do so, please contact us.
Backlit Will Not Turn on
Solution: Press the Backlit button. If it does not work, replace the battery.
Automatically Turning off / LCD Displays 'ER5'
Solution: Contact us for replacement.
Device Will Not Turn on / Screen Flashing
Solution: Contact us for replacement.
To learn more about us, please visit us at astroai.com
Documents / Resources
References
Download manual
Here you can download full pdf version of manual, it may contain additional safety instructions, warranty information, FCC rules, etc.
Download AstroAI GL-1402A - 250PSI Digital Tire Inflator with Tire Pressure Gauge Manual
Advertisement


Need help?
Do you have a question about the GL-1402A and is the answer not in the manual?
Questions and answers