
Related Manuals for Berry BM1000


Summary of Contents for Berry BM1000
- Page 1 User Manual Fingertip Pulse Oximeter Model: BM1000 Shanghai Berry Electronic Tech Co., Ltd. Release date: 26/11/2021 Version: 1.0...
-
Page 2: Install Battery
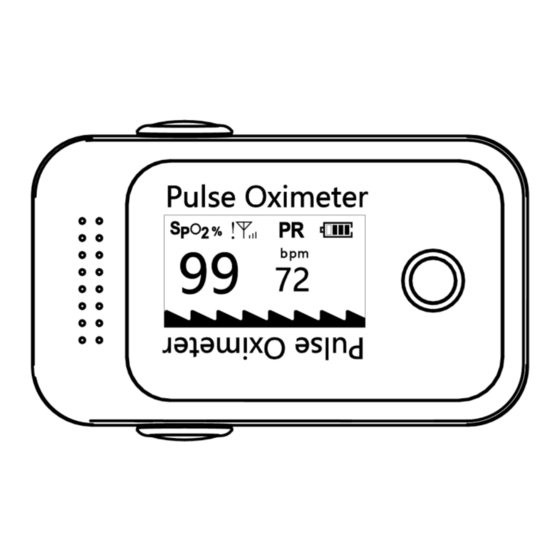
Quick Operation Guide: 1. Install Battery 1) To remove the back cover compartment, push the white button and follow the direction of the printed arrows. 2) Install two AAA batteries into the battery compartment. Match the plus (+) and minus (-) signs in the compartment. - Page 3 3) The data (SpO and Pulse Rate) will read as below. Don’t move the finger; be sure to remain motionless during the reading. 4) Once the measurement is finished, it will display “Thank you” as shown below. Remove finger. The device will turn off automatically. Thank you...
-
Page 4: Product Description
Main page Product Description The pulse oximeter is an important, common device that checks oxygen saturation (SpO and pulse rate. It is a small, compact, simple, reliable, and durable physiological monitoring device. It contains the mainboard, OLED display, and dry batteries. Intended Use The pulse oximeter is a reusable device intended for intermittent checks of oxygen saturation and pulse rate for adults in a clinical environment. -
Page 5: Safety Information
Diagram of Measurement Principle Safety Information • Anyone who uses the pulse oximeter must receive adequate training before use. • The pulse oximeter is only meant to assess patients’ physiological conditions. It must be used in conjunction with clinical symptoms. It is not intended for treatment. - Page 6 • A functional tester can’t be used to assess the accuracy. • If the patient is the intended operator, the patient must read the operation manual carefully or consult with a doctor and/or manufacturer before usage. If there’s any discomfort while using the pulse oximeter, stop usage immediately and go to the hospital.
- Page 7 • Change sensor location and check skin integrity and circulatory status at least every 2 hours. Factors affecting measurement accuracy: • The measurements depend on absorption of a special wavelength ray by oxidized hemoglobin and deoxyhemoglobin. The concentration of non- functional hemoglobin may affect the accuracy of the measurement.
-
Page 8: Display Introduction
Display Introduction Figure 2 Battery and Lanyard Installation To remove the back cover compartment, push the white button and follow the direction of the printed arrows. Install two AAA batteries into the battery compartment. Match the plus (+) and minus (-) signs in the compartment. -
Page 9: Directions For Use
Warning! Keep the oximeter away from young children. Small items such as the battery door, battery, and lanyard are choking hazards. Directions for Use 1. After properly installing two AAA batteries, push down on the lid’s press sign as shown in the Figure 5 and open the clip. -
Page 10: Function Description
Function Description 1. Press the “POWER/FUNCTION” button to power on the device. Press it again to rotate the display orientation, as shown in Figure 7 and Figure 8. Figure 7 Figure 8 2. Press and hold the “POWER/FUNCTION” button for more than 3 seconds to show the IMEI and SIM card number. - Page 11 Figure 11 Figure 12 Figure 13 5. The product will automatically shut down when there is no finger inserted for more than 10 seconds or after upload is finished. Network Indicator Description SYMBOL DESCRIPTION SIM card is not inserted No signal Signal is weak Signal is normal Signal is good...
-
Page 12: Cleaning And Disinfection
Cleaning and Disinfection • Do not immerse the oximeter and any relevant accessories in water or disinfectant. • We recommend that the product be disinfected only when necessary to avoid long-term damage to the product. • Don’t use cleaning agents/disinfectants other than the recommended models. •... -
Page 13: Technical Specifications
Technical Specifications 1. Display Mode: OLED 2. SpO Measurement range: 0~100% Accuracy: ±3% (70%~100%) 3. Pulse Rate: Measurement range: 25~250bpm Accuracy: ±2bpm • Pulse Rate accuracy has passed verification and comparison with the SpO simulator. 4. Low Perfusion: Range: 0.5%~20% Accuracy: ±3% (70%~100%) PR Accuracy: 25~250bpm ±2bpm 5. - Page 14 LED: Wavelength: 660nm/905nm Output Power: <0.1mW Arms Specifications 1. SpO Arms: RANGE ARMS SPECIFICATION 70% – 80% 1.65 80% – 90% 1.22 90% – 100% 1.11 2. Clinical Data Graphical Plot:...
-
Page 15: Troubleshooting
Troubleshooting TROUBLE POSSIBLE REASON SOLUTION The SpO and PR 1. The finger is not properly 1. Please try again. can’t be displayed positioned. 2. Try again. Go to a hospital normally, and the 2. The patient’s SpO is too low for a diagnosis if you are value disappeared. -
Page 16: Symbol Meaning
Date of manufacture. Serial Number. Batch Code. Catalogue numbe. IP22 Degrees of protection provided by enclosure. Shanghai Berry Electronic Tech Co., Ltd. Unit 104, 1 Floor, 7 Building, No.1188 Lianhang Road, Minhang District, Shanghai, China 201112 TEL: +86-21-5853 1958 FAX: +86-21-5853 0420 WEB: www.shberrymed.com... -
Page 17: Appendix A-Emc Declaration
Appendix A—EMC Declaration Guidance and manufacturer’s declaration—electromagnetic emissions— for all EQUIPMENT and SYSTEMS Guidance and manufacturer’s declaration—electromagnetic emission The Pulse Oximeter is intended for use in the electromagnetic environment specified below. The customer or the user of the Pulse Oximeter should assure that it is used in such an environment. -
Page 18: Guidance And Manufacturer's Declaration - Electromagnetic Immunity
Discharges shall be applied with no connection to an artificial hand and no connection to PATIENT simulation. PATIENT simulation may be connected after the test as needed in order to verify BASIC SAFETY and ESSENTIAL PERFORMANCE. Applies only to ME EQUIPMENT and ME SYSTEMS with magnetically sensitive components or circuitry. - Page 19 additional test frequency shall be used in the ISM or amateur radio band. This applies to each ISM and amateur radio band within the specified frequency range. - The ISM (industrial, scientific and medical) bands between 0.15 MHz and 80 MHz are 6.765 MHz to 6.795 MHz;...
- Page 20 1970 GSM 1900; DECT; LTE Band 1, 3, 4, 25; UMTS 2450 2400—2570 Bluetooth, Pulse modulation WLAN, 217 Hz 802.11 b/g/n, RFID 2450, LTE Band 7 5240 5100—5800 WLAN 802.11 a/n Pulse modulation 217 Hz 5500 5785 NOTE: If necessary to achieve the IMMUNITY TEST LEVEL, the distance between the transmitting antenna and the ME EQUIPMENT or ME SYSTEM may be reduced to 1 m.
Need help?
Do you have a question about the BM1000 and is the answer not in the manual?
Questions and answers