WAGAN Tech 7010 - 3-in-1 Electric Jack, Impact Wrench & Air Compressor Manual
Also See for 7010:
- User manual (17 pages)
Advertisement
Table of Contents
Contents
WAGAN Tech 7010 - 3-in-1 Electric Jack, Impact Wrench & Air Compressor Manual
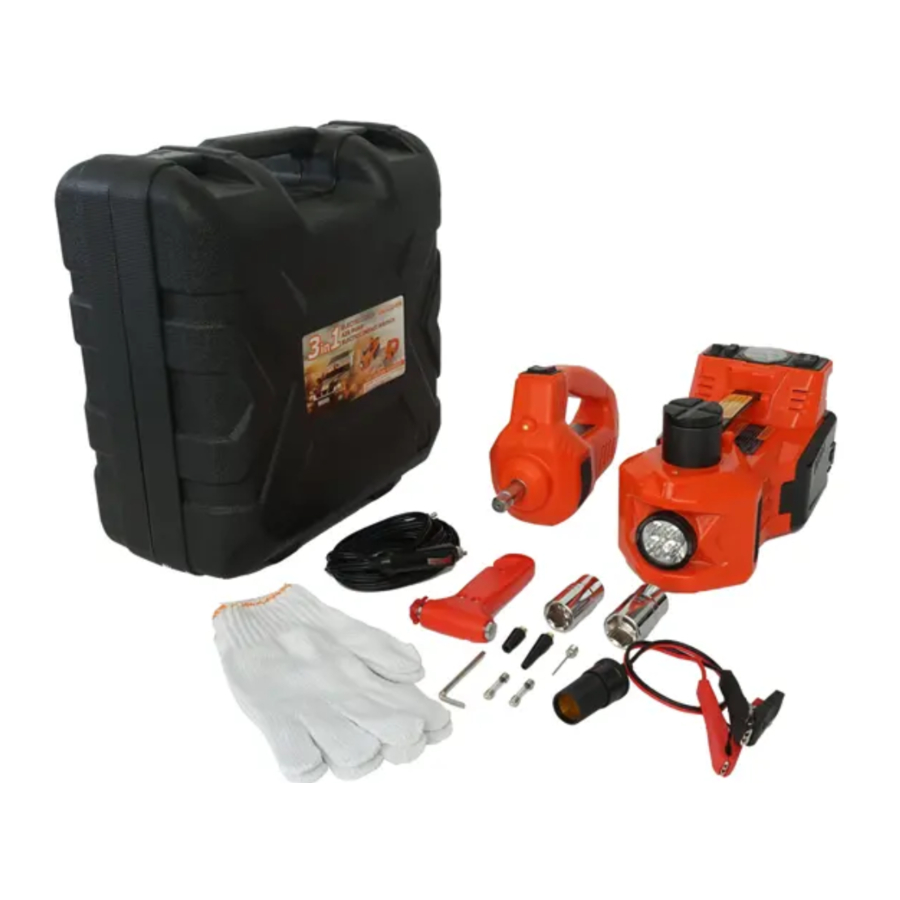
INCLUDED
| Name | Quantity |
| 2 in 1 Electric Jack | 1 pc |
| Electric Impact Wrench | 1 pc |
| Safety Hammer | 1 pc |
| Plastic Tool Box | 1 pc |
| Battery Clamp Connecting Cable | 1 pc |
| Gloves | 1 pair |
| 12V DC Power Cable | 1 pc |
| Socket Adapters | 2 pcs |
| Fuse | 2 pcs |
| Instruction Manual | 1 pc |
2-in-1 Electric Jack
FEATURES
- Advantages: Fashionable and beautiful design, adopting advanced electric machinery technology. Low noise, high speed, stable lifting performance and more.
- Safety: As a safety consideration, the machine is designed with a selflocking power structure and overload protection In other words: when the power has been disconnected, the lifted jack will not fall. After re-connecting the power, the jack will go on working. Otherwise, use the safety knob to lower the car, which will protect the operator's personal safety.
- Practical: In order to be more convenient, the machine also has Tire Inflator Pump, Illumination, and Warning functions. The machine combines two main functions: Car Jack and Tire Inflator Pump.
- Application: The machine is widely used for your family car, go-anywhere vehicle, and multi-purpose vehicle.
SPECIFICATIONS
| Electric Jack: | |
| Input Voltage | 12V DC |
| Rated Power | 150W |
| Rated Current | 13A |
| Fuse | 15A |
| Length of Power Cable | 3.5 m |
| Max. Load Car Weight | 3.0 T |
| Lift Height Range | 155–450 mm |
| Working Temperature | −15~50 ˚C |
| Inflator Pump: | |
| Input Voltage | 12V DC |
| Inflating Speed | 35 L/min |
| Working Current | 10A |
| Pressure | 10 BAR/150 PSI |
| Length of Air Hose | 600 mm |
| Cylinder Diameter | 25 mm |
PRODUCT PARTS

Diagram One
| 1 | Switches | See Diagram Three |
| 2 | Storage Box | Air hose storage |
| 3 | Pressure Rod | For lifting |
| 4 | Top Light | Illumination for Chassis |
| 5 | Front Light | For illumination |
| 6 | Protective Pad | Protective pad for lifting |
| 7 | Adjustment Screw | Adjust the distance of the pressure rod and automobile chassis |

Diagram Two
| NO. | NAME | DESCRIPTION |
| 1 | Pressure Rod Set | See Diagram One |
| 2 | Front Light | For Illumination |
| 3 | Safety Valve | Unlock the pressure rod in emergencies |
| 4 | Handle | Hold if moving the jack |
| 5 | Tool Box | Small tool storage |
| 6 | Switches | See Diagram Three |
| 7 | Cable Socket | Connect the 12V DC power cable |
| 8 | 12V DC Power Cable | Power cable with car cigarette lighter socket head |
| 9 | Warning Light | Safety and warning indicator |

Diagram Three
| NO. | NAME | DESCRIPTION |
| 1 | Direction Switch | Up/Close/Down |
| 2 | Pressure Gauge | Pressure display |
| 3 | Function Switch | Inflate/Close/Lift |
| 4 | Light Switch | On/Off |
| U | Up | |
| D | Down | |
 | Inflate | |
 | Lift | |
| O | Close |
USAGE
Jack Function
- Stop the car and engage the car brake.
- Check the machine switch, confirming it is in the off "O" position. If not, please do so first, then connect the power plug into the car cigarette lighter socket. (Note: if the car battery is not charged enough, please charge it first by starting the car engine or replacing the battery)
- Position the jack by the side of car tire and ensure the center of the Pressure Rod is aligned to the loading part of automobile chassis. Then rotate the adjustment screw to make it as close to the automobile chassis as possible.
- Toggle the function switch to "Lift" and the direction switch to "Up". The jack will begin to operate. When the distance between the car tire and the floor is about 5cm, switch off the power. While the power is disconnected, the machine will automatically lock and won't fall.
- After changing the tire, flip the direction switch to "Down". The jack will start to fall at a constant speed.
- When finished operating, collect the cables and tools in the box.
Inflation Function
- Prepare for the equipment. Pull out the air hose and choose the correct inflatable head to connect. Then turn on the power.
- Adjust the function switch to "Inflation". The machine will start to inflate. Please observe the change in pressure with the pressure gauge.
- When finishing, please switch off the power first, then disconnect the inflatable head and store in the tool box. Disconnect the power plug from the cigarette lighter socket and collect the cables into the tool box.
NOTE: when inflating, do not use continuously for more than 10 minutes.
SAFETY WARNINGS
- Please read this manual carefully before using.
- The material of the cover is plastic, which is easy to break. Please handle it with care when using. When carrying, please use the handle. Do NOT lift by the pressure rod.
- Do not attempt to disassemble the machine to avoid breaking the machine and voiding the warranty.
- Do not operate for an overly extended period. When not using, please turn off the power.
- Avoid dropping the machine into the water or using in bad condition.
- Check the power Car Cigarette Lighter socket uses 12V DC/15A power before use.
- Take notice of the smooth floor and loading capacity when using. Also pay attention to locating the exact loading position of the car before the lifting operation.
- Do not overload when using the machine. Make sure to keep upright and in contact with the lifting car while operating. Never operate it at a slant.
- Do not pull the power cable casually when using. Avoid breaking the cable or causing a short circuit.
- Make sure the car is in park and on the side of the road before using. Turn off the engine before using.
- In the process of using the machine, ensure the operator stays with it throughout the operation. In case the operator has to leave for a short while, please shut off the machine first.
- The machine uses the power of precise hydraulic oil. Please keep adequately ventilated. Avoid using in especially high or low temperatures.
The working temperature should be between −15 ˚C and 50 ˚C.
TROUBLESHOOTING
Jack is not working
- Check whether the vehicle power is on.
- Check whether the function switch is in the correct function position.
- Check if the indicator LED for the cigarette lighter plug is lit or not. If not, please re-connect the plug. If after re-connecting, it is still not lit, please check whether the internal fuse of the cigarette lighter plug is destroyed.
- Check whether the plug connecting the power cable and the jack is loose from the jack or disconnected.
- If the socket is not powered, check whether the plug connecting the power cable and the 12V DC plug is loose. Please connect the power correctly. If the power switch is in the position of "O", please move the switch to "I" (See Diagram Three). Check whether the cigarette lighter plug fuse is broken, if it is, please replace it, then try again.
Not Inflating
- Check whether the inflator pump will start.
- Check whether the nozzle of air hose is correctly connected to the tire air nozzle.
- Inspect the air hose to see if it is leaking air.
The pressure rod does not rise
- Confirm whether the jack motor starts correctly.
- Check whether the function switch is in the JACK function position, and also check that the direction is correctly selected with the "Up/Down" switch
- Check whether the lowest temperature is within the working temperature range for this product. If not, please preheat the jack first, thawing the hydraulic oil before using it.
- Not using the machine for a long time may cause the oil to thicken. Please first switch the direction to "Down" for one minute when starting, then press the switch to "Up".
The pressure rod does not lower
- Confirm whether the jack motor starts correctly.
- Check whether the function switch is in the JACK function position, and also check that the direction is correctly selected with the "Up/Down" switch".
- Not using the machine for a long time may cause the oil to thicken. Please first switch the direction to "Up" for one minute when starting, then press the switch to "Down".
- Remove the head of safety valve(See Diagram Two, point 3), loosen the safety valve with hex key (rotate about half circle counterclockwise) till the pressure rod falls to the lower position, then tighten it again.
Electric Impact Wrench
SPECIFICATIONS
- Voltage: 12V DC
- Max. Current: 12A
- Rated Power: 100W
- Max Torque: 340N.M
- Weight: 1.9 kg
ACCESSORIES
- Fuse
- 2 pcs wheel nut socket adapters (17–19mm, 21–23 mm)
- 3.5 m power cable with 12V DC cigarette lighter socket adapter
OPERATING INSTRUCTIONS
- Park your vehicle safely on level ground, then follow your vehicle manufacturer's instructions to jack up the vehicle so that the wheel you want to change is clear of the ground.
- Plug the Electric Impact Wrench into your vehicle's cigarette lighter socket, or connect directly to your car battery 12V using only the supplied adapter cable.
- Choose the proper socket to attach to the wrench's shaft (check Figure 1).

- Switch to the correct direction for loosening or tightening (check Figure 2).

- Press the switch to the right side (
![]() ) to start operating. Each nut will be loosened after hearing the "clatter" sound two or three times.
) to start operating. Each nut will be loosened after hearing the "clatter" sound two or three times. - Press the switch to the left side (
![]() ) to tighten nuts. It will be tight enough after hearing the "clatter" sound two or three times.
) to tighten nuts. It will be tight enough after hearing the "clatter" sound two or three times.
- Press the switch to the right side (


CAUTION
- This electric wrench is only usable with 12V vehicle power systems.
- Do not use the electric wrench continuously for more than 10 minutes at a time.
- Do not touch the drive shaft head with your hand during operation.
- Take care to use the correct polarity when connecting the wrench to a vehicle's battery terminals. For negatively grounded vehicles, always connect the red battery clip to "+" positive terminal and the black battery clip "−" negative terminal.
- Replacement fuses should be rated 12A or less.
- Press the switch to off 3–5 seconds after hearing the "clatter" sound. Then continue operating.
- The manufacturer recommends checking the tightness of the wheel nuts with a wheel brace after tightening with the impact wrench. The impact wrench is only for emergency use. Use a professional torque wrench to recheck the correct torque as soon as possible.
- The manufacturer takes no responsibility for incorrect usage of this product and the electric wrench is only designed to loosen and tighten the wheel nuts of a vehicle.
- Young children should be supervised to ensure they do not play with the appliance.
31088 San Clemente Street
Hayward, CA 94544, U.S.A.
Tel: +1.510.471.9221
U.S. & Canada Toll Free: +1.800.231.5806
customerservice@wagan.com
www.wagan.com

Documents / Resources
References
Download manual
Here you can download full pdf version of manual, it may contain additional safety instructions, warranty information, FCC rules, etc.
Download WAGAN Tech 7010 - 3-in-1 Electric Jack, Impact Wrench & Air Compressor Manual
Advertisement


Need help?
Do you have a question about the 7010 and is the answer not in the manual?
Questions and answers