
Related Manuals for Waterford FITMASTER

Summary of Contents for Waterford FITMASTER
- Page 1 Professional Bicyclist Sizing Instrument Owner’s Manual Copyright 2004 Waterford Precision Cycles, Inc. - All Rights Reserved. Page - 1...
-
Page 2: Table Of Contents
Care and Maintenance ........14 Warranty............14 Dear Fitmaster Customer: Thank you for choosing Fitmaster to help you offer the ultimate in rider service. The Fitmaster is designed to provide precise mea- surements and years of solid service. This manual is designed to make it easy to assemble and use this instrument. -
Page 3: Parts List
Rim strip Tube Tire Axle spacing washers Chain Front angle plate assembly Front angle plate label Seatmast slider Seat clamp Head tube slider Top tube slider Seatpost Copyright 2004 Waterford Precision Cycles, Inc. - All Rights Reserved. Page - 3... -
Page 4: Assembly Instructions
Step 4. Install the resistance unit. Use the parts bag #3 to connect the unit (#2) to the base (#1). Please note that the resistance roller mounts under, not behind the wheel. Page - 4 Copyright 2004 Waterford Precision Cycles, Inc. - All Rights Reserved. - Page 5 Step 8. Install the chain. Using the chain tool, install the chain according to the manufacturer’s specifications. Tension the chain as you would with a fixed gear or single speed bike. Copyright 2004 Waterford Precision Cycles, Inc. - All Rights Reserved. Page - 5...
- Page 6 A. Install head tube and seat tube sliders (#23 and #21, re- spectively) to the tubes in the associated mounting plates. B. Install the seat clamp (#22) on the seat tube slider (#23). Page - 6 Copyright 2004 Waterford Precision Cycles, Inc. - All Rights Reserved.
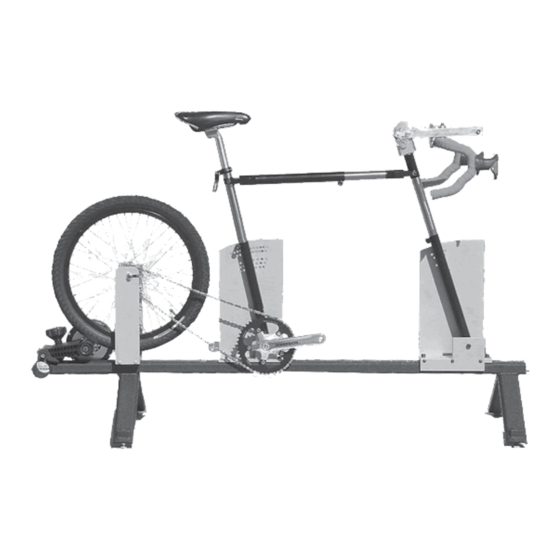
- Page 7 (#23 shown at right) and the head tube slider (#21). B. Install the seat post (#25). Tighten using the seat clamp. Completed Basic Fitmaster Assembly Copyright 2004 Waterford Precision Cycles, Inc. - All Rights Reserved. Page - 7...
-
Page 8: Fitting Area Preparation
• Cabinet for extra parts and tools. • Desk and/or clipboard for recording measurements and other rider information. Non-Supplied Parts List You must supply general parts to be able to use the Fitmaster. These parts are readily available in every bike shop. Item... -
Page 9: The Fitting Process
Though not a comprehensive guide to fitting, the following overview shows how to integrate the Fitmaster into your fitting process. Below is an overview of how Waterford conducts bicycle fitting: Assess the Rider: Fit Kit's Quick Fit System provides a... -
Page 10: Fitting For A Custom Frame
D. Install either the rider’s pedals or pedals compatible with the rider’s cycling shoes. E. Loosen the front angle plate bolts on the Fitmaster. This allows the front plate to float on the base as you make the other adjustments. - Page 11 D. Once you establish the starting top tube length and slope. Lock down all the sliders, the stem and bars. E. The rider should pedal under light to moderat resistance to warm up. Waterford recommends that the rider warm up fully - 5-10 minutes - before providing feedback on the fit.
-
Page 12: Fitting To A Stock Design
C. Mount the rider’s choice of saddle or (if no saddle specified), a suitable saddle. D. Install the rider’s pedals or pedals compatible withthe rider’s cycling shoes. E. Loosen the front angle plate bolts on the Fitmaster. This allows the front plate to float on the base as you make the other ajustments. - Page 13 B. Saddle height from the bottom bracket. G. Crank length. C. Stem length and rise. D. Saddle position on the rails. E. Saddle height over (or under) the bars. Copyright 2004 Waterford Precision Cycles, Inc. - All Rights Reserved. Page - 13...
-
Page 14: Care And Maintenance
Care and Maintenance The Fitmaster is designed to give years of commercial use with a minimum of care. Below are measures that insure the proper functioning of your Fitmaster: 1. Lubricate all threads during assembly and re-assembly. 2. Keep all machanical parts - chain, hubs, bottom bracket properly adjusted and lubricated.
Need help?
Do you have a question about the FITMASTER and is the answer not in the manual?
Questions and answers