
Subscribe to Our Youtube Channel
Related Manuals for Digifly AIR-XC


Summary of Contents for Digifly AIR-XC
- Page 1 OWNER’s MANUAL DIGIFLY AIR-XC Ver. 706a – English - Rev.1 AirXC_Manual_706a_ENG_rev_1.pdf Page 1/96 ...
- Page 2 If your Digifly product is not working correctly or is defective, you must first contact your dealer, in order to avoid unnecessary inconvenience. Please do not send the instrument back before previous approval.
- Page 3 INDEX INDEX ................................3 GETTING STARTED ............................6 2.1 CONNECTIONS, SENSORS AIR MANAGEMENT SOFTWARE ................6 2.2 BATTERY ..................................7 2.2.1 BATTERY RECHARGE ............................7 2.2.2 EXTERNAL POWER SUPPLY ..........................7 2.3 KEYBOARD - NORMAL OR LONG KEY PRESS ......................8 2.4 ...
- Page 4 AIRSPACE CTR (second layer) ........................37 6.16 3D AIRSPACE MANAGER (CTR) ..........................37 6.16.1 UPLOAD AND ENABLE AIRSPACE CTRs TO THE DIGIFLY AIR ..............37 6.16.2 VISUAL AND ACOUSTIC DISTANCE WARNING TO THE CTR ................39 6.16.3 CTR’s HORIZONTAL DISTANCE INDICATOR ....................39 ...
- Page 5 SOFTWARE ..............................59 14.1 AIR MANAGEMENT SOFTWARE ..........................59 14.1.1 DIGIFLY AIRTOOLS SOFTWARE (PC / Mac) ....................59 14.1.2 DIGIFLY AIRPAGES SOFTWARE (PC / Mac) ....................60 14.1.3 GPSDUMP SOFTWARE (PC, Mac, ANDROID) ....................63 14.2 DIGIFLY AIRUPDATER SOFTWARE FOR FIRMWARE UPDATE (PC, M ) ..............
-
Page 6: Getting Started
Main Features : Dual purpose mini USB socket allows the Digifly AIR to be recharged with any standard USB 5v charger and, additionally, to be connected to a personal computer or Mac for configuration & flight data management. Micro SD card slot; use Class 10 cards with 8 to 32GB formatted FAT32. -
Page 7: Battery Recharge
Proper solar panels are suitable to power the instrument. Important Notice: do not keep your Digifly AIR connected to its USB port in flight or in any situation where the USB cable could create an undesired movement to the charging port, applying force on the soldered connection of the mini USB, resulting in its detachment from the board. -
Page 8: Power On And Off
2.4 POWER ON & OFF In order to avoid that your Digifly unintentionally turns on, we have updated the power on process adding a secondary confirmation step: 1) The instrument must have been on OFF mode for at least 5 seconds... -
Page 9: Restore Factory Settings
Important: after every firmware update, it is necessary to update the help file containing the help messages as well. The help file update can be performed from your PC/Mac using Digifly AirTools, function: “upload HELP” or using the microSD (Main Menu / microSD Manager / Auto Import) (see 12.1). - Page 10 7) To confirm a factory settings reset, you need to press the button within a max. of 5 seconds 8) Otherwise, to cancel the operation, press the button or wait more than 5 seconds for the operation to cancel automatically 2.9 RESET If a system crash occurs (resulting in the instrument freezing), press the (arrow down) and the...
- Page 11 QUICK REFERENCE GUIDE 3.1 SYMBOLS Battery level Bluetooth activated Static icon = GPS FIX valid (GPS position available) Blinking icon = low GPS signal (GPS position NOT available) Flight recorder on Volume level Direction towards the center of the current Waypoint Direction towards the optimized point of the current WP’s cylinder Direction towards the optimized point of the current WP’s cylinder Last thermal position...
- Page 12 3.2 PAGES The Digifly AIR features 6 pages: 5 configurable pages and one main page with GPS info, called the “MASTER INFO GPS PAGE " which, for safety reasons, cannot be changed or disabled. 3.2.1 CONFIGURABLE PAGES The pages 7,8,9,10,12 are configurable; each one is linked to one of the 5 configurable parameters (from MAIN SETUP\ n.
- Page 13 3.2.2 MANUAL PAGE SWITCHING To manually change the pages, press the key to go forward or the key to go back. You can manually switch pages even if you are in “Intellifly” mode. 3.2.3 AUTOMATIC CROSS COUNTRY PAGES SWITCHING (INTELLIFY) ...
- Page 14 Estimated height at arrival to the active waypoint’s cylinder (H1) When the Digifly recognizes a thermal and you make a turn to fly into it, the Digifly will automatically switch to page 7 (XC Thermal), which besides the navigation information, will also display the instruments for thermal flying: Thermal Assist will help you center the thermal’s core better and (DT) will show you the distance to the...
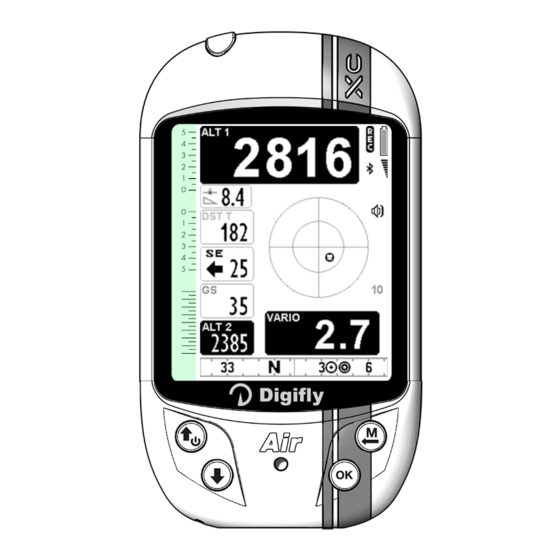
- Page 15 3.3.1 PAGE 7 XC (THERMAL) A2 Altimeter A1 Altimeter Wind speed and Thermal Assist direction Distance to the thermal (DT) Analogical vario Analogical GPS ground speed Digital vario Analogical vario scale Digital GPS ground speed Direction to next WP Compass and navigation Analogical Average.Vario Battery level Volume level...
- Page 16 3.3.2 PAGE 8 XC (GLIDE) A1 Altimeter A2 Altimeter Wind speed and Clock direction Chronometer Analogical Vario Analogical GPS ground speed Digital Vario Digital GPS ground Analogical vario scale speed Compass and navigation Current glide ratio Battery level Analogical Average.Vario Wind direction and Wind speed Volume level...
- Page 17 3.4 PAGE 9 COMPASS Clock Analogical A1 Altimeter Digital A1 Altimeter Chronometer Analogical vario scale Current glide ratio Analogical GPS ground speed Analogical Vario Digital GPS ground speed Digital Vario WP name Analogical Average Vario Compass main points Direction to WP icons Volume level Distance to the WP Position of last thermal...
- Page 18 3.5 PAGE 10 RELAX Page 10 "RELAX" displays the most important information in very LARGE font size: A1 barometric altimeter, Current glide ratio, Distance to the thermal, Thermal Assist, Wind speed and direction, GPS ground speed, A2 barometric altimeter, Variometer and Navigation compass. Flight recorder ON Battery level A1 Altimeter...
- Page 19 3.6 PAG 12 MAP CTR Airspace Analogical vario average Current Waypoint Analogical Vario scale Last Waypoint Analogical Vario Optimized route Next Waypoint Digital Vario GPS Groundspeed Wind speed and direction Current glide ratio Battery level Bluetooth ON Compass and navigation Digital A1 Altimeter Distance from Takeoff Digital QNE Altimeter...
- Page 20 3.7 PAGE 13 MASTER INFO GPS PAGE On the MASTER INFO GPS page, all values relative to your GPS position and navigation are visible. While on this page only, you can access the following particular functions: “take me here” (GOTO HOME), “save current position”...
- Page 21 3.7.1 GPS STATUS INFORMATION The GPS icon signal has different meanings: o Static GPS icon = Correct GPS FIX (GPS position available) o Blinking GPS icon = poor GPS signal (valid GPS position NOT yet AVAILABLE) 3.7.2 LATITUDE & LONGITUDE COORDINATES ...
-
Page 22: Date And Time
3.7.10 NAVIGATION TO “HOME” WAYPOINT (GOTO HOME) Available only on the GPS INFO page, it ensures that the instrument guides us back to the point where we activated this function from. It is particularly useful, for example, when flying at a new site without any waypoints and want to be guided to the official landing zone (LZ). -
Page 23: Main Functions
MAIN FUNCTIONS 4.1 ALTIMETERS The Digifly AIR features 8 different altimeters: ALT 1, ALT 2, ALT 3, ALT QNE, ALT FL, ALT GPS, ALT H1 and ALT HA. ALT 1 (A1) : Barometric altimeter ALT 2 (A2) : A2 Altimeter ALT 3 (A3) : Gain during the current thermal ALT QNE (QE) : QNE Standard Pressure Altitude. - Page 24 4.1.3 MAXIMUM ALTITUDE ALARM This parameter (ADVANCED SETUP \ n. 2 A1AL) will notify you when you reach the set altitude; the alarm will be reset once you go back down below the set threshold by 10m (33ft). It ranges from 0 to 9,000ft (approx..
-
Page 25: Digital Vario
This allows to have a vario with high sensitivity and instantaneous response, that is yet fluid and immune to the turbulence while very helpful in weak conditions, thanks to its pre-thermal function. Furthermore, in contrast to varios, based on a pressure sensor only, the Digifly is not affected by false readings due to acceleration. -
Page 26: Acoustic Vario
The chosen volume is shown by the ‘loudspeaker’ icon on the bottom left side of the display. Remember that when you turn your Digifly AIR on, it checks the volume of the acoustic vario and, if it happens to be turned off, it will immediately turn it up to HIGH. - Page 27 DG2: (default) new Digifly official sound profile. Note: The suggested initial settings for this profile are: o DYNH=ON o DUMP=15 o PTMD=0 o PROF=DG2 o RVAR=5 o DG3: sound profile equivalent to the Bräuniger / Flytec standard sound. Note: The suggested initial settings for this profile are:...
- Page 28 4.2.7 VARIO SIMULATOR For a perfect tuning of the acoustic vario, without flying, it is possible to set the ‘Vario Simulator’ mode, setting the VARIOMETER SETUP \ n. 18 SIMV parameter to “ON” and VARIOMETER SETUP \ n. 19 AUTV to “OFF”. Then exit from menu and use the arrow keys to set the preferred vario sound.
- Page 29 4.3 BAROMETER The barometer displays the atmospheric pressure in millibar. It is possible to adjust its calibration with the ADVANCED SETUP \ n. 1 KBAR parameter. This parameter can only be modified directly using the menu on the AIR instrument and not using the AirTools software.
-
Page 30: Advanced Functions
ADVANCED FUNCTIONS 5.1 SYNTHETIC INERTIAL PLATFORM The synthetic inertial platform produces data regarding space location. Made by a data acquisition system that with a complex processing algorithm calculates 3 synthetic accelerometers , 3 synthetic magnetometers and 3 synthetic gyroscope. AirXC_Manual_706a_ENG_rev_1.pdf ... -
Page 31: Gps Functions
GPS FUNCTIONS 6.1 INTEGRATED GPS MULTI-CONSTELLATION RECEIVER WITH 99 CHANNELS Digifly AIR features an extremely sensitive, and state-of-the-art, integrated GPS multi-constellation receiver with 99 channels. 6.2 GPS STATUS INFORMATION The GPS status icon has different meanings: o Fixed GPS icon = GPS FIX valid (GPS position available) o Blinking GPS icon = insufficient signal (GPS position NOT yet AVAILABLE) 6.3 GPS SIGNAL QUALITY (HDOP) - Page 32 6.8 GPS DIRECTION (TRK) The GPS direction (“TRK”) is the glider’s direction related to the ground. 6.9 GROUND EFFICIENCY (GLIDE RATIO) It shows the instant efficiency (glide ratio) related to the ground when the vario drops below - 0.15m/sec. ...
- Page 33 6.11 LAST THERMAL POSITION, DISTANCE & HEIGHT INFORMATION The data: direction “BRG T”, distance “DST T” and altitude gain “A3” are displayed when a thermal is detected. The thermal’s core position is graphically shown (regarding our current position and in scale) with a “T” inside ...
- Page 34 in ADVANCED SETUP \ n. 11 CRUT; default =15 seconds. When this happens, the plotter cleans up and the zoom is automatically set on the basis of the calculated distance between the current position and the current waypoint so both can be displayed on the plotter at the same time. 6.14 PLOTTER ...
- Page 35 The Map instrument is to be found on page 12, by default. The Map can be placed on any page (using the Digifly AirPages software) and it can go from 120x120 to 240x240 pixels and any size in between.
- Page 36 6.15.1 NAV (first layer) To display the NAV Layer (NAVIGATION) on your map, you need to have an active route or navigation to a waypoint. NAV Layer has three different layouts, switchable by button, when looking at the Map tool: ...
- Page 37 -in all 3 dimensions- that our distance from the different airspaces is never closer than the safety threshold we have set, both horizontally and vertically. As soon as you pass these set thresholds, an acoustic alarm will sound and your Digifly AIR will post a warning message on your screen. ...
- Page 38 Online converter with the option of selecting the different classes of CTRs: Converter OpenAir -> GoogleMap http://cunimb.net/openair2map.php b) Using the USB cable supplied, connect your Digifly to the PC/Mac and go to AirTools in the Digifly’s Menu. c) On your computer, open the AirTools program and click on the “AirSpaces” tab d) Click on “Load from file”, set the type of file to “OpenAir (*.txt)”...
- Page 39 6.16.2 VISUAL AND ACOUSTIC DISTANCE WARNING TO THE CTR Set the horizontal distance to the airspace, at which your warnings will go off, using the ADVANCED SETUP\ n. 6 CTRD parameter: 0=disabled, from 1 to 9999 mt=enabled (default 400) ...
-
Page 40: Waypoint Management
- using a Mac (via USB cable) using AirTools or GpsDump - using an Android Smartphone (via USB OTG cable or Bluetooth) using the GpsDump App - using another Digifly AIR via the micro SD memory card (see 12.1 Micro SD Manager) 7.1.1 MANUALLY CREATING A NEW WAYPOINT ... - Page 41 NAVIGATE TO A SINGLE WAYPOINT (GOTO) 8.1 ACTIVATING NAVIGATION TO A WAYPOINT (GOTO) 8.1.1 NAVIGATION TO WAYPOINT HOME (GOTO HOME) Available only when you are on the GPS INFO page; it ensures that the instrument guides us back to the point where we activated this function from.
- Page 42 8.1.4 NAVIGATION TO A GENERIC WAYPOINT (GOTO) With a valid GPS position, go to the menu with the key, select a Waypoint database (Competition / User). Scroll the list using the arrow keys and set the cursor on the wished Waypoint, LONG PRESS the key, then confirm activating the navigation to it by pressing the key again, or cancel using the key.
- Page 43 8.2 NAVIGATION FUNCTIONS TO A SINGLE WAYPOINT (GOTO) The following navigation functions are available if navigation toward a single waypoint (GOTO) is active: 8.2.1 DIRECTION , DISTANCE , EXPECTED GLIDE RATIO & HEIGHT TO THE CURRENT WAYPOINT BRG 1 (B1): is the direction to the current Waypoint; it is shown on the compass with the icon and the “follow me"...
- Page 44 8.2.2 COMPASS TO THE CURRENT WAYPOINT There are two types of “Compass” instruments: a circular and linear compass and two models of the linear one. All of them will show you the direction to the current waypoint displayed with the icon.
-
Page 45: Route Management
- using a PC (via USB cable) using AirTools - using a Mac (via USB cable) using AirTools - using another Digifly AIR via the microSD memory card (see 12.1 MicroSD Manager) On the “Route” page, you will have the total route distance for both the standard and optimized route. When ... -
Page 46: Deleting A Route
9.5 MODIFY A WAYPOINT IN A ROUTE (PARAMETER CHANGE) Press the keys to set the cursor on the desired waypoint’s line that you want to modify. Press the key to open the drop down menu containing the possible actions, then select “EDIT –... -
Page 47: Route Navigation
(oversample). Cylinder validation: when you enter a cylinder the Digifly AIR will alert you with a sound and you will see a message of “WPOK” (or “TASK FINISHED” if it is the arrival Waypoint), then the flight recorder rate returns to the setup value (MAIN SETUP \ n.6 RECR). - Page 48 If the navigation is activated the following functions are visible: 10.3.1 DIRECTION , DISTANCE , EXPECTED GLIDE RATIO & HEIGHT OVER THE CURRENT WAYPOINT BRG 1 (B1): Shows direction to the current waypoint cylinder along the optimized route. It is ...
- Page 49 10.3.2 COMPASS TO THE CURRENT WAYPOINT There are two types of “Compass” instruments: a circular and a linear compass and two types of linear ones. All of them display the direction to the optimized point of the cylinder (optimized route) using the icon.
- Page 50 10.3.7 REQUIRED GLIDE RATIO TO GOAL It is the required glide ratio to reach the goal, along the optimized route. 10.3.8 ARRIVAL TIME & TIME TO GOAL "TIMA (TA)" shows the estimated arrival time to get to the arrival waypoint along optimized route and "ETIM A (EA)"...
-
Page 51: Flight Recorder
11 FLIGHT RECORDER When the Digifly Air starts the flight recorder, it shows the “REC ON” message and the “rec” icon, on the bottom of the display, starts blinking. The following parameters are continuously recorded: Date and time, latitude, longitude, fix status, barometric altimeter QNE , altimeter GPS, number of satellites, GPS ground speed, variometer and barometric A1 altimeter. -
Page 52: Recording Rate
11.2 RECORDING RATE The recorder rate can be adjusted from 1 to 60 seconds, go to: MAIN SETUP \ n.6 RECR). Setting 1 data point per second, will record over 30 hours of flight data. Setting 1 data point per minute, will record up to 1800 hours of flight data. ... - Page 53 12 ADDITIONAL MEMORY CARD On the Digifly AIR’s housing, you will find the microSD Class 10 memory card reader slot, with a capacity ranging from 8GB to 32GB formatted FAT32. To insert a memory card, your instrument must be OFF. Place the card with the label facing the instrument’s keyboard side and insert the card’s connector side in the instrument;...
- Page 54 “File Explorer” function - Use arrows to highlight a directory, then the button to access it - LONG PRESS the button to return to the main directory - Exit using the button “Auto Import” (from microSD) function : This function is very helptul to automatically import all the files in the microSD’s \AUTOIMPO folder.
-
Page 55: Connections & Interfaces
13 CONNECTIONS & INTERFACES It is possible to connect your Digifly AIR-XC to a PC, Mac, Smartphone, Tablet, PDA, etc. using the provided USB cable or with a wireless connection via Bluetooth. 13.1 USB CABLE CONNECTION Connecting to an Android Smartphone via USB cable does not require a driver installation; just use a simple ... - Page 56 Take note of the COM port number, to be used later on to manually set the correct port number of third-party software (e.g. GpsDump). Please note that all Digifly software has automatic COM port number detection (Auto-search) and therefore it does not need this setting.
-
Page 57: Bluetooth Connection
Smartphone. This means that the Digifly AIR-XC is also a Telemeter and in Digifly we call this the Integrated Digi-FlyBox ; other companies call this function an “Info Box / Data Source / Sensor Box”, but none of these will include an anemometer (Pitot Tube System) like our instrument does. - Page 58 4) AIR looks forward to the pairing request from the external device. 5) From the Bluetooth’s control panel of the external device, press the option "Search". 6) A list of available devices is created, select "Digifly Air nnn" (where “nnn” are the last three digits of your instrument’s serial number).
- Page 59 14.1.1 DIGIFLY AIRTOOLS SOFTWARE (PC / Mac) The Digifly “AirTools” software is also available for both Windows and Mac, to download for free at .digifly.com It allows the full management of: flights, routes, waypoint, settings, the help language of the “SETUP ...
- Page 60 .digifly.com The Digifly “AirPages” software is available for both Windows and Mac, to download for free at It gives you the possibility to create and graphically configure the “User Pages”, so that you can then upload them to the 5 configurable pages of the AIR instrument (GPS Info page is not configurable).
- Page 61 OFF = the layout view of the page is disabled (the page will be skipped) STD = it will show the corresponding layout of the preset page by Digifly (pgs. 7 - 12) that come with your AIR-XC. USR = it will show the corresponding layout of the page "USER PAGE 7 to 12" created and uploaded by the User with the FREE Digifly AirPages program.
- Page 62 AirXC_Manual_706a_ENG_rev_1.pdf Page 62/96 ...
- Page 63 COMPETITION waypoint banks. GpsDump for PC/MAC These GpsDump versions will only communicate with your Digifly AIR only via the USB cable and do require the installation of the FTDI USB drivers (see paragraph 13.1). How to use GPSDump: o Press the button (“MENU”...
- Page 64 Ensure that the ADVANCED SETUP \ n. 22 ACHA parameter is set to ”SPP “, ensure that the ADVANCED SETUP \ n. 23 A-ID parameter is set to ”1 “ and to have already paired your Android device to your Digifly AIR (see paragraph 13.2.1).
- Page 65 Note: when using Bluetooth communication, it is important to make sure to select “Bluetooth devices” (last item on list) from the “Select GPS type” list and then select your instrument by clicking on “Digifly AirXXX” where “XXX” are the last 3 digits of your AIR’s serial number; for example, "Digifly Air123"...
-
Page 66: Firmware Update Procedure
6) On your PC/Mac run the Digifly’s firmware updating program "AirUpdater". 7) Set the COM Port (“Auto-search”) and the speed (115200) should be automatically set, press the “Start” button, then select the firmware file (e.g. AirXc_706a.hex) and confirm. - Page 67 off and resets it. Turn the instrument back on as usual. This will not erase any data or settings from your instrument. On the other hand, if the update is underway and stops halfway through, then the firmware has been erased; even though the instrument is completely fine, there is NO DAMAGE, but it will drain the battery fairly quickly.
- Page 68 14.3 FLIGHT PLAYBACK SIMULATOR COMPATIBLE WITH CONDOR SIMULATOR The flight playback simulator accepts inbound RMC, GGA and LXWP0 strings sent from the Condor simulator. To activate the playback simulator, use the VARIOMETER SETUP \ n. 18 SIMV parameter : SIMV = 0: simulation mode disabled (default) SIMV = 1: acoustic vario simulation enabled SIMV = 2: standard playback simulation mode enabled using a USB cable at 115200 baud, it will accept...
- Page 69 10 times per second via USB cable or Bluetooth, to external devices such as E-Reader, Smartphone, Tablet, etc. that have a software compatible to receive, decode and display the Digifly’s Telemetry such as LK8000, XCSoar, XCTrack, Top Hat, GpsDump, TTLiveTrack24, Flyskyhy (see paragraphs 15.2, 15.3, 15.4, 15.5, 15.6, 15.7, 15.8 for more details about these programs).
- Page 70 To set these parameters correctly, follow the instructions found in the corresponding sections that talk about the different software compatible with the Digifly’s Telemetry: o LK8000 (see paragraph 15.2) o XCSoar (see paragraph 15.3) o XCTrack (see paragraph 15.4) o Top Hat (see paragraph 15.5) o GpsDump (see paragraph 15.6)
- Page 71 15.1.1 Digi-F TELEMETRY GPS DATA SELECTION LYBOX Select the telemetry GPS data transmission with the ADVANCED SETUP \ n. 16 TGPS parameter: o TGPS=0 : no GPS data transmitted (default). o TGPS=1 : GPS data ($GPGGA + $GPRMC) sent once per second ...
- Page 72 15.1.2 Digi-F TELEMETRY AIRDATA TYPE SELECTION LYBOX The ADVANCED SETUP \ n. 17 TAIR parameter defines the type of protocol used to transmit the "AirData" information (default=DGF): o DGF “$PDGFTL1, QNE m, QNH m, vario cm/s, netto vario , IAS km/h, L/D ground tens, wind speed km/h , wind dir, volt battery hundreds, *chksum[CR][LF]”...
- Page 73 (only once) the pairing procedure with the external device (see 13.2.1) o To correctly decode the Digifly’s telemetry, it is necessary (only once) to enter in the LK8000 : FLY mode, Menu, Config 2/3, LK8000 Setup, Device Setup, Device A : Name: Digifly, Port: BT:Digifly Airnnn (where “nnn”...
- Page 74 3) When the AIR receives from the confirmation that it is connected the external device, it automatically exits from the "Telemetry BT" menu, returns to the current page of instruments, turns the Bluetooth icon on and activates the continuous transmission of real-time Digifly telemetry data at high speed. In case of problems, press the key on the AIR to exit and try again.
- Page 75 AirXC_Manual_706a_ENG_rev_1.pdf Page 75/96 ...
- Page 76 (see 13.2.1) o To correctly decode the Digifly’s telemetry, it is necessary (only once) to enter in the XCSoar : FLY mode, Menu, Config 1/3, Devices, Edit Device A : Port: Digifly Airnnn (where “nnn” are the last three digits of your instrument’s serial number), Driver: Digifly Leonardo, Close configuration.
- Page 77 problems, press the key on the AIR to exit and try again. If everything is correct, the "Monitor" page in XCSoar will display the telemetry data transmitted from the AIR For more info about the XCSoar software please visit their website www.xcsoar.org AirXC_Manual_706a_ENG_rev_1.pdf ...
- Page 78 ADVANCED SETUP \ n. 21 T-ID = 1 o To correctly decode the Digifly’s telemetry, it is necessary (only once) to enter in the XCTrack : menu, Settings, select the “Sensors” sub-menu, select “use external Bluetooth sensor”, select Digifly Airnnn (where “nnn”...
- Page 79 ADVANCED SETUP \ n. 21 T-ID = 1 o To correctly decode the Digifly’s telemetry, it is necessary (only once) to enter in the XCTrack : menu, Settings, select the “Sensors” sub-menu, select “use external USB sensor”, select “use external GPS”, select “use external barometric sensor”.
- Page 80 AirXC_Manual_706a_ENG_rev_1.pdf Page 80/96 ...
- Page 81 (see 13.2.1) o To correctly decode the Digifly’s telemetry, it is necessary (only once) to enter in the TopHat : FLY mode, Menu 3/4, Set up TopHat, Devices, Edit Device A : Port: Digifly Airnnn (where “nnn” are the last three digits of your instrument’s serial number), Driver: Digifly Leonardo, Close configuration.
- Page 82 problems, press the key on the AIR to exit and try again. If everything is correct, the "Monitor" page in TopHat will display the telemetry data transmitted from the AIR For more info about the TopHat software please visit their website www.tophatsoaring.org/Download.html AirXC_Manual_706a_ENG_rev_1.pdf ...
- Page 83 15.6 Digi-F LIVE TRACK & TELEMETRY TO GPSDUMP LYBOX The free GpsDump software (App Android) running on an external device (e.g. Smartphone, Tablet, etc.) receives the Digi-F Telemetry Data sent in real time at high speed by the AIR via Bluetooth , displays and sends them to the Live Track server (e.g.
- Page 84 (see 13.2.1) o To correctly decode the Digifly’s telemetry, it is necessary (only once) to enter in the GpsDump : LOG Menu, click “Live Tracking” , select “Service” : “LiveTrack24” and fill in the requested fields, press “START”, “Select logger type”...
- Page 85 15.7 Digi-F LIVE TRACK & TELEMETRY TO TTLIVETRACK24 LYBOX The free TTLiveTrack24 software (App Android) running on an external device (e.g. Smartphone, Tablet, etc.) receives the Digi-F Telemetry Data sent in real time at high speed by the AIR via Bluetooth , displays and sends them to the Live Track server (e.g.
- Page 86 To correctly decode the Digifly’s telemetry, it is necessary (only once) to enter in the TTLiveTrack24 : Settings Menu, tick the box next to "Use AIR BT GPS", “Choose Bluetooth GPS” : Digifly Airnnn (where “nnn” are the last three digits of your instrument’s serial number), tick the box next to "LiveTrack24 Enabled” and fill in the requested fields.
- Page 87 15.8 Digi-F LIVE TRACK & TELEMETRY TO FLYSKYHY LYBOX The Flyskyhy software (App Iphone) running on an external device (e.g. Smartphone, Tablet, etc.) receives the Digi-F Telemetry Data sent in real time at high speed by the AIR via Bluetooth BLE with auto reconnection, displays and sends them to the Live Track server (e.g.
- Page 88 Flyskyhy “Settings” menu, “Vario”, “Model” , Select “Digifly Air” and the “Select an Accessory” popup will come up. Switch on your Digifly Air vario device, and it should show up in the popup after a while. Select it, and a connection will be established.
- Page 89 All the incoming commands must follow the NMEA string format: $PDGFabc,p1,p2,p3*cc[CR][LF] and have a valid NMEA checksum. The string allows for a maximum of 100 characters. The Digifly Air always replies, once the operation is complete, with a copy of the inbound command or with an error message: $PDGFERR*50[CR][LF]...
-
Page 90: Optional Accessories
16 APPENDIX 16.1 DIGIFLY AIR STANDARD ACCESSORIES The Digifly AIR-XC are shipped with the following standard accessories: Protective padded bag. Internal rechargeable lithium battery. USB PC cable for flights download, managing other functions and firmware updates directly from the Internet. -
Page 91: General Specifications
Bluetooth Dual Mode SPP / BLE data communication High Speed real time Digifly Telemetry data output 10 times per second via Bluetooth and via USB cable Integrated Digi-F (sensor box) with high speed telemetry via Bluetooth and via USB cable to LK8000, LYBOX XCSoar, XCTRack, GpsDump, TTLiveTrack24, Flyskyhy and many other free apps. - Page 92 Dimensions (H x L x D) 152mm x 86mm x 20mm / Weight -with battery- 180g (0.4lb or 6.4oz) The Digifly AIR instruments are supplied with a rechargeable internal lithium battery and USB cable 3-year warranty. AirXC_Manual_706a_ENG_rev_1.pdf ...
-
Page 93: Main Set Up Parameters
16.4 MAIN SET UP PARAMETERS Name Description Range Default Units CTRS display contrast setting 1 - 99 LANG language selection USR/UK/ITA/ESP/DEU/FRA/CZE/HUN/PLN/GRK/TRK/LN1/POR/CAT RECM recorder mode selection OFF/ALW/AUT ---- R.DS meters variation start autorecorder 0.1 – 5 R.TI seconds variation start autorecorder 1 - 30 RECR recorder rate... - Page 94 16.5 VARIOMETER SETUP PARAMETERS Name Description Range Default Units V.UP acoustic vario lift setting 0 - 2.00 00.10 V.PT acoustic vario pre-thermal setting 0 - 1.50 00.50 V.DN acoustic vario sink setting 0 - 25.00 02.50 DYNH dynamic frequency change enable OFF/ON ---- DUMP...
-
Page 95: Advanced Setup Parameters
16.6 ADVANCED SETUP PARAMETERS Name Description Range Default Unit KBAR barometer calibration +/- 10.0 A1AL Altitude alarm A1 0 - 9000 A1SY enable A1 - AGPS synchronizing OFF/ON ---- A2AU A2 altimeter automatic reset (to 0) OFF/ON ---- CTRM CTR mode setting OFF/ON ---- CTRD... - Page 96 Digifly Offices Corporate Headquarters North, Central and South American Headquarters Digifly Europe Srl Digifly USA Bologna St. Augustine, FL Italy USA Phone : +39 370 1167217 Phone : +1 (240) 343‐5987 Web : www.digifly.com Web : www.digiflyusa.com E‐mail : info@digifly.com E‐mail : flydigifly@gmail.com AirXC_Manual_706a_ENG_rev_1.pdf Page 96/96 ...
Need help?
Do you have a question about the AIR-XC and is the answer not in the manual?
Questions and answers