Advertisement
- 1 General notes
- 2 Safety instructions
- 3 Battery pack/charger
- 4 Intended use
- 5 Accessories and spare parts
- 6 Scope of delivery
- 7 Safety devices
- 8 Symbols on the device
- 9 Description of the device
- 10 Assembly
- 11 Initial startup
- 12 Operation
- 13 Transport
- 14 Storage
- 15 Care and service
- 16 Troubleshooting guide
- 17 Technical data
- 18 Documents / Resources
General notes

Read the original instructions before using the device for the first time and act in accordance with it. Keep the original instructions for future reference or for future owners.
Safety instructions
General safety instructions

- Risk of asphyxiation. Keep packaging film out of the reach of children.

- Persons with reduced physical, sensory or mental capabilities and persons lacking experience and knowledge may only use the appliance if they are properly supervised, have been instructed on use of the appliance safely by a person responsible for their safety, and understand the resultant hazards involved.
- Children must not operate the device.
- Children must be supervised to prevent them from playing with the appliance.
Note
- Do not operate the device when other persons or animals are in the work area.
Safety instructions
- Never fully immerse the device in liquids.
- Only operate the device outdoors.
- Regularly check the device for damage. Do not operate the device if you discover visible damage.
- Ensure that the surface to be cleaned is free of sand, stones or loose elements before starting work. These can be flung away during cleaning or damage the surface and the device.
- Be aware of the recoil of the device during operation. The device can move back and forth uncontrollably when switched on. Hold the device securely and maintain a solid and safe footing.
- Do not operate the device in the vicinity of devices that are connected to electrical power.
- Observe the safety instructions provided with the battery pack.
Battery pack/charger
Read and adhere to the operating instructions and safety instructions for handling the battery and charger.
Intended use
Risk of injury from flung particles
Use the weed remover only with an intact protective hood.
The device is intended for superficial removal of moss and weeds from joints and various surfaces including composite stones, washed concrete slabs, and tiles.
Only use the device in private households. The telescoping handle and pivoting cleaning head can be adjusted to suit different body heights.
Foreseeable misuse
Any type of improper use is prohibited. The operating personnel are liable for damage resulting from incorrect use.
Accessories and spare parts
Only use original accessories and original spare parts. They ensure that the appliance will run fault-free and safely.
Information on accessories and spare parts can be found at www.kaercher.com.
Scope of delivery
The scope of delivery for the appliance is shown on the packaging. Check the contents for completeness when unpacking. If any accessories are missing or in the event of any shipping damage, please notify your dealer.
Safety devices
Brush protective cover
Illustration B
The protective cover prevents the operator or persons in the vicinity from being injured by flung particles.

Symbols on the device
 | Warning of flying objects. |
 | Keep other persons away from the work area. |
 | Wear suitable hearing protection and safety goggles when operating the device. |
 | Protect the device from rain and spray water. |
 | For users up to 177 cm tall. |
 | For users taller than 178 cm. |
 | For use under objects (e.g. benches). |
 | Direction of rotation for opening the bristle strip locking cover. |
 | Direction of rotation for closing the bristle strip locking cover. |
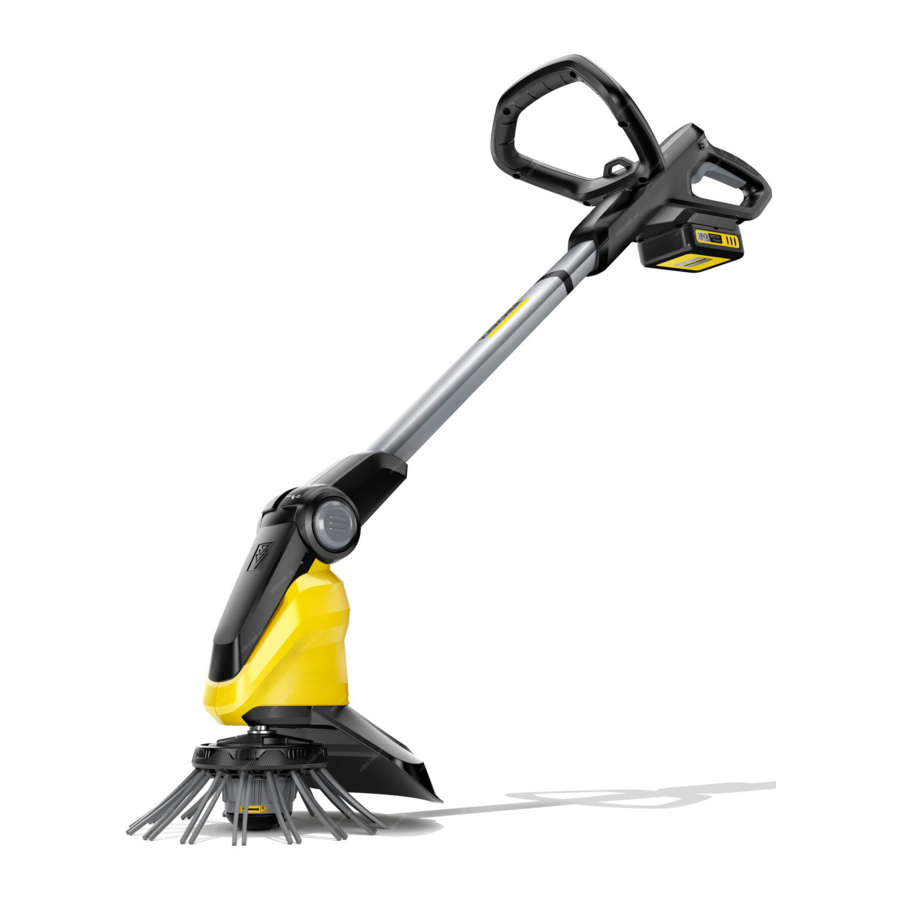
Description of the device
Illustration A

- Rotating nylon brush
- Pivoting cleaning head
- Pivoting cleaning head unlocking button
- Telescoping handle
- Second handle
- Telescoping handle unlocking button
- Trigger lockout button
- Handle
- Trigger
- Mount for 18 V Battery Power battery pack
- Battery pack unlocking button
- Type plate
- Brush protective cover
- Guide aid with bristle strip locking cover
Assembly
- Push the pipe provided with the side opposite to the Kärcher logo onto the drive housing.
The pipe latches audibly into place.
![warning]() ATTENTION
ATTENTION
Risk of damage
The handle is pre-assembled at the optimum length for assembly. Do not change the setting until the telescoping handle is completely assembled.
- Insert the upper pipe section (Kärcher logo side) into the mount on the handle until it audibly latches into place.
Illustration C

- Fit the power cable into the cable duct in the telescoping handle from the bottom to the top.
Illustration D

- Push the second handle into the mount until it audibly latches into place.
Illustration E

- Push the protective cover into the mount until it audibly latches into place.
Illustration F

- Join the bristle strip into a crown by snapping the ball into the recess.
Illustration H

- Place the bristle crown into the holder.
Illustration I

- Put on the guide aid including the locking cover on the bristle strip and screw closed in an anti-clockwise direction.
Illustration J


Initial startup
Adjusting the device
Adjusting the telescoping handle
You can adjust the length of the device to suit your requirements.

- Press the unlocking button.
- Adjust the telescoping handle as desired.
Illustration K
Adjusting the cleaning head
You can adjust the angle of the cleaning head to suit your requirements. The device has the following setting options:
 | For users up to 177 cm tall. |
 | For users taller than 178 cm. |
 | For use under objects (e.g. benches). |
- Press the cleaning head unlocking button.
- Adjust the cleaning head.
Illustration L


Inserting the battery pack
 ATTENTION
Dirty contacts
Damage to the device and battery
Check the battery mount and the contacts for soiling and clean them as necessary before inserting the battery.
Illustration M

- Push the battery into the mounting in the device until it audibly latches into place.
Removing the battery
Uncontrolled startup
Risk of injury
Remove the battery pack from the device during work breaks and before carrying out any service or care work.
Illustration N

- Press the unlocking button.
- Remove the battery from the device.
Operation
Switching on the device
You must press the unlocking button to enable the trigger (safety function). Only then can the device be switched on via the trigger.
- Press the trigger lockout button.
Illustration O

- Press the trigger at the same time. The device starts up.
- Release the trigger lockout button. The device continues running.
- Release the trigger.
The device stops.

Removing weeds
Note
Please note that the device only removes weeds at the surface. It does not remove the roots.
Note
We recommend using the device only in a horizontal, slightly angled position. Vertical use can result in faster wear of the bristle strip.
The gentle nylon brush is capable of removing a wide range of weed types from and between almost any hard surface. The cleaning results can however vary depending on external influences (ambient humidity, ground moisture and ambient temperature).
ATTENTION
Risk of damage
Do not scrub with the device or use the protective cover for scraping. This may damage the device
- Always guide the device with slow movements overthe surface to be cleaned, at a slight angle without applying any pressure. Do nor guide the device flat over the surface.
Illustration P

- Work on stubborn weeds multiple times slowly.
- Hold the device at the side of the second handle when cleaning joints so that it is slightly titled. Please note that loose material in the joint may also be removed.

Transport

Failure to observe the weight
Risk of injury and damage
Be aware of the weight of the device during transportation.
Storage
Failure to observe the weight
Risk of injury and damage
Be aware of the weight of the device during storage.
Correct storage of the device
Store the device by hanging from the eye in the handle. You can also alternatively place the device on the edge of the protective cover.
ATTENTION
Risk of damage to the bristles
Do not store the device standing on the bristles.
Care and service
Changing the bristle strip
Note
The bristle strip must be replaced when the bristles show signs of wear.
- Remove the battery pack from the device.
- Screw open the handle lock of the bristle strip holder in a clockwise direction and remove it.
Illustration G

- Pull out the worn bristle strip.
- Join the new bristle strip into a crown by snapping the ball into the recess.
Illustration H - Place the bristle crown into the holder.
Illustration I - Put on the guide aid including the locking cover on the bristle strip and screw closed in an anti-clockwise direction.
Illustration J

Replacing the protective cover
Risk of injury from flung particles
Use the weed remover only with an intact protective hood.
The protective cover must be replaced when it shows signs of wear such as cracks or fractures.

- Remove bristle strip.
- Release the lock on the protective cover with a flatblade screwdriver.
Illustration Q - Pull the protective cover away to the rear.
- Attach the new protective cover and snap it intoplace; see chapter.
Cleaning
The battery pack must be removed from the device before cleaning.
ATTENTION
Improper cleaning
Damage to the device
Do not clean the device with a hose or high-pressure water jet.
Do not use aggressive detergents.
Do not knock the brush on the ground.
- Remove the battery pack.
- Remove the plant residue using a brush.
- Clean the device with a moist cloth.
Removing the second handle
Illustration R
The second handle can be removed for repair purposes.

- Release the lock on the second handle with a flatblade screwdriver.
- Pull the second handle downwards and out of the holder.
Take care to ensure that the second handle engages on re-installation.
Troubleshooting guide
Malfunctions often have simple causes that you can remedy yourself using the following overview. When in doubt, or in the case of malfunctions not mentioned here, please contact your authorised Customer Service. As the battery pack ages, even if it is looked after, its capacity reduces such that the full run time will no longer be reached when fully charged. This does not indicate a defect.
The device does not start up
The battery pack is not inserted correctly.
- Push the battery pack into the mounting in the device until it audibly latches into place.
The battery pack is discharged.
- Charge the battery pack.
The battery pack is in sleep mode.
- Press and hold the power switch longer or press the power switch a second time.
The battery pack is defective.
- Replace the battery pack.
Bristle strip blocked/device overloaded/motor protection has triggered.
- Allow the device to cool down for a few minutes.
- Press less hard when operating the device
The device stops during operation
The battery has overheated
- Stop working and allow the battery to cool down to the permissible temperature range. This can take a few minutes.
Unsatisfactory cleaning results
Worn bristles
- Replace the bristle strip.
Bristle strip locking cover including guide aid cannot be opened
Soiling
- Remove the battery pack.
- Insert a flat screwdriver into the guide aid recess.
Illustration S

- Using the screwdriver as a lever, turn the brush protective cover in the direction of the "lock open" symbol.

Technical data
| WRE 18-55 | WRE 18-55 Battery Set | ||
| Device performance data | |||
| Battery pack type | - | Battery Power 18/25 | |
| Working voltage of the battery | V | 18 | 18 |
| Brush speed | 1/min 2300- | 2800 | 2300- 2800 |
| Brush diameter | mm | 180 | 180 |
| Brush material | Nylon | Nylon | |
| Dimensions and weights | |||
| Weight | kg | 2,8 | 3,3 |
| Length x width x height | mm | 1370 x 2 30 x 380 | 1370 x 2 30 x 380 |
| Determined values | |||
| Hand-arm vibration value m/s | 2 | 3,2 | 3,2 |
| Uncertainty K | m/s 2 | 0,5 | 0,5 |
| Sound pressure level | dB(A) 71 | 71 | |
| Uncertainty K pA | dB(A) 2 | 2 | |
| Sound power level L WA + K uncertainty WA | dB(A) 87 | 87 | |
Subject to technical modifications.

Documents / Resources
References
Download manual
Here you can download full pdf version of manual, it may contain additional safety instructions, warranty information, FCC rules, etc.
Download Kärcher WRE 18-55, WRE 18-55 Battery Set - Weed remover Manual
Advertisement


Need help?
Do you have a question about the WRE 18-55 and is the answer not in the manual?
Questions and answers