Table of Contents
Advertisement
service@cotlin.top
L Series Ice Maker
Installation and maintenance instructions
L400 L500
Customer Service
------------------------------
7/24 Mail: service@cotlin.top
File No:1.9.01.00018
Version No:A
File No: 1.9.01.00018
Version No:A
Note: Subsequent update versions of this manual will not be noticed.thank you.
1 / 24
Advertisement
Table of Contents

Related Manuals for COTLIN L Series


Summary of Contents for COTLIN L Series
- Page 1 L Series Ice Maker Installation and maintenance instructions L400 L500 Customer Service ------------------------------ 7/24 Mail: service@cotlin.top File No:1.9.01.00018 Version No:A File No: 1.9.01.00018 Version No:A Note: Subsequent update versions of this manual will not be noticed.thank you. 1 / 24...
-
Page 2: Table Of Contents
Content 1. Features --------------------------------------------------------------------------------4 2. Appearance & Size ----------------------------------------------------------------------4 3. Critical Parameter -----------------------------------------------------------------------6 4. Unpacking ------------------------------------------------------------------------------6 5. Installation Location ---------------------------------------------------------------------6 6. Leveling Adjustment -------------------------------------------------------------------- 7 7. Water Supply/Purge ---------------------------------------------------------------------7 7.1 Water Supply ------------------------------------------------------------------------7 7.2 Purge -------------------------------------------------------------------------------7 8. Power Supply ---------------------------------------------------------------------------8 9. - Page 3 Please read these safety instructions in the manual carefully when you use and maintain the unit. It may cause injury to the body and damage to the ice machine if someone ignores these tips. In this manual, you will see safety prompts in the following form:...
-
Page 4: Features
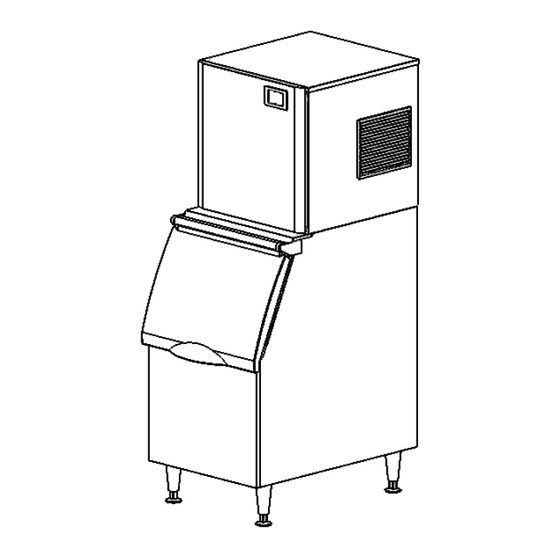
Features L series ice maker, with a number of patent control systems, simple operation, accurate control, suitable for different water quality conditions; Key components are made from internationally renowned brands to ensure reliable operation in harsh environments;... - Page 5 Appearance ⑦. Power supply cable ①. Top cover plate ⑧. Inlet value ②. Pannel ⑨. Condernser ③. Front plate ⑩. Back plate ④. Right side plate Purge pipe connector ⑤. Door Left side plate ⑥. Adjustable feet Purge pipe connector File No: 1.9.01.00018...
-
Page 6: Critical Parameter
Critical Parameter Model Power Frequency Current Power Refrigerant Liquid High side Low side (HZ) (g/oz) Design pressure Design pressure (psig) (psig) L400 R290 140/5.0 L500 1030 R290 150/5.3 Unpacking Before unpacking, check the anti-tilt sign is in good condition, the outer packing of the machine is in ... -
Page 7: Leveling Adjustment
Leveling and Adjustment Screwing home four adjustable parts of the legs first, and then screwing the legs into the ice maker bottom plate; Moving the ice maker to the installation place, and adjusting the legs to ensure the ice maker is ... -
Page 8: Power Supply
Warning The power supply must be reliably grounded and the wiring used must comply with the laws and regulations of the country and region where the ice maker is used. Ice makers must be connected to the potable water pipes. -
Page 9: Making Ice
Off:The ice making work, press the [switch] key once, the ice making machine stops the ice making (standby state), the screen shows "OFF", and then pull out the power plug. Making 11.2 a. The ice maker automatically enters the ice making preparation work after electrification, the preparation process includes water pump start, hot valve open, compressor start, fan start, etc. -
Page 10: Booking Ice
11.6 Booking Ice Standby state (display display "OFF"), first press "[ booking/adding ]" enter time setting, press "[ booking/adding ]" again can increase 10 minutes, press twice increase 20 minutes, and so on, increase in 10 minutes as a unit, press "[ light/decreasing ]" once can reduce 10 minutes, decline in turn; after setting up, press "[ switch ]"... -
Page 11: Routine Cleaning
Initial launch. Restart after a long downtime. Confirm the inlet tap is open. Confirm that the inlet valve has been opened. The ice machine is powered on. Check all water pipes and pipe joints to ensure no leakage. -
Page 12: Remove Panel
14.1 Remove Front Panel and Top Panel of Ice Maker Remove front panel of ice maker, there is a screw on the top cover plate of the ice maker and on the left and right of the front panel, please use a Phillips screwdriver to remove the screw;... -
Page 13: Flume Cleaning
Brush the plastic parts around the evaporator with nylon brush; 14.3 Cleaning of Sinks ress the [switch] key in standby mode, the screen displays “off”, unplug the power plug, remove two screws on the water pump hanging plate and two screws on the float cover with a screwdriver, remove the clamp , unplug the water supply pipe, and then remove the water pump and the connector at the float to clean the float. -
Page 14: Cleaning & Disinfection
Important Tips Please install all parts after clearing, install and cooperate correctly. 15. Cleaning and Disinfection In order to make the operation of the ice making machine stable and efficient, the user has the responsibility to operate according to the requirements of cleaning and disinfection (the operation of cleaning and disinfection is not included in the warranty clause). - Page 15 Remove all ice cubes stored in the refrigerator with an ice shovel; Click the "Clean / Set" button, the ice maker enters the cleaning phase, the inlet valve opens, and the screen display starts timing; When the evaporator starts running water;...
- Page 16 After 30 s, the is completed; Entering the automatic rinsing stage, first cleaning for 3 minutes, then draining for 30s, after the rinsing process rec recirculation for 5 times, the whole cleaning process is over, and the screen shows "OFF" , in to stand by state, the whole process takes about 37 minutes.
- Page 17 9. While soaking the parts, dip the cleaning liquid with a nylon brush or soft cloth to wipe the surface of the parts in contact with water and ice cubes, such as changing the inner surface of the ice plate, the inner surface of the front plate, the evaporator ice grid, ice blocking plate, ice storage bucket, etc.
- Page 18 Brush evaporator Brush sink Flush evaporator Flush hose and mandrel File No: 1.9.01.00018 Version No:A Note: Subsequent update versions of this manual will not be noticed.thank you. 18 / 24...
-
Page 19: Disinfection Process
10. Remove soaked parts and rinse with clean water (rinse 5 times). 15.2 Disinfection Process 1. Mix 8 liters of warm water (45~50℃) and 2 packs of disinfectants (KAY5,28.4/ packs) into disinfectant solution (the amount of disinfectant is adjusted according to the amount of cleaning parts needed). -
Page 20: Parts Removal
When 30 s is finished, after entering the automatic rinsing stage, after cleaning for 3 minutes, then draining for 30 s, the tap water rinsing process for 2 times, then using pure water rinsing cycle 3 times, the whole cleaning process is over, The screen shows "OFF", into standby state and unplug"... - Page 21 Unplug pipe Remove two screws Spin out the plastic cover and remove the plastic mandrel Note: when the pipe is assembled, the hole position of the pipe should be opposite to that of the mandrel, and must not be in the same direction. The correct diagram is as follows:...
-
Page 22: Regular Clean
Disassembly of water retaining plates:Both hands hold the rotating shaft at the same end of the baffle, and pull the side of the baffle out of the pin hole by pulling it to the other end. 16. Regular Cleaning Note If water is left in the machine in an environment below 0°C, it may cause... -
Page 23: Out Of Use/Winterization
18.Removal From Service / Winterization Note If water is left in the machine in an environment below 0°C, it may cause serious damage to the machine parts. This fault is not covered by a warranty. Special protection measures are required if the ice maker is out of service for a long period of time or exposed to an environment of 0°C or less. - Page 24 Warning CAUTION – RISK OF FIRE OR EXPLOSION. FLAMMABLE REFRIGERANT USED. CONSULT REPAIR MANUAL/OWNER'S GUIDE BEFORE ATTEMPTING TO SERVICE THIS PRODUCT. ALL SAFETY PRECAUTIONS MUST BE FOLLOWED. Warning CAUTION – RISK OF FIRE OR EXPLOSION. DISPOSE OF PROPERLY IN ACCORDANCE WITH FEDERAL OR LOCAL REGULATIONS.
Need help?
Do you have a question about the L Series and is the answer not in the manual?
Questions and answers
My ice machine display reads 74°. Ice is always melting.
The COTLIN L Series ice machine displaying 74° and the ice always melting could be caused by one or more of the following:
1. High Ambient Temperature: The machine is designed to operate in an environment between 10°C and 38°C. A temperature of 74°F (approximately 23°C) is within range, but if the actual ambient temperature exceeds 38°C, the machine may not function properly, causing ice to melt.
2. Poor Ventilation: Inadequate air space around the machine or blocked ventilation windows can cause overheating, affecting ice production and storage.
3. Incorrect Water Temperature: The water inlet temperature should be between 5°C and 32°C. If it is outside this range, ice production may be inefficient.
4. Improper Installation: If the machine is not level, or placed near a heat source or in direct sunlight, it can affect performance and cause ice to melt.
5. Electrical or Mechanical Issues: If the unit is not properly connected to electricity or grounded, or if internal components are malfunctioning, the cooling system may not work effectively.
Checking environmental conditions, installation setup, and ensuring proper ventilation and electrical connections can help resolve the issue.
This answer is automatically generated
@Mr. Anderson Concerning previous high temp inquiry, It reads 74° C not F. Are there any adjustments I can make on the display panel while I am acertaining the other issues you mentioned? Thank you for your time! I am very frustrated. I have to keep buyimg ice and we are just a small place Thank you
what is warrenty? are replacement parts available?
The context states that faults are not covered by warranty, but it does not provide specific details about the warranty terms or availability of replacement parts. Therefore, warranty coverage and replacement parts availability cannot be determined from the provided information.
This answer is automatically generated