Table of Contents
Advertisement
Quick Links
Advertisement
Table of Contents

Related Manuals for NST Audio VR2

Summary of Contents for NST Audio VR2
- Page 1 Venue Remote User Manual Revision 1.0 www.nstaudio.com © NST Audio Ltd 2023...
-
Page 2: Table Of Contents
ROHS ..................................... 7 Thank You ..................................8 Specifications ................................8 Installation Instructions ..............................9 Wall Template for Mounting the VR2 ........................10 Concept Of VR2 Operation ............................11 Setting up the VR2 ..............................12 Physical VR2 controls ..............................14 VR2 Control Pages in Detail ............................15 Preset Recall ................................15... -
Page 3: Eu Declaration Of Conformity
EU Declaration of Conformity This declaration is issued under the sole responsibility of the manufacturer. NST Audio Ltd. Unit 4C Seph Way York Road Industrial Park Malton North Yorkshire YO17 6YF United Kingdom Declare that this declaration of conformity is issued under our sole responsibility and belongs to the following product:... -
Page 4: Declaration Of Conformity
Declaration of Conformity This declaration is issued under the sole responsibility of the manufacturer. NST Audio Ltd. Unit 4C Seph Way York Road Industrial Park Malton North Yorkshire YO17 6YF United Kingdom Declare that this declaration of conformity is issued under our sole responsibility and belongs to the following product:... -
Page 5: Important Safety Instructions
Important Safety Instructions CAUTION: RISK OF ELECTRIC SHOCK. DO NOT OPEN. The lightning flash with arrowhead symbol within an equilateral triangle is intended to alert the user to the presence of uninsulated “dangerous voltage” within the product’s enclosure that may be of sufficient magnitude to constitute a risk of electric shock to persons. The exclamation point within an equilateral triangle is intended to alert the user of important operating and maintenance (servicing) instructions in the literature accompanying the appliance. -
Page 6: Instructions De Securite Importantes
Instructions De Securite Importantes ATTENTION: RISQUE DE CHOC ELECTRIQUE. NE PAS OUVRIR. Le symbole représentant un éclair fléché dans un triangle équilatéral a pour but d’alerter l’utilisateur de la présence d’une “tension dangeruese” non isolée à l’intérieur du boitier, pouvant ê t re d’une force suffisante pour constituer un risqué d’électrocution. Le point d’exclamation dans un triangle équilatéral a pour but d’alerter l’untilisateur de la présence d’instructions importantes concernant le fonctionnement et la maintenance, dans la documentation qui accompagne l’appariel. -
Page 7: Weee
WEEE Once your NST Audio product has reached the end of its useful life, please ensure that is recycled in a proper manner. "The WEEE Regulations 2013 are the UK interpretation of the EU WEEE Directive and aim to reduce the quantity of waste electrical and electronic equipment (WEEE) disposed of in the UK". -
Page 8: Thank You
Thank You Thank you for choosing an NST Audio product for your application. Please spend a little time reading through this manual, so that you can obtain the best possible performance from the unit. All NST products are carefully designed and engineered for cutting-edge performance and world-class reliability. If you would like further information about this, or any other NST product, please do not hesitate to contact us. -
Page 9: Installation Instructions
Installation Instructions The VR2 wall panel control is designed to fit into the provided bracket, and is secured with two countersunk screws into the top and two underneath at the bottom (supplied). The bracket is surface mounted onto the wall with four screws. Please use the template overleaf to position screw holes. -
Page 10: Wall Template For Mounting The Vr2
Wall Template for Mounting the VR2 PRINT AT FULL SIZE! DO NOT SCALE TO FIT PAGE IF PRINTING FROM A PDF CHECK AGAINST THE 30mm MEASUREMENT BEFORE USING TO MARK HOLES! PRINT AT FULL SIZE! DO NOT SCALE TO FIT PAGE IF PRINTING FROM A PDF... -
Page 11: Concept Of Vr2 Operation
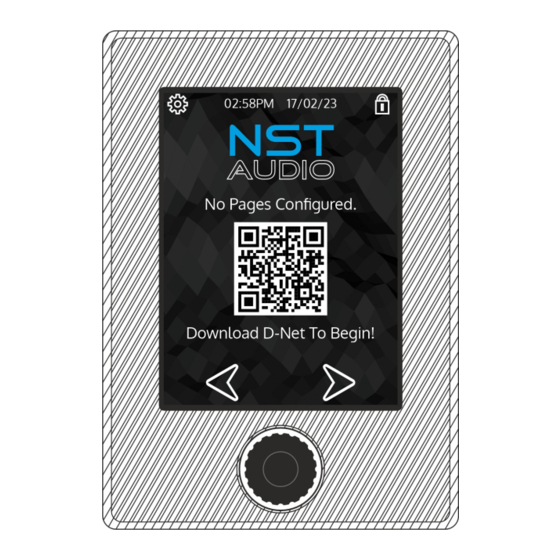
Concept Of VR2 Operation The VR2 initially powers up with no control pages configured. The QR Code shown on-screen takes you to the software page on the NST Audio website to download a copy of D-Net and get started. The screen can display two panes side by side, and these panes can have a variety of system functions, namely: Preset recall (page 15) –... -
Page 12: Setting Up The Vr2
D-Net’s ‘Virtual Rack’, as shown in the example below: To access the VR2’s control panel, simply double click / tap the VR2 device on the left. This will open the VR2’s control panel, to allow initial set-up or editing of an existing device. - Page 13 VR2’s screen may not show the correct time. D-Net compares the time displayed on the VR2 against the time setting of the PC, and will show an alert and message if the time needs setting (plus a warning icon on the VR2 status bar). Press the “Set Time”...
-
Page 14: Physical Vr2 Controls
Physical VR2 controls Once the VR2 has been set-up, using D-Net, the panel is operated by using the single rotary control and the touch screen. The brightness of the display and the bezel LEDs can be adjusted by accessing the ‘Settings’ page, by pressing the cog icon in the top left corner of the display. -
Page 15: Vr2 Control Pages In Detail
Rename the pane title to something more useful by double clicking on it in the Panes window, and choose the accent colour which changes the title underline and the button text colour on the VR2 (and bezel colour is configured to follow – see settings on page 20 for how to change this). -
Page 16: Gain Change
Rename the pane title to something more useful by double clicking on it in the Panes window, and choose the accent colour which changes the title underline and the button text colour on the VR2 (and bezel colour is configured to follow – see settings on page 20 for how to change this). -
Page 17: Routing Change
VIP area. On the VR2, routing screens work virtually the same as preset recalls, except that after the confirmation query, the screen doesn’t show an “ACTIVE” message. -
Page 18: Source Select
Rename the pane title to something more useful by double clicking on it in the Panes window, and choose the accent colour which changes the title underline and the button text colour on the VR2 (and bezel colour is configured to follow – see settings on page 20 for how to change this). -
Page 19: Ip Commands
Rename the pane title to something more useful by double clicking on it in the Panes window, and choose the accent colour which changes the title underline and the button text colour on the VR2 (and bezel colour is configured to follow – see settings on page 20 for how to change this). -
Page 20: Vr2 Configuration Settings - Customise Operation
Alternately, the colours may be used to group types of control – all gains are blue, all mutes are red etc. There are several timers that can be set to affect how the VR2 behaves when it’s not being used – how long it waits before going to sleep, and how the bezel illumination behaves. - Page 21 Lock Device: This locking mechanism is not related to the creation of user levels – this is to lock the VR2 from unauthorized configuration changes in D-Net. The PIN is stored in the VR2 and will prevent anyone downloading D-Net and connecting to There is no backdoor/master password so use this feature carefully! gain access to the configuration.
-
Page 22: Preset Sheduling - Automatic Timed Preset Recall
D-Net. If any timed presets are enabled, the VR2 will display an alarm clock icon to the right of the settings cog icon beside the clock. Timed presets can be configured and viewed via D-Net. -
Page 23: Adding Users And Permissions
Adding Users and Permissions It is also possible to set up different user levels (up to 10) and protect each with a 6 digit PIN code. Each user can be granted access to any or all defined panes, and this system can be used for either “vertical” security control (so users’ permissions based on seniority) or “horizontal”... - Page 24 To switch between users, or to immediately lock the remote without waiting for the timeout to expire, press the padlock/home icon in the top right hand corner of the VR2’s screen. Use the rotary to choose the required user from the list and press “Select”.
-
Page 25: Offline Set-Up And Download
VR2 (and presets saved in the offline configuration) if D-Net is going to be able to populate the lists of controls. Alternately, go online to a live system and save this file for later use offline, with the ability to then add a VR2 and work with what was previously saved. -
Page 26: Faqs (Frequently Asked Questions)
What do I do if I forget a user’s PIN? - Connect up to D-Net again to gain access to the users set-up for the VR2 and make a note of the user’s PIN or change it to something more memorable. -
Page 27: Maintenance
Maintenance The VR2 will require very little routine maintenance. Cleaning the panel surround should only be done with a cloth lightly dampened with water! The use of chemical or abrasive cleaners may damage the finish. Do not use a wet cloth to clean the screen.
Need help?
Do you have a question about the VR2 and is the answer not in the manual?
Questions and answers