Table of Contents
Advertisement
Quick Links
Watkins Wellness
INSTALLATION
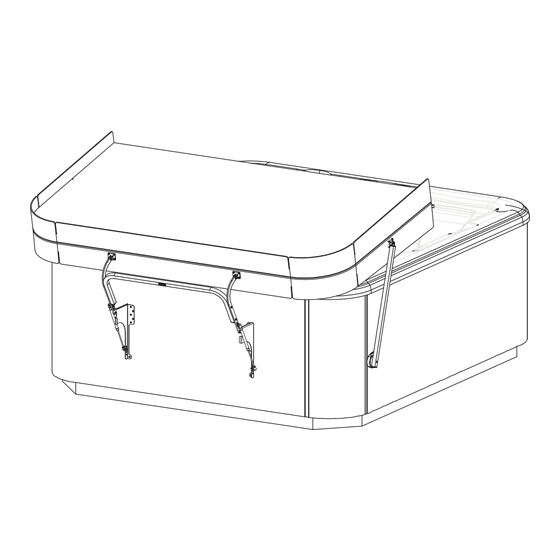
COVER CRADLE
Of your
INSTALLATION REQUIREMENTS ................. 1
INSTALLATION REQUIREMENTS ................. 2
PREPARATION ................................................. 3
COVER CRADLE INSTALLATION.................. 4
®
TABLE OF CONTENTS
INTENDED USE IN KIT # 72577
®
COVER CRADLE INSTALLATION.................. 5
ATTACH CROSSLINK ASSY.
COVER CRADLE INSTALLATION.................. 7
COVER CRADLE INSTALLATION.................. 9
62733 C (04/19)
Advertisement
Table of Contents

Summary of Contents for Watkins Wellness COVER CRADLE
-
Page 1: Table Of Contents
Watkins Wellness ® INSTALLATION ® COVER CRADLE Of your TABLE OF CONTENTS INSTALLATION REQUIREMENTS ....1 COVER CRADLE INSTALLATION....5 KIT INCLUDES ATTACH CROSSLINK ASSY. INSTALLATION REQUIREMENTS ....2 COVER CRADLE INSTALLATION....7 TOOLS REQUIRED ATTACH SIDE ARM ASSY. IMPORTANT INFORMATION ALIGN SIDE ARM ASSY. -
Page 2: Installation Requirements
INSTALLATION REQUIREMENTS KIT INCLUDES RIGHT PIVOT ASSY. LEFT PIVOT ASSY. 46° BAG #1 (72574) BAG #4 BAG #2 BAG #3 (75104) (72575) (72576) PART QUANTITY DESCRIPTION PART QUANTITY DESCRIPTION Pivot Assembly, Right #10 x 1” Square Flat Head (Bag 1) Pivot Assembly, Left #10 X 1½”... -
Page 3: Installation Requirements
INSTALLATION REQUIREMENTS TOOLS REQUIRED Cordless Drill Flat Head Screwdriver 7/16” Socket with #2 Square Drive Bit Ratchet 1/8” Drill Bit Fine Tip Marker 1/2” Wrench Safety Glasses IMPORTANT INFORMATION • One Technician is recommended for this installation. • Read all of the instructions thoroughly before performing this installation. •... -
Page 4: Cover Cradle Installation Preparation
COVER CRADLE INSTALLATION PREPARATION STEP 1 INSTALL PREPARATION The cover warning label must be facing the front of the spa on (Front to Back) • Refer to (Figure 1.1) for the Left and Right cover confi guration or the right side of spa on lifter set orientation for (Front to Back) cover (Side to Side) confi... -
Page 5: Cover Cradle Installation
COVER CRADLE INSTALLATION two of the #10 x 1½”square (J) Flat Head STEP 1 ATTACH BACK HINGES screws on the top (marked) holes fi rst. 4. Using the 1/8” drill bit and the bottom two 1. Locate Bag #1, some of the contents will be holes of the Side Hinge, drill through the used to fasten the Rear Hinges. -
Page 6: Cover Cradle Installation
COVER CRADLE INSTALLATION IMPORTANT: Carefully examine cover to be STEP 4 ATTACH CROSSLINK ASSY sure it is still aligned evenly with the outside edges of the spa bar top (Figure 1.3). 1. Unscrew Pan Head Screws attached to the 4. Using the Mounting Bracket (bottom part Rear Hinges (G) (Figure 5.1). -
Page 7: Cover Cradle Installation
COVER CRADLE INSTALLATION NON-REMOVABLE REMOVABLE PANELS SPAS WITH PLASTIC OR PANELS METAL FRAME Figure 5.4 b. Spas with Removable Panels a. Spas with Non-removable Panels Spas with Plastic or Metal Frame 5. Secure the Mounting Brackets 5. Secure the Mounting 5. -
Page 8: Attach Side Arm Assy
COVER CRADLE INSTALLATION 1. Locate the Cardboard Template (H) and place ATTACH SIDE ARM ASSY STEP 5 on ground below Side Arm Assembly (Figure 7.1). 1. Remove the single bolt attached to the Side Hinge (F)(Figure 6.1) on the side of the spa. - Page 9 COVER CRADLE INSTALLATION NON-REMOVABLE REMOVABLE PANELS SPAS WITH PLASTIC OR PANELS METAL FRAME Figure 7.2 b. Spas with Removable Panels Spas with Plastic or Metal Frame a. Spas with Non-removable Panels 5 Secure the Side Arm 5. Secure the Side Arm 5.
-
Page 10: Install Gas Spring
COVER CRADLE INSTALLATION STEP 7 INSTALL GAS SPRING STEP 8 ADJUST GAS SPRING 1. Locate the Gas Springs (C) and snap onto The motion of the cover when opening should be the upper ball stud (attached to the Pivot Arm controlled and smooth rotating to a gentle stop. - Page 11 COVER CRADLE INSTALLATION Always “ease” the cover to the Open and Close Position to avoid “Slamming” thereby prolonging the service life of BLANK your cover.
- Page 12 62733 C (04/19)
Need help?
Do you have a question about the COVER CRADLE and is the answer not in the manual?
Questions and answers