Table of Contents
Advertisement
Quick Links
Advertisement
Table of Contents

Related Manuals for Sheeran LOOPER X

Summary of Contents for Sheeran LOOPER X
- Page 1 User Guide English Manual Version 1.0.0...
-
Page 2: Table Of Contents
Table of Contents (1.0) Introduction ........4 (5.5) FX ............. 24 (5.5.1) Applying FX ..........24 (1.1) Box Contents ........4 (5.5.2) Editing FX ..........25 (5.5.3) Pedal Assignment ......... 26 (1.2) Support ..........4 (5.5.4) Expression Pedal Assignment ..27 (5.6) Tuner .......... - Page 3 (6.0) Other Functions ......46 (6.1) USB Recording ....... 46 (6.2) External MIDI Control ....47 (6.2.1) MIDI Clock Receive ....... 49 (6.2.2) MIDI Clock Send ........50 (7.0) Appendix ........51 (7.1) Technical Specifications ....51 (7.2) Trademarks & Licenses ....53...
-
Page 4: (1.0) Introduction
(1.0) Introduction Welcome to your Sheeran Looper X! This is a comprehensive guide designed for you to get the most out of Looper X. We recommend you read through this guide before playing. (1.1) Box Contents Sheeran Looper X USB Cable... -
Page 5: (2.1) Connection Diagram
Items not listed under (1.1) Introduction > Box Contents are sold separately. See the following (3.2) Rear Panel section for more information on each connection. Full-range, flat- response amplifiers Guitar Microphone USB Flash Drive SD Card Power outlet External Instruments Headphones Computer Expression... -
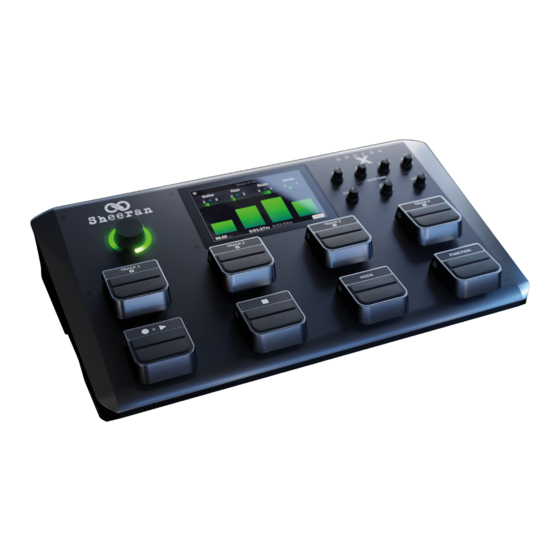
Page 6: (3.0) Features
(3.0) Features (3.1) Top Panel Display This full-color multi-touch display shows information relevant to Sheeran Looper X’s current operation. Touch the display (and use the hardware controls) to control the interface. See (5.0) Menu to learn how it works. 2. Encoder (Navigation Wheel) Turn this encoder to scroll through the available menu options or adjust the parameter values of the selected field in the display. - Page 7 5. RECORD + PLAY Pedal Press this pedal to record, overdub, and start playback of your loop. • First Press: Start recording the loop (pedal indicator LED turns red). • Second Press: Sets the loop length and begins overdubbing (pedal indicator LED turns orange). •...
- Page 8 Turn this knob to adjust the volume level of the Aux Input. Important: The audio signal from the aux input is routed directly to the outputs of Sheeran Looper X without any modeling or effects applied and cannot be used by the looper. It is also unaffected by the...
-
Page 9: (3.2) Rear Panel
Important: The audio signal from the aux input is routed directly to the outputs of Sheeran Looper X without any modeling or e ects applied and cannot be used by the looper. It is also una ected by the main volume or phones volume knobs. - Page 10 Connect this USB port to a computer using a standard USB cable. This connection allows Sheeran Looper X to send and receive the digital audio signal to and from your computer. You can also use this connection to import or export audio files, loops, and FX racks. See (5.12) Menu >...
-
Page 11: (4.0) Operation
(4.1) Basic Looping Sheeran Looper X lets you record audio onto four tracks and store each set of four tracks as a loop. Each track can have up to 99 layers. Each track can be a minimum of 1 second long, with no maximum length limit. - Page 12 To begin looping using Ed’s classic workflow in Multi Mode: Begin with either Track or Waveform views. Select a track by pressing one of the Track 1–4 pedals. The Track pedal LED and Record + Play pedal LED will both turn red to indicate the track is armed for recording.
-
Page 13: (4.2) Looper Modes
(4.2) Looper Modes Sheeran Looper X provides 5 different Looper Modes to record, overdub and play your looper tracks. The currently selected Looper Mode is indicated in the bottom right of the touchscreen in the Track, Wave, and Mixer views. -
Page 14: (4.3) Importing Audio
• Factory: This is a collection of over 300 exclusive drum and percussion loops. • Internal: This is the internal storage of Sheeran Looper X. • USB/SD: These sources will appear if you have external storage connected to the respective ports on the rear panel of Sheeran Looper X. -
Page 15: (4.4) Functions
(4.4) Functions The two Functions menus provide access to various features of Sheeran Looper X through simple pedal presses. To open the Functions menu, press the FUNCTION pedal. The pedal indicator will be lit orange, and the touchscreen will display the Functions A menu. - Page 16 Load: Select this option to load a loop using the pedals. You are only able to select loops that are on the same storage device and in the same folder as the currently loaded loop. Use the Track 1–4 pedals to load a different loop. Use the STOP and MODE pedals to move up or down in your banks of loops.
-
Page 17: (4.4.2) Functions B
(4.4.2) Functions B Bounce: On the first Bounce page, use the Track 1–4 pedals to select which tracks you would like to bounce. Then, press the RECORD + PLAY pedal to navigate to the next page. If the looper track is empty, the option will be grayed out. On the next Bounce page, use the Track 1–4 pedals to select the destination looper track for the bounce. - Page 18 Backing Track: Select this option to open the Backing Track feature. See (5.8) Menu > Backing Track Player to learn more. Transpose: Use the Track 1–4 pedals to select a looper track to adjust the transposition. You can also select multiple tracks to change their transposition by the same value.
-
Page 19: (5.0) Menu
The Navigation Menu can be accessed in most pages by tapping the squares icon in the top-left corner of the touchscreen. This menu is used to access the various features of the Sheeran Looper X. To access the menu screen, tap the Menu icon in the upper left corner of the Main screen. - Page 20 Settings: Tap here to adjust the available settings that can be adjusted globally. • Audio Routing: Tap here to adjust Sheeran Looper X’s audio routing settings. • Transfer: Tap here to enter USB Transfer Mode and transfer files to/from a computer. • Firmware: Tap here to enter Firmware Update mode.
-
Page 21: (5.2) Track
(5.2) Track Track view is the main performance view for Sheeran Looper X. Track view displays the audio signal level of your looper tracks, as well as other track and loop information. Tap here to Tap here to access the save the loop. -
Page 22: (5.3) Wave
(5.3) Wave Wave view is similar to Track view. It can also be used as a performance view, but instead of displaying the incoming track audio levels, it displays waveforms of the loop audio. Tap here to Tap here to access the save the loop. -
Page 23: (5.4) Mixer
(5.4) Mixer The Mixer page can be used as a third looping performance screen, while also providing tools to adjust the audio mix of your tracks and add effects. Tap here to reset Tap here to changes to the Mixer. save the loop. -
Page 24: (5.5) Fx
(5.5) FX (5.5.1) Applying FX On the FX Page, you can assign multiple effects (called FX Racks) at once to an audio input or looper track. Each FX Rack is made up of multiple effects that can be individually edited and toggled on the (5.5.2) Menu >... -
Page 25: (5.5.2) Editing Fx
(5.5.2) Editing FX On this page, you can select from included FX presets and edit effect parameters. Return to FX Page Load Save FX Rack Access Individual FX Enable/Bypass Parameters FX Rack Enable/Bypass Solo Track Individual FX Individual FX Parameters To enable or bypass the full FX Rack, tap the Enable/Bypass button in the top-left corner of the touchscreen, underneath the back arrow. -
Page 26: (5.5.3) Pedal Assignment
(5.5.3) Pedal Assignment On the Pedal Assign page, you can modify the functions of Sheeran Looper X's pedals in an FX Rack. Return to FX Page Select FX Rack Trigger Behavior Assign All or Individual FX to Pedal To select the FX Rack controlled by the pedal, tap the icon that shows the name of the FX Rack (e.g., Vocal, Guitar, Lo-Fi), and then select the new FX Rack to control. -
Page 27: (5.5.4) Expression Pedal Assignment
(5.5.4) Expression Pedal Assignment In the Expression menu, you can assign up to 4 effect parameters or volume and panning controls to your connected expression pedal. Assign Expression Parameter Unassign Parameter Change Parameter Range To assign a parameter to the expression pedal, tap the + sign in an empty slot, and then select an FX Rack, looper track volume or looper track panning parameter to assign. -
Page 28: (5.6) Tuner
(5.6) Tuner The built-in tuner allows you to quickly tune your instrument using the intuitive and easy-to-read display. While using the tuner, all input signals will be muted from the outputs. Loop playback will continue to play back to the outputs. -
Page 29: (5.7) Managing Loops
(5.7) Managing Loops As you create loops, you will want to save and load them so you can continue to edit them or use them for performance. Tap to save your loop. Navigation Tap to save Tap to create a new loop. Menu your loop. -
Page 30: (5.7.1) Storage
(5.7.1) Storage As you create and save loops, your Sheeran Looper X's internal storage may become full. To prevent this, you can connect external USB or SD storage as needed. This gives you virtually unlimited storage of loops! To enter the Storage page, tap the Navigation Menu icon in the top-left corner, and then tap the Storage icon. -
Page 31: (5.8) Backing Track Player
Backing Tracks can be played directly from internal storage, or from external USB/SD storage devices. Backing tracks can be loaded to the Sheeran Looper X’s internal storage by using the (5.12) Menu >... -
Page 32: (5.9) Loop Settings
(5.9) Loop Settings Use the Loop Settings page to configure the settings for an individual loop. To show the loop settings, tap the Navigation Menu icon in the top-left corner of the touchscreen, and then tap the Loop Settings icon. (5.9.1) Tempo and Click Tempo: This setting determines the tempo of the loop. -
Page 33: (5.9.2) Looper Mode
• Multi Mode: Use this mode if you want four looper tracks locked to the same length. This is Ed Sheeran’s iconic Looper X workflow. • Sync Mode: Use this mode if you want four looper tracks that can vary in length, with one primary track and three other tracks that can be a multiple or division of the primary track’s length, and will... -
Page 34: (5.9.3) Track Length And Quantize
The loop tempo can still be changed after it has been automatically detected by the first recording. When set to 1-64 Bars, Sheeran Looper X will set that individual track to be that specific length of bars, based on the loop’s current tempo. -
Page 35: (5.9.4) One Shot And Decay
When this parameter is set to 100% for a track, it will not decay over time. As you decrease this parameter, Sheeran Looper X will gradually fade out the track at this newly set rate. The lower the number, the faster the loop will decay. -
Page 36: (5.9.6) Customize Pedal Menu
Sheeran Looper X functions. To select an assignment for a pedal, tap the function name on each pedal to open the list of options. By default, this will be shown as Empty. -
Page 37: (5.10) Global Settings
(5.10) Global Settings Use the Global Settings page to configure Sheeran Looper X’s overall settings, including settings that affect all loops. To show the Global Settings, tap the Navigation Menu icon in the top-left corner of the touchscreen, and then tap the Global Settings icon. -
Page 38: (5.10.2) Audio
1/4 Output Level: This setting determines the output level of the 1/4" Outputs. When set to Line, the output level will be +18 dBu. Use this setting if you are connecting Sheeran Looper X to a full-range, flat-response amplifier, PA speaker, mixer, or audio interface. When set to Amp, the output level will be +6 dBu. -
Page 39: (5.10.3) Usb Audio
USB connection and how its outputs function while doing so: • Live: The audio signal will be sent to your computer as well as to the Sheeran Looper X’s outputs. • DAW: The audio signal will be sent to your computer only. The Sheeran Looper X’s outputs will... -
Page 40: (5.10.4) Midi
MIDI Clock Source: This setting determines how Sheeran Looper X will receive MIDI clock messages. Tap the field and then use the encoder to select the desired source. Select Looper X to receive MIDI clock messages from the 5-pin MIDI Input on the rear panel. If you have a class-compliant MIDI device connected to the USB Type-A Ports, select the device's name to set it as the MIDI clock source. -
Page 41: (5.10.5) Info
(5.10.5) Info On this tab, you can view the currently installed firmware version. You can also access Sheeran Looper X’s EULA by tapping the License field. -
Page 42: (5.11) Audio Routing
You can use the Audio Routing page to control where your input, looper track and output audio signals are sent. These settings are global settings (not per loop) so that you can quickly configure Sheeran Looper X to work best for your gear and performance settings. -
Page 43: (5.11.2) Track
(5.11.2) Track To route an input to a looper track, tap the desired Input 1–4 button. When Stereo Link is enabled, Inputs 1+2 and/or Inputs 3+4 will be selected together. To select a track output mode, tap the Mono (monoaural) or Stereo (binaural) buttons. To route a track to an output, tap the desired Output 1–4 button. -
Page 44: (5.11.3) Output
(5.11.3) Output To adjust the output level of an individual output, tap and drag the white line at the top of its meter. Double-tap the meter to return the fader to the default 0 dB level. -
Page 45: (5.12) Transfer
X drive from your computer. 6. After the drive has been ejected, tap Sync on your Sheeran Looper X to "commit" any changes you made to the contents of the Looper X drive. An additional prompt will appear to confirm you have ejected the drive. -
Page 46: (6.0) Other Functions
To use Sheeran Looper X as an audio interface: Use a standard USB cable to connect Sheeran Looper X's USB Type-B Port to an available USB port (type-A) on your computer. 2. With your computer already powered on, power on Sheeran Looper X using the power switch. -
Page 47: (6.2) External Midi Control
MIDI gear. These MIDI messages can be received from hardware connected to the USB Type-A Port or the 5-pin MIDI Input. Tip: You can enable or disable this feature and change the MIDI Channel used for Sheeran Looper X to receive messages in the (5.10) Menu >... - Page 48 MIDI Control: Pedal Actions (CC#3 or MIDI Note) All actions on this page are triggered by sending the listed Data Messages using MIDI CC#3 messages, or by sending MIDI note messages. Data/Note Action Data/Note Action Start/Stop/All Track 3 Half-Step Down FX 1 Toggle Track 4 Half-Step Down FX 2 Toggle...
-
Page 49: (6.2.1) Midi Clock Receive
(6.2.1) MIDI Clock Receive The Sheeran Looper X can be synced to the tempo of an external MIDI device (e.g., a drum machine) while recording and playing your loops in Fixed, Sync and Serial-Sync modes. The Sheeran Looper X can receive MIDI clock from a device connected to the traditional 5-pin MIDI Input, or from a class compliant device connected to the USB Type-A Port on the rear panel. -
Page 50: (6.2.2) Midi Clock Send
(6.2.2) MIDI Clock Send Sheeran Looper X can send MIDI clock and MIDI start/stop messages to an external MIDI device (e.g., a drum machine) while recording, overdubbing, and playing your loops in Multi, Sync and Band modes. Sheeran Looper X can also send MIDI clock from a device connected to the traditional 5-pin MIDI Output, or from a class compliant device connected to the USB Type-A Port on the rear panel. -
Page 51: (7.0) Appendix
(7.0) Appendix (7.1) Technical Specifications Hardware Display 7” color multi-touch display Pedals (8) aluminum die-cast pedals with RGB LED status indicators Knobs (1) 360° navigation/data encoder with push-to-enter and RGB LED indicator (4) Input gain knobs (1) Main Output volume knob (1) Headphones volume knob (1) Auxiliary Input volume knob Connectors... - Page 52 Looping Specifications Modes Multi, Sync, Song, Band, Free Functions Record, Overdub, Play, Stop, Undo, Clear Track, Clear All, Reverse, Fade In/Out, Mute, Solo, Peel, Bounce, Multiply/Divide Length, Multiply/Divide Speed, Transpose Tracks Max Loop Length Unlimited Max Layers per Loop 99 peelable layers Unlimited bouncing Max Overdub Time per Loop Unlimited...
-
Page 53: (7.2) Trademarks & Licenses
(7.2) Trademarks & Licenses Sheeran Looper products are produced by inMusic Brands, Inc. HeadRush is a trademark of inMusic Brands, Inc., registered in the U.S. and other countries. SD is a registered trademark of SD-3C, LLC. macOS is a trademark of Apple Inc., registered in the U.S. and other countries. - Page 54 Manual Version 1.0.0...
Need help?
Do you have a question about the LOOPER X and is the answer not in the manual?
Questions and answers