Table of Contents
Advertisement
Quick Links
设 计
陈壮筹
2018.08.08
DESIGN
校 对
黄志胜
CO.BY
标准化
STANDARD
业务
王浴舟
seller
批 准
曾磊
AUTHORIZ
E
技术要求
1、
尺寸:145*210mm,68P
2、
单色印刷,应清晰,不能有印刷缺陷。
3、
切边应成直角,不能歪斜。
样板需送设计部门认可方可生产。
4、
标记
MARKER
1、
自62310-72409101起更新版本
自62310-72409101起更正页码
2、
3、
自62310-78509301起更新版本
4、
自62310-A8251001起更新封底、参数页
5、
自62310-B4856301起更新版本
6、
说明书递交文档
图纸名称 PART NAME
西班牙 Edesa
EFT-1411 WH/A
CE-BCD210CM-SQ
22031020007324
说明书.
重量
图样
版本号
标记
(g)
REV.NO
REL
.
0
共 页
第 页
TOTAL
NO. OF SHEETS
SHEETS
40P
变更内容
图号/物料编码 PART NO.
材料 MATERIAL
80g双胶纸
比例
scale
美的冰箱事业部
1:1
MIDEA REFRIGERATION
DIVISION
修改日期
2018.12.20
2019.01.07
2019.05.13
2020.06.17
2020.09.26
签名
陈壮筹
陈壮筹
陈壮筹
陈壮筹
陈壮筹
Advertisement
Table of Contents

Related Manuals for Edesa EFT-1411 WH/A


Summary of Contents for Edesa EFT-1411 WH/A
- Page 1 说明书递交文档 设 计 陈壮筹 图号/物料编码 PART NO. 图纸名称 PART NAME 2018.08.08 DESIGN 西班牙 Edesa 校 对 EFT-1411 WH/A 黄志胜 CO.BY CE-BCD210CM-SQ 22031020007324 标准化 材料 MATERIAL 说明书. STANDARD 80g双胶纸 重量 图样 版本号 业务 比例 标记 王浴舟 REV.NO seller scale 批 准...
- Page 2 EFT-1411 WH/A...
- Page 13 El polvo detrás del refrigerador y en el suelo deben limpiarse oportunamente para mejorar el efecto de enfriamiento y el ahorro de energía. Revise la junta de la puerta con regularidad para asegurarse de que no haya residuos. Limpie la junta de la puerta con un paño suave humedecido con agua jabonosa o detergente diluido.
- Page 17 EDESA:...
-
Page 18: Table Of Contents
Contents SAFETY WARNINGS ......................1 INSTALLTION ........................3 Location ........................3 Reversing the Door Swing(optionnal) ..............3 Door Handle Install Illumination (optional) ............... 7 Door Space Requirements ..................8 Levelling the Unit ....................... 8 Cleaning Before Use ....................8 Before Using Your Unit ....................8 Interior Accessories .................... -
Page 19: Safety Warnings
1. SAFETY WARNINGS Warning : risk of fire / flammable materials THIS appliance is intended to be used in household and similar applications such as staff kitchen areas in shops, offices and other working environments; farm houses and by clients in hotels, motels and other residential type environments;... - Page 20 -Leave the shelves in place so that children may not easily climb inside. refrigerator must be disconnected from the source of electrical supply before attempting the installation of accessory. REFRIGERANT and cyclopentane foaming material used for the appliance are flammable. Therefore, when the appliance is scrapped, it shall be kept away from any fire source and be recovered by a special recovering company with corresponding qualification other than be disposed by combustion, so as to prevent damage to the environment or any other harm.
-
Page 21: Installtion
2. INSTALLTION 2.1 Location When selecting a position for your unit you should make sure the floor is flat and firm, and the room is well ventilated. Avoid locating your unit near a heat source, e.g. cooker, boiler or radiator. Also avoid direct sunlight as it may increase the electrical consumption. - Page 22 2) Remove the screws fixed the top-hinge with cross-slot screwdriver. 3) Replace the top-hinge and the top-door limit block and the door bearing bush to the other side. Remove the nut with sleeve.Take off the washer then remove the axes to the other side and fixed.
- Page 23 Note:the refrigerator-freezer incline angle less 45°. 5) Replace the bottom door bearing bush and the limit block. 6) Replace the bottom hinge to the other side then fix it with screws 7) Replace the mid-hinge.
- Page 24 8) Set the bottom door right position,fix the mid-hinge. 9) Replace the top-hinge. 10) Set the top door right position,fix the top-hinge and the cover. 11) Install the four screw caps and two catches to corresponding position. ·Ensure the Appliance is unplugged and empty. ·Adjust the two leveling feet to their highest position.
-
Page 25: Door Handle Install Illumination (Optional)
*The picture above is only for reference. The actual configuration will depend on the physical product or statement by the distributor 2.3 Door Handle Install Illumination (optional) Note: Figures in the user manual are only for reference. The actual product may differ slightly. The refrigerator must be disconnected from the source of electrical supply before attempting the installation of accessory. -
Page 26: Door Space Requirements
Door Space Requirements The unit's door must be able to open fully as shown. W×D≥902×1052mm Levelling the Unit To do this adjust the two levelling feet at the front of the unit. If the unit is not level, the door and magnetic seal alignments will not be covered properly. -
Page 27: Interior Accessories
◆ Before Plugging in You must check that you have a socket which is compatible with the plug supplied with the unit. ◆ Before Turning On! Do not turn on until two hours after moving the unit. 2.8 Interior Accessories Various glass or plastic storage shelves are included with your appliance - different models have different combinations. -
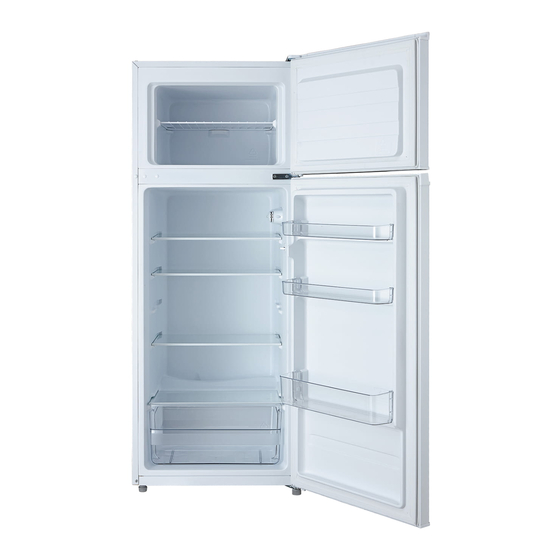
Page 28: Product Overview
3. PRODUCT OVERVIEW *The picture above is only for reference. The actual configuration will depend on the physical product or statement by the distributor 4. OPERATION 4.1 Switching On Your Unit Setting“Off” :UnitOff Setting“Min” :Less Cool Temperature Setting“Med” or “MID” :Normal Operation(adequate for most situations) Setting“Max”... -
Page 29: Noise Inside The Unit
thermostat control knob is set to OFF, the refrigerator will not be running. 4.2 Noise Inside the Unit! You may notice that your unit makes some unusual noises. Most of these are perfectly normal, but you should be aware of them! These noises are caused by the circulation of the refrigerant liquid in the cooling system. -
Page 30: Cleaning Tips
the interior of the refrigerator or contaminated food. Clean the bottle frame, shelves and drawers with a soft cloth dampened with soapy water or diluted detergent. Dry with a soft cloth or dry naturally. Wipe the outer surface of the refrigerator with a soft cloth dampened with soapy water, detergent, etc., and then wipe dry. -
Page 31: Trouble Shooting
7. Trouble shooting The following simple issues can be handled by the user. Please call the after-sale service department if the issues are not settled. Whether the freezer is plugged and connected to power; Inoperation Low voltage; Failure power or tripping circuit Odorous foods should closely wrapped;... -
Page 32: Disposal
If it is the outer condenser, the rear wall should be always clean free of dust or any impurities. ◆ The appliance should be located in the coolest area of the room, away from heat producing appliances or heating ducts, and out of the direct sunlight. ◆... - Page 33 EDESA:...
- Page 35 1.AVISOS DE SEGURANÇA Aviso : Risco de fogo/materiais inflamáveis Este eletrodomés�co des�na-se a ser u�lizado em aplicações domés�cas e similares, tais como áreas de cozinha de pessoal em lojas, escritórios e outros ambientes de trabalho; casas de campo e por clientes em hotéis, motéis e outros ambientes residenciais; ambientes �po alojamento e pequeno-almoço;...
- Page 40 As poeiras atrás do frigorífico, bem como no chão, devem ser limpas periodicamente de forma a melhorar o efeito de arrefecimento e a economia de energia. pano macio humedecido em água e sabão ou detergente diluído em água. O interior do frigorífico deve ser limpo regularmente para evitar odores. bebidas, prateleiras, gavetas, etc.
- Page 41 Não use esfregões, esfregões de aço inoxidável, escovas de arame, abrasivos (como pasta dos dentes), solventes orgânicos (como álcool, acetona, óleo de banana, etc.), água quente, interior. Água quente e solventes orgânicos, como o benzeno, podem deteriorar ou danificar as Não enxague diretamente com água ou outros líquidos durante a limpeza, de forma a evitar curtos circuito ou afetar o isolamento elétrico após imersão.
- Page 44 Tropical: ‘Este aparelho de refrigeração destina-se a ser usado a temperaturas ambientais variando entre 16 °C a 43 °C’. As peças encomendadas na tabela seguinte podem ser adquiridas do canal EDESA: Peça Encomendada Fornecido por Tempo Mínimo Requerido para a Provisão termóstatos...
- Page 48 NETTOYAGE...
- Page 65 Les pièces commandées dans le tableau ci-dessous peuvent être obtenues par EDESA : Cartes de circuits imprimés...
- Page 66 PRODUCT FICHE - EU Directive 2019/2016 EDESA EFT-1411 WH/A N/ST:[16 38]°C EDESA EFT-1411 WH/A N/ST:[16 38]°C EDESA EFT-1411 WH/A N/ST:[16 38]°C...
- Page 67 PRODUCT FICHE - EU Directive 2019/2016 EDESA EFT-1411 WH/A N/ST:[16 38]°C EDESA EFT-1411 WH/A N/ST:[16 38]°C...
Need help?
Do you have a question about the EFT-1411 WH/A and is the answer not in the manual?
Questions and answers