
Subscribe to Our Youtube Channel
Related Manuals for infobit iWall 409R Gen2


Summary of Contents for infobit iWall 409R Gen2
- Page 1 409R Gen2 HDMI 4K60Hz 4x9 Video Wall Controller User Manual V1.0 INFOBIT AV www.infobitav.com info@infobitav.com...
-
Page 2: Table Of Contents
7. Inputs & outputs connection ..................8 8. Network Connection ....................... 9 9. PC Software Control ..................... 10 9.1 Download and run the iWall 409R Gen2 software ............... 10 9.2 Interface introduction ......................10 9.2 Connection Settings ......................12 9.3 Select Input sources ......................15 9.4 Window adjustment ...................... -
Page 3: Overview
1. Overview • The iWall 409R Gen2 is a new generation HDMI 4K60Hz video wall controller designed by INFOBIT AV. Supports 4x HDMI inputs, 2x DP inputs (simultaneous as HDMI IN1 and IN2), 9x HDMI outputs and 1x HDMI loop out. -
Page 4: Applications
• Supports full-channel 24bit, RGB 8:8:8 high color sampling depth, high-quality video image output. 3. Applications It is mainly used in industrial applications such as ultra-high-definition video surveillance, large-scale video walls, advertising, exhibitions, conference, and digital signage. INFOBIT AV www.infobitav.com info@infobitav.com... - Page 5 Single videowall mode Flexible Videowall+ matrix mode Flexible layers roaming mode Side-by-side copy mode Flexible layers overlay mode Rotation 180° Rotation 270° Rotation 90° Portrait display wall mode INFOBIT AV www.infobitav.com info@infobitav.com...
-
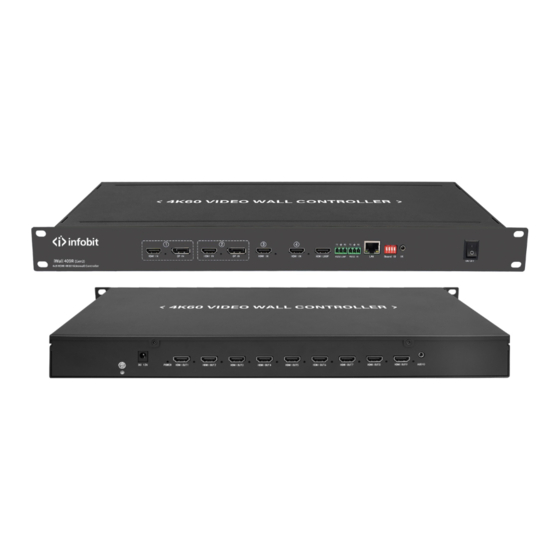
Page 6: Front Panel
HDMI input, max. 4K60Hz Input #4 HDMI loopout, max. 4K60Hz RS232 Loop RS232 In For Serial control Network For PC software control DIP switch IR extender For IR remote control Status indicators Input signal detection Power ON/OFF INFOBIT AV www.infobitav.com info@infobitav.com... -
Page 7: Rear Panel
5. Rear Panel Power Supply, 12V 5A AC-DC HDMI output #1-9, max. 1080P60Hz Audio out, 3.5mm Status indicators 6. Spec Model iWall 409R Gen2 Inputs HDMI 2.0 x4; DP 1.2 x2; HDCP 2.2 Input max. video frequency 600MHz Max. input resolution 4096x2160@60Hz... -
Page 8: Inputs & Outputs Connection
1, can not be used simultaneously. The HDMI #2 and DP #2 are input 2, can not be used simultaneously. OUTPUTS: Connect HDMI out 1 to 9 to displays. Display orders are shown as below: INFOBIT AV www.infobitav.com info@infobitav.com... -
Page 9: Network Connection
• Set the IP address of the controller to 192.168.1.xx (the default IP address of the iWall 409R Gen2 is 192.168.1.192), to make sure your PC is under the same IP address segment as the iWall 409R Gen 2. User can change the IP address of the iWall 409R Gen2 later in the software. -
Page 10: Pc Software Control
9.1 Download and run the iWall 409R Gen2 software Visit the website www.infobitav.com/iwall409r-gen2 to download the Windows-based software “iWall 409R Gen2 Controller software.rar” and zip to folder, then double-click the icon “iWall 409R.exe” to run the software. 9.2 Interface introduction INFOBIT AV www.infobitav.com... - Page 11 “Connection Settings” button. 4- Save all config To save all configuration data to the iWall 409R Gen2 hardware. The PC software will auto read the configuration saved last time when the software is connected to the hardware. 5- Videowall Canvas Showing the virtual videowall layouts video windows and displaying the input number (1, 2, 3 and 4) as colored numbers.
-
Page 12: Connection Settings
9.2 Connection Settings “Connection Settings” Before controlling the iWall 409R Gen2, user must setup connection firstly by click the “Connection Settings” button. INFOBIT AV www.infobitav.com info@infobitav.com... - Page 13 The default IP address of the iWall 409R Gen2 is 192.168.1.192, user shall change the IP address of the control PC to be 192.168.1.xx to make sure the PC and iWall 409R Gen2 are under the same network segment before connecting the hardware. Follow below pictures to change your PC IP address: Click Edit to change IP under the “Ethernet”...
- Page 14 Then Click the drop-down list of the “Select the PC IP” menu, click “Refresh”. 5- Find device Click “Find device”, wait for about 3s, the detected iWall 409R Gen2 will be listed in the “Device list” row. 6- Modify the IP and MAC address Used for changing the iWall 409R Gen2 IP address.
-
Page 15: Select Input Sources
7- Connect the device. Select iWall 409R Gen2 in the above list and then click “Connect the device” to get the connection done. 8- Disconnect To disconnect the PC to the iWall 409R Gen2. 9- Serial connection Showing the list of COM communications ports, select the right one. -
Page 16: Window Adjustment
3- You can also use the keyboard numbers 1/2/3/4 to complete the switching of signal sources after selecting the window. 9.4 Window adjustment 1- Select the window and drag the four corners of with the mouse to adjust the size and position. See below picture: INFOBIT AV www.infobitav.com info@infobitav.com... - Page 17 See below picture: 5- Layers settings Use mouse to drag-and-drop to move the video windows in the videowall canvas area to setup layers overlay. Right-click to setup layers priorities. See below pictures: INFOBIT AV www.infobitav.com info@infobitav.com...
-
Page 18: Save All Config
9.5 Save all config Before disconnecting, click “Save all config” to save all settings data. After reconnecting, the control PC will read the saved configuration automatically. INFOBIT AV www.infobitav.com info@infobitav.com... -
Page 19: Audio Channel
Enable all HDMI outputs ( HDMI out #1 to 9) with embeded audio. 2- Open output 1 port only Enable only HDMI out #1 with embeded audio. 3- Diable audio out Disable all HDMI outputs ( HDMI out #1 to 9) embeded audio. INFOBIT AV www.infobitav.com info@infobitav.com... -
Page 20: Image Rotation
2- Setup rotation for each video image. Right-click on the video window area, then click “Rotation”, see below picture: It supports 90, 180 and 270 rotation, it is used for portrait videowall application, for example LED or digital signage LCD wall. INFOBIT AV www.infobitav.com info@infobitav.com... -
Page 21: Video Gen Mode
9.9 Adaptive filling Enable or disable the automatic adaptive features of the video windows. This function is invalid now, it is reserved in future version. INFOBIT AV www.infobitav.com info@infobitav.com... -
Page 22: Close Window
9.10 Close Window To close the video window, click “Close Window”. It can be enabled by right-click to “Open window”. 9.11 Picture Adjustment User can adjust the brightness, contrast ratio, saturation, color temperature, hue and sharpness properties. INFOBIT AV www.infobitav.com info@infobitav.com... -
Page 23: Windows Adjustment
9.12 Windows Adjustment 1- Layer Display/ Hide INFOBIT AV www.infobitav.com info@infobitav.com... - Page 24 It is built-in shortcut video windows presets. See below pictures. Single image mode Dual-image mode (picture in picture) Dual-image (Left-to-Right side by side) Dual-image (Top-to-Down side by side) Quad-image mode (Mosaic) Quad-image mode (Picture in Picture) INFOBIT AV www.infobitav.com info@infobitav.com...
-
Page 25: Image Effects
User can setup image effects like “Horizontal Mirror”, “Vertical Mirror” and more image parameters. 9.14 Developer 1- Developer Including “De-interlace’ and more developer tools. 2- Offline Disconnect the PC software with the iWall 409R Gen2, used for software demo. 3- Data Sync Read the saved configuration data. INFOBIT AV www.infobitav.com info@infobitav.com... - Page 26 4- Communication Check the communication log. 5- Factory Reset Reset the iWall 409R Gen2 to factory settings. 6- Command send intervals. Setup command sending delays intervals. INFOBIT AV www.infobitav.com info@infobitav.com...
-
Page 27: Ir Remote
1x1: Single display mode, all display show the same source. row+ Setup videowall rows: 1-9 Col+ Setup videowall Cols: 1-9 1Win Single-image mode 2Win Dual-image mode 3Win Three-image mode 4Win Quad-image mode ↑ Window moving up ← Window moving left ↓ Window moving down INFOBIT AV www.infobitav.com info@infobitav.com... -
Page 28: Dip Switch
DIP to upper for 6-10s, then DIP to down side. Then rebooth the iWall 409R to clear the data. Down: Enable loopout; Up: Disable looput. Down: UDP direct connection; UP: Enable DHCP. Note: Must reboot the iWall 409R Gen2 after changing the DIP switch. 12. Keyboard control INFOBIT AV www.infobitav.com... -
Page 29: Rs232 Connection
Switch to select window 1➡2➡3➡4➡1 Rotate 90° anticlockwise Switch input #1 Switch input #2 Switch input #3 Switch input #4 13. RS232 Connection Baud rate: 115200 Stop: 1 Bit: 8 Check: 1 The RS232 connection as below: INFOBIT AV www.infobitav.com info@infobitav.com... -
Page 30: Rs232 Control Command List
Connect the control device like PC, Central control, touch panel or other console to the RS232 IN at the iWall 409R Gen2, via the serial cable. 14. RS232 Control Command List Adjust Range 1st+2nd+3rd Branch Stage Stage Crc8 Usable Stage... - Page 31 Disable Enable 2:3PD insignificance Parameter Check Disable 2:3PD time insignificance Parameter Check 0~15 Disable Sensitivity insignificance Parameter Check Disable D_Correction insignificance Parameter Check Disable 24 PSF Mode insignificance Parameter Check Disable B_Correction insignificance Parameter Check Disable INFOBIT AV www.infobitav.com info@infobitav.com...
- Page 32 Check 0~255 Enable 022800003E Void Ignore Window_Fill insignificance Parameter Check Enable 022A0000E8 Window_On insignificance Parameter Check Enable 022B000184 Freeze insignificance Parameter Check Enable 022C000192 Singal(physics) insignificance Parameter Check Enable 022D0001F9 Audio(physics) insignificance Parameter Check Enable 022E000144 INFOBIT AV www.infobitav.com info@infobitav.com...
- Page 33 Parameter_L Check -50~2047 Disable V_displace Parameter_H Parameter_L Check -10~2047 Disable 90 rot insignificance Parameter Check Enable 033200010A Void Ignore 270 rot insignificance Parameter Check Enable 0334000070 Void Ignore Void Ignore Auto_scale insignificance Parameter Check Enable 03370001CA INFOBIT AV www.infobitav.com info@infobitav.com...
- Page 34 Enable 041500003A Void Ignore Scence insignificance Parameter Check Disable Save it for Void Ignore 418Pro Splice insignificance Parameter Check 0~16 Enable 0601000A29 Save it for Splice Ignore 418Pro Void Ignore Reset insignificance insignificance Check Void Astrict INFOBIT AV www.infobitav.com info@infobitav.com...
Need help?
Do you have a question about the iWall 409R Gen2 and is the answer not in the manual?
Questions and answers