Table of Contents
Advertisement
Quick Links
Advertisement
Table of Contents

Related Manuals for Showerbuddy SB2T TUBBUDDY-TILT

Summary of Contents for Showerbuddy SB2T TUBBUDDY-TILT
-
Page 3: Table Of Contents
Exploded Parts ............... 3 Parts List ................ 4 Assembly ..................5 Setup ..................13 Operation ................... Strut Adjustment ............Cleaning + Maintenance ..........Safety Instructions ............Warranty Information ............34 page 2 Showerbuddy SB2T... -
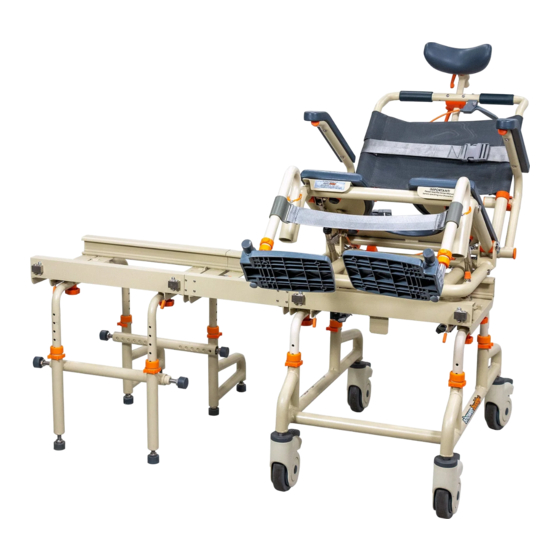
Page 4: Exploded Parts
500-259 500-600 500-253 500-600 500-254 90CLP 500-253 500-254 Showerbuddy undertakes continuous improvement to design and function. Some parts may be shown that have subsequently been updated or changed since publication. page 3 Showerbuddy SB2T... -
Page 5: Parts List
Back Rest Fabric 500-259 Leg Tube Hand Grips Bridge Tongue (Short) Suction Cups Calf Strap Clip On 90CLP Height Adjustment Tubes (Rolling Base) Bath Base Leg (Rear) Rolling Base Track Primary Brake Lever (Left) Primary Brake Lever (Right) Showerbuddy SB2T page 4... -
Page 6: Assembly
Swing the arm rest forward so that it locks into position in the arm rest clip. Slide the arm rest lock over the arm rest clip to lock the arm rest in position. page 5 Showerbuddy SB2T... - Page 7 Showerbuddy...
- Page 8 Adjust to the required height and secure in the correct position. By screwing the neck rest handle in a clockwise direction the neck rest attachment will tighten and secure the neck rest height adjustment tube in position. page 7 Showerbuddy SB2T...
- Page 9 Make sure each leg is fully located in the slot at the rear to prevent the leg from roating. To rotated the leg simply lift and rotate out of the way. Showerbuddy SB2T page 8...
- Page 10 10 After lifting the footrests rotate the footrests outwards to allow the user easy access to the chair. When required rotate the footrests inwards to reposition them for the user. page 9 Showerbuddy SB2T...
- Page 11 Ensure the commode bucket is pushed in far enough that the brackets securely hold the commode bucket in position. The commode bucket should be centred under the opening in the cushion. Showerbuddy SB2T page 10...
- Page 12 Slide the chest belt through the 2 attachment loops on the back rest. Before use adjust the length of the chest belt to suit the user. page 11 Showerbuddy SB2T...
-
Page 13: Setup
NOTE Each height adjustment hole raises the seat base 25mm or 1”. Check to ensure all securing clips are fully inserted. Ensure both height adjustment tubes are aligned at the same height. page 12 Showerbuddy SB2T... - Page 14 Showerbuddy SB2T page 13...
- Page 15 Firmly push the wheeled base onto the tongues on the bridge so the secondary brakes are pushed out of the way. Secure the bridge to the wheeled base using the latch in the centre of the bridge track. page 14 Showerbuddy SB2T...
- Page 16 NOTE Do not unscrew the thread more than 25mm or 1”. If you require more height, raise the bath base track by adjusting the height adjust-ment tubes up or down. Showerbuddy SB2T page 15...
- Page 17 Press the clip pin in on the stabilising tube and slide outwards to the correct position. For smaller adjustments unscrew the rubber stopper to firmly secure the bath base in position. page 16 Showerbuddy SB2T...
-
Page 18: Operation
Secure the neck rest in the correct position by securely tightening the neck rest handles. NOTE Ensure both handles are securely tightened prior to use to prevent the neck rest moving. page 17 Showerbuddy SB2T... - Page 19 This will allow the castor to move freely again. NOTE The castor wheels should always be locked when performing transfers . The castor wheels can be rotated forward to make the chair more stable. page 18 Showerbuddy SB2T...
- Page 20 NOTE Before reclining the chair is it important to be confident with the motion and how the chair operates. The chair has safety stoppers which prevent the chair reclining further than 30°. page 19 Showerbuddy SB2T...
- Page 21 ALWAYS DETATCH THE BRIDGE AFTER TRANSFER OF THE CHAIR. step 8 With your Showerbuddy SB2T assembled you are now ready to transfer the chair into the bath. Lift and hold the primary brake lever to release the chair.
- Page 22 9 Transfer your Showerbuddy SB2T from the wheeled base onto the bath base. Ensure the chair is transferred all the way onto the bath base and primary brake clicks to secure the chair in position. step 10 With your Showerbuddy SB2T secured in...
- Page 23 11 With your Showerbuddy SB2T secured in position on the bath base with the bridge and wheeled base removed you have easy access to the user and chair. If required you can adjust how far your Showerbuddy SB2T is reclined by squeezing the tilt handle.
- Page 24 13 With the bridge and wheeled base re-connected you can transfer the your Showerbuddy SB2T back onto the wheeled base. Lift and hold the primary brake lever to release the chair. The primary brakes are located on each side of the wheeled and bath base tracks at the front.
- Page 25 While returning the chair to the up-right position, you will initially need to support a small amount of the users weight. page 24 Showerbuddy SB2T...
- Page 26 17 Ensure the primary brake securely locks your Showerbuddy SB2T in position on the wheeled base before disconnecting the bridge. Unlock the brakes on the castor wheels. Release the latches which connect the bridge to the wheeled base and roll the wheeled base away.
-
Page 27: Strut Adjustment
If the handle doesn’t return to position freely, use a screw driver to slightly loosen the screw on the tilt handle. This will allow the handle to move freely and will also make the handle easier to squeeze. page 26 Showerbuddy SB2T... - Page 28 Check to ensure that the stainless steel caps on the ends of both of the orange cables are inserted all the way into the cable adjustor as shown. During packaging/shipping and owner setup these parts can sometimes come out. Showerbuddy SB2T page 27...
- Page 29 Keep arms and hands on the armrests at all times. page 28 Showerbuddy SB2T...
-
Page 30: Cleaning + Maintenance
+ maintenance It is recommended that your shower chair is serviced annually by your Showerbuddy Dealer or an authorised, competent service agent, in addition: 1. Regularly inspect all parts of the chair for defects. Any defective part should be removed promptly. -
Page 31: Safety Instructions
It is important that the user(s), and/or the caregivers of the user(s), learn how to safely operate the Showerbuddy shower chair. The following must be read before use of the Showerbuddy shower chair to ensure the safe operation of your Showerbuddy shower chair: The Owner(s) Manual must be read and understood before using the Showerbuddy shower chair. - Page 32 A slippery floor can be caused by dust, water, soap or any substance that doesn’t Transfers should never be attempted with the Showerbuddy allow the tires (tyres) to grip. shower chair positioned on slippery surfaces since the wheel locks can only prevent the wheels from rotating.
- Page 33 Lift the wheelchair up using the push handles and the front upper corners of the wheelchair frame, where the footrests are placed. WARNING! It is not allowed to lift the wheelchair up by gripping the footrests or armrests! We recommend to detach footrests before lifting the chair page 32 Showerbuddy SB2T...
-
Page 34: Warranty Information
33 Showerbuddy SB2T... - Page 36 All ShowerBuddy products are CE, TUV, ISO9001 and TGA certified and comply with AS-NZS 3973. Copyright © 2023 by Showerbuddy New Zealand Ltd, New Zealand. e:admin@shower-buddy.com All rights reserved...
Need help?
Do you have a question about the SB2T TUBBUDDY-TILT and is the answer not in the manual?
Questions and answers