
Subscribe to Our Youtube Channel
Summary of Contents for Alpine ELITE CALGARY
- Page 1 OWNERS MANUAL 0800 99 33 88 (NZ) www.alpinespas.co.nz service@alpinespas.co.nz 1800 99 33 88 (AUS) www.alpinespas.com.au service@alpinespas.com.au...
- Page 2 Find something else...
-
Page 3: Table Of Contents
TABLE OF CONTENTS Introduction................................ Welcome / Spa Pool Record & Warranty..................Important Safety & Operating Instructions................Placing the spa pool............................10-14 Installation Instructions........................... Spa pool contents............................. Assembling the accessories........................Pre-fill procedure.............................. Filling the spa pool............................13-14 Electrical wiring / powering up......................... 14-17 Startup & Refill Procedure........................14-15 Installing the filter cartridges........................ -
Page 4: Introduction
1. INTRODUCTION Congratulations! You are the proud new owner of an Alpine Spa! It is our pleasure to welcome you to the Alpine Spa family. Luxurious hours soaking under the stars whilst enjoying good company and hydrotherapy massage, is now ready and waiting for you every day, all within the confines of your own backyard! We take exceptional pride in our product and have worked hard to ensure all our spa pools include not only the latest in spa pool technology, but also the absolute best in design, quality and construction. So you can rest assured our products will last you for many relaxing years to come. Cheers, The Alpine Spas Team... -
Page 5: Welcome / Spa Pool Record & Warranty
Your Personal Record & Warranty Spa Pool Details Please fill in this information below and keep on hand for future reference. Alpine Spas may request this information upon the submission of a service or technical request. Your name..............................Spa Pool model............................ -
Page 6: Important Safety & Operating Instructions
3. IMPORTANT SAFETY & OPERATING INSTRUCTIONS READ AND FOLLOW ALL INSTRUCTIONS! WHEN INSTALLING AND USING THIS SPA POOL AND ITS ELECTRICAL COMPONENTS , BE SURE TO FOLLOW BASIC SAFETY PRECAUTIONS INCLUDING THE FOLLOWING: 1. WARNING: To reduce the risk of injury, do not permit children to use this product unless they are closely supervised at all times. 2. DANGER: Risk of accidental drowning. Extreme caution must be exercised to prevent unauthorized access by children. 3. DANGER: Risk of injury. Never operate the spa pool if suction fittings are broken or missing. 4. DANGER: Risk of electrical shock. Do not permit any electrical appliance such as a light, radio, television, etc. within 1.5m of a spa pool unless such appliances are installed and built-in by the manufacturer. 5. ELECTRICAL SUPPLY: The electrical supply for this product must include a suitably rated switch & RCD to open all ungrounded supply conductors to comply with the national electrical standards. This disconnect must be readily accessible and visible to the spa pool occupant but installed at least 1.5m from the spa pool’s water. 6. - Page 7 8. CAUTION: Risk of electrical shock. Do not service the spa pool controller yourself as opening or modifying the controller may expose you to dangerous voltage or other risk of injury. Refer all servicing to qualified service personnel unless advised otherwise by the retailer. 9. CAUTION: Risk of electrical shock. If the power supply connections or power supply cord(s) are damaged, if water is entering the audio / video compartment or any electrical equipment compartment area, if the protective shields or barriers are showing signs of deterioration, or if there are signs of other potential damage to the unit: turn off the unit and refer the servicing to Alpine Spas. 10. The spa pool should be subject to periodic routine maintenance and care according to the ‘Spa Pool Care & Maintenance’ and ‘Service Information’ sections of this manual. Installation of the spa pool for anything other than a residential dwelling may result in voiding the manufacturer’s warranty. Please contact the dealer to confirm. 12. Do not bring any object into the spa pool that could damage the spa pool shell. Never insert any object into any opening. 14. WARNING: Do not sit on the spa pool cover or place objects on it.
- Page 8 DO NOT leave the spa pool empty and exposed to direct sunlight without it’s cover - doing so may damage the acrylic. DO NOT power the spa pool without first filling with water. DO NOT allow the water level to fall below the filter/skimmer box. The water level should be kept in line with the perimeter LEDs or at least 50mm above the bottom of the skimmer box at all times. DO NOT allow any persons to place their head under the water. DO NOT roll or slide the spa pool on its side. DO NOT use any chemicals or water balancing products in the spa pool, other than those sold or provided by Alpine Spas or Spa Supplies (Spa Supplies is for NZ customers ONLY). DO ensure a water maintenance regime is used and followed regularly. Failing to balance water or sanitise correctly can damage spa pool components and void warranty. A guide is provided which should be followed carefully. DO ensure the spa pool cover is placed on the spa pool and locked when not in use. DO perform a regular spa pool cleaning schedule as instructed by this manual. DO drain and refill your spa pool at least every 3-4 months or more frequently if required. DO ensure at least 4 hours of filtration is performed by the spa pool each day (this is set as a default: 2 hours, twice per day).
-
Page 9: Placing The Spa Pool
Placing the Spa Pool Choosing the Best Position When choosing where to position your spa pool, the first thing you should consider is what is going beneath it. Your spa pool is very heavy, weighing anything between 1000kg and 2500kg when filled. It is therefore very important you choose an adequate foundation that is strong and level to ensure there is no shifting or strain on the spa pool shell or framing. The base we recommend you use is either a minimum 100mm thick concrete pad, or a reinforced deck. If you choose a deck as a base, please check that it complies with all NZ/AUS building standards and that its max load rating will adequately withstand your spa pool’s weight, plus the total bather load weight. Check Drainage You need to be sure the area in which the spa pool is placed has enough drainage capacity to handle the entire water content of the spa pool. In the event of spillage, areas around the spa pool may become wet; therefore, all flooring, furniture, walls and adjacent structures should be moisture-resistant. Check Service Access It is important to consider the access to the cabinet surrounding the spa pool. In the unlikely event of a leak or issue with components, a service agent may require access to a particular cabinet. We advise leaving a 600mm perimeter of space around the entire spa pool, otherwise the spa pool may need to be moved by the customer into a position suitable for a technician at the time of service. Access to all cabinets is the responsibility of the owner. Detailed Installation Guide For more detailed information and tips on positioning and installing, we highly recommend you read through our ‘Pre-Delivery Guide’. The guide was emailed to... -
Page 10: Installation Instructions
Spa Pool Water Care Handbook Easy to use illustrated guide to water maintenance. 0800 99 33 88 www.alpinespas.co.nz sales@alpinespas.co.nz Copyright Alpine Spas Ltd - 2017 - Ver 1.3 Drain Valve to Cover Keys & iPack Bag Cable Exit Manuals & Garden Hose Screws Carry Straps... -
Page 11: Pre-Fill Procedure
Spa Pool Cover Lifter (Optional Extra) The cover lifter needs to be assembled onto the spa pool, please follow the instructions carefully. Some brackets may need to be secured onto the spa pool cabinet. Certain setups may have restrictions - see our ‘Cover Lifter Installation Guide’ for confirmation. Download the ‘Cover Lifter Installation Guide’ from our support page: www.alpinespas.co.nz/support or www.alpinespas.com.au/support PRE-FILL PROCEDURE STOP!! BEFORE FILLING, START HERE! FAILING TO FOLLOW THIS PROCEDURE MAY RESULT IN ISSUES STARTING UP THE SPA POOL OR VOIDING WARRANTY. Steps to Prepare for Filling: Open all of the spa pool jets by Check the silver plaque on the As the spa pool has been water... -
Page 12: Filling The Spa Pool
4. INSTALLATION INSTRUCTIONS FILL LEVEL WARNING FAILURE TO KEEP SPA POOL FILLED TO MINIMUM REQUIRED LEVEL (AS SEEN BELOW) WILL RESULT IN DAMAGE TO COMPONENTS. MONITOR WATER LEVEL AND REFILL AFTER USE. SWITCH OFF SPA POOL IMMEDIATELY IF WATER LEVEL DROPS BELOW FILTER BOX. -
Page 13: Electrical Wiring / Powering Up
4. INSTALLATION INSTRUCTIONS ELECTRICAL WIRING / POWERING UP ANY ELECTRICAL WIRING WORK MUST BE PERFORMED BY A LICENSED ELECTRICIAN. How to Check The Model of Your Spa Pool: The model name is imprinted on a silver plaque, usually located along the bottom edge of the spa pool cabinet. Check around the whole perimeter of the spa pool to locate. Silver Plaque Electrical Information Per Model MODEL CABLE/PLUG TECH INFO / WIRING... -
Page 14: Startup & Refill Procedure
5. STARTUP & REFILL PROCEDURE Setting Up a 32A or 45A Model and Matching the Circuit Breaker. The SV3 controller contains mains current measurement hardware that allows the controller to monitor the RMS current draw. The current sensing hardware is only installed on Phase 1. Phases 2 and 3 can also be monitored if they are wired to terminal “CS” of the mains terminal block (refer to SV install manual). Current measurement is used for variable element operation. The purpose is to automatically adjust heater power level to match the residual current available when accessory devices (ie pumps) are operating. The OEM menu item C.LMT (current limit) should be set to match the rating of the circuit breaker that feeds the spa pool. In multi phase installations the C.LMT should be set to match the current limit of Phase 1. The SV controller will shut down and latch fault code (Er10 - over current) if the SV controller detects a mains current above 110% of C.LMT. The default current limit (C.LMT) only needs to be programmed once at time of installation to match the rating of the circuit breaker that feeds the spa pool. The default value for the SV3 Controller is pre-set at 32A. To Change the C.LMT: Press the button, scroll down using the button and then select ADV. Enter the following PIN 14863 and then press ENTER. Locate CLMT (Current Limit), you may need to scroll down, and then adjust the limit to match the rating of the circuit breaker that feeds the spa pool. Press the button to confirm. - Page 15 Note: Only one Nature Stick is supplied (and required) for the NaturePure system. For dual filter models, the Nature2 Stick can be fitted to either filter container. The Nature2 Stick should be replaced (discarded) every 4 months. NZ customers can purchase these from www.spasupplies.co.nz or at an Alpine Spas showroom. AUS customers can purchase these from an Alpine Spas showroom. AVOID DAMAGE TO SPA POOL & VOIDING WARRANTY - ONLY USE FILTER CARTRIDGES PURCHASED FROM ALPINE SPAS OR SPA SUPPLIES (SPA SUPPLIES IS FOR NZ CUSTOMERS ONLY) .
-
Page 16: Switching On & Heating Up
5. STARTUP & REFILL PROCEDURE SWITCHING ON & HEATING UP Automatic Startup Procedure Upon activating power, the spa pool’s topside control panel should light up and the screen will display a series of specific sequences and numbers. If the screen is blank when you power on, switch off/on again. Priming The spa pool will enter a ‘priming mode’ whenever it is first initiated or restarted. This is startup function which will run the circulation pump to clear any air in the plumbing for 20 seconds at a time. The topside control panel will display “PRIMING” or similar to indicate the priming mode state. Check that the circulation pump has engaged by visually sighting moving/rippling water inside spa pool. Water may flow from the waterfall (if open and equipped). If the priming function fails, an error message (likely to be ER3-Water Prime) will display on the topside control panel - check the troubleshooting guide at the back of this manual for assistance. HEAT-UP PROCESS Automatic Heating After priming has finished, the spa pool is automatically configured to begin heating to 38 . The circulation pump will engage and the spa pool will begin filtering and heating up automatically. Note: A default snooze timer is in place which disables functions (including heating) between 22:00 – 07:00. This will slow initial heat up time if not temporarily disabled. You must set the time (clock) on the topside control panel and then disable the snooze timer to allow for a fast first time heat-up. -
Page 17: Balancing & Sanitising The Water
Follow the water care startup procedure found in the Water Care Handbook to setup the water for use. Only use products supplied by Alpine Spas or Spa Supplies (Spa Supplies is for NZ customers ONLY) (including filter cartridges) in your spa pool. Use of unapproved products may result in your warranty becoming void, please contact us if in doubt. - Page 18 6. SPA USAGE GUIDE & TIPS TOPSIDE CONTROL PANEL QUICK GUIDES OVERVIEW The 'topside control panel' is the main control for your spa pool where you can set temperature and turn on pumps and lights. It's also where you will apply settings to control how the spa pool operates. The following pages cover the different topside control panels associated with your particular spa pool model. These quick guides provide an overview of the buttons and the actions they perform however the panels are capable of multiple functions not explained in the diagram. A full copy of the topside control panel user manual can be downloaded from our support page. Note: If your topside control panel does not light up when powering on, switch the spa pool off and on again. Download full topside control panel user manuals from our support page: www.alpinespas.co.nz/support or www. alpinespas.com.au/support...
- Page 19 SPANET SmartTouch ALL MODELS HEAT RANGE 10 - 41.0 1. LIGHT SENSOR 6. LIGHT BUTTON 11. DECREASE SET TEMP The SmartTouch is equipped with a light The light button is used to toggle the spa Press this button to decrease the set sensor to automatically adjust the bright- light(s) ON / OFF and to access the light temperature.
-
Page 20: Spa Pool Usage Guide & Tips
6. SPA POOL USAGE GUIDE & TIPS SPA POOL OPERATION Post Heat-up Once the default 38°C is reached the circulation pump will stop operating and will only re-engage if the spa pool loses temperature, a filter cycle has begun or the system is polling automatically to check temperature. Understanding the Display (Topside Control Panel) When the spa pool is first powered and priming has completed, the default display will show the current water temperature, current time & date, current activity scroll and the set temperature. Water Temperature Shows the current water temperature. Time & Date Shows the current set time. It's important that this time is set correctly. - Page 21 The ‘PUMP’ button/s will activate the jet pump/s and high pressured water will flow from the jet pieces. Turn the diverter valves to switch pressure between seats. Setting the Time & Date Be sure to set the correct date and time on the topside control panel. Vital functions such as filtration, sanitisation cycles and power saving settings are dependent on this being accurate. Navigate to the time & date display by following the instructions below. Press the button Then press the TIME or DATE menu item to adjust, you may need to use the or button to scroll up and down. Once you have selected the TIME or DATE, press the , button to adjust accordingly. Time is set in 24-hour time format. Date is set by weekday, day, month and year. Once you have finished each adjustment, press the button to confirm. Spa Pool Behavior - Running Modes Your spa pool is pre-set to ‘NORM’ (normal) running mode by default which is the standard operating mode and it’s recommend to leave this unchanged as it is the most economical mode for regular use. Normal mode means that the spa pool will always aim to keep the water temperature at the users set temperature (default 38°C) so it is ready to use whenever you are. Other modes are available to use, which may be useful at different times of the year or if you cannot use the spa pool for a set period of time: Name...
- Page 22 6. SPA POOL USAGE GUIDE & TIPS Filter Cycles A filter cycle is a period in which the circulation pump is run for a user programmed length of time. This allows for a dedicated period of water sanitising and clean up. Heavier spa pool usage may require longer filter cycle times. At the start of each filter cycle, the main jet pump may run briefly to purge the plumbing. Filter cycle operation consists of two separate programmable parameters: - Duration of filtration per day [FILT] (hours per day, e.g. 4 hours total per day) - Filter cycle blocks [F.CYC] runtime divided into cycles every 1/2/3/4/6/8/12 or 24 hrs (default=3) The default settings are: 4 hours of filtration per day over 4 individual 1-hour filter blocks (e.g. every 4 hours, an hour long filter cycle will engage.) Setting Filter Cycle Hours of Filtration [FILT] Press the button Press the FILT menu item to adjust, you may need to use the or button to scroll up and down. Change the filtration using the or button. Then press the button to confirm. (Default = 4 hours) Setting Filter Cycle Blocks [F.CYC]: Press the button Press the F.CYC menu item to adjust, you may need to use the...
- Page 23 Disabling the Default Sleep Timer [SNZE] Follow these steps if you wish to quickly disable the default sleep timer: Press the button Press the SNZ.1 menu item to adjust, you may need to use the or button to scroll up and down. Using the button, cycle through the options until you find 'Disabled'. Then press the button to confirm. Setting & Adjusting Sleep Timers [SNZ.1] Two individual sleep timers can be set, each of which can operate on one or more specified weekdays. These appear in the form of [SNZ.1] and [SNZ.2] in the settings. Each sleep time setting consists of a week day setting, start time and stop time (refer table below). Item Description Notes #.DAY Selected day of operation Sat / Sun / Mon / Tue / Wed / Thu / Fri Sat-Sun / Mon-Fri / Sat-Fri / : Default = Sat-Fri #.BGN Begin Time Adjustable: 00:00 - 23:59 Sleep time period begins Default = 22:00 (10PM) #.END End Time...
- Page 24 6. SPA POOL USAGE GUIDE & TIPS Power Save [P.SAV] Power utilities in some regions offer household power meters that can track power usage during different times of the day. This allows the utilities to offer greatly reduced power pricing during off peak power times. The Power Save (P.SAV) function allows the user to program in the peak power period so the spa control knows not to perform filtration and/or heating during those expensive hours. Instead the controller will take advantage of the competitively priced off peak hours, and run the filtration and/or heating during the off peak hours. NOTE: If P.SAV function is to be used the spa user MUST consider any sleep timers [SNZE] and adjust them accordingly. Sleep timer settings will OVERRIDE any P.SAV settings. Running P.SAV function while sleep timer is set will likely result in cold water temperatures due to insufficient heat time available. Setting & Adjusting Power Save [P.SAV] The power save setting consists of a choice of mode, peak power period start time and peak power period end time (refer table below). Item Description Notes P.SAV Power Save Mode OFF = P.SAV disabled (Default) Functions disabled during LOW = Filtration disabled peak power periods HIGH = Filtration & Heating disabled Begin Time Adjustable: 00:00 - 23:59...
- Page 25 Sanitise/Clean-up Cycle The sanitise button activates a 20 minute sanitisation cycle that runs the filtration pump and ozone / U. V to filter the spa pool water to restore and refresh water quality. At the start and end of the cycle, the controller will sequentially (one at a time) run a variety of pumps for one minute each to purge the plumbing and clear any unfiltered water trapped in those lines. Key-lock Function The keypad buttons can be locked to prevent accidental key presses or to limit access to certain controller functions. This feature is particularly helpful when spa pool covers are used or where children are present. There are two types of key- locks available: Full Lock Mode - locks all buttons so all presses are ineffective until unlocked. Partial Lock Mode - only ‘PUMPS’, ‘LIGHT’ and ‘SANITISE’ buttons allowed. Press the button Press the LOCK menu item to adjust, you may need to use the or button to scroll up and down. Select between PARTIAL and LOCK. Then press the button to confirm. (Default = OFF) Partial Lock Full Lock To unlock a locked SmartTouch, press on a locked button, the Enter Pin screen will appear (refer aside). Press the unlock pin sequence 1,4,7,8,9 (L-shaped pattern) and then press the...
-
Page 26: Getting To Know Your Spa Pool
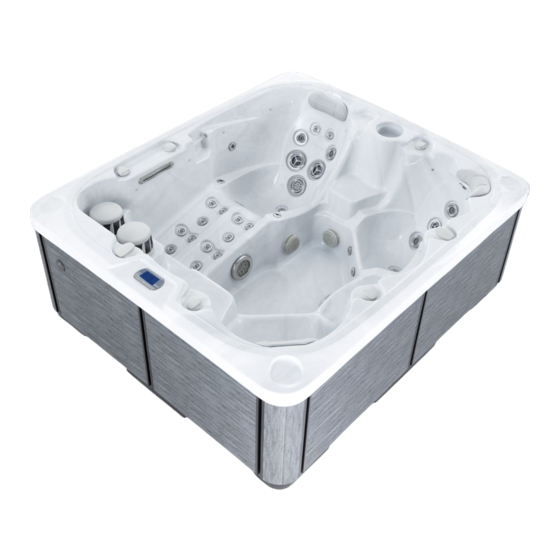
7. GETTING TO KNOW YOUR SPA POOL CALGARY SPA POOL OVERVIEW Components: Spa Pool Controller SpaNet SV3 Topside Control Panel SpaNet SmartTouch Heater Element 5.25kW SpaNet Heater Pumps 2x 3HP Water Pump & 1x Circulation Pump Skimmer/Filter Type Floating Weir Sanitisers UV + Ozone Electrical Info 32/45 Amps 230 - 240V AC 50hz IPX5 Cable No Cable - Hardwiring Required Hardwire Required: This spa pool requires direct hardwiring from the circuit board to the system controller with suitable electrical cable. BELOW DIAGRAMS ARE FOR 32A CONNECTIONS. - Page 27 Identify labeled parts on pages 38-41. Remove left side front panel to access controller...
- Page 28 7. GETTING TO KNOW YOUR SPA POOL MONTREAL SPA POOL OVERVIEW Components: Spa Pool Controller SpaNet SV3 Topside Control Panel SpaNet SmartTouch Heater Element 5.25kW SpaNet Heater Pumps 2x 3HP Water Pump & 1x Circulation Pump Skimmer/Filter Type Floating Weir Sanitisers UV + Ozone Electrical Info 32/45 Amps 230 - 240V AC 50hz IPX5 Cable No Cable - Hardwiring Required Hardwire Required: This spa pool requires direct hardwiring from the circuit board to the system controller with suitable electrical cable. BELOW DIAGRAMS ARE FOR 32A CONNECTIONS.
- Page 29 Identify labeled parts on pages 38-41. Remove left side front panel to access controller FRONT OF SPA...
- Page 30 7. GETTING TO KNOW YOUR SPA POOL KINGSTON SPA POOL OVERVIEW Components: Spa Pool Controller SpaNet SV3 Topside Control Panel SpaNet SmartTouch Heater Element 5.25kW SpaNet Heater Pumps 3x 3HP Water Pump & 1x Circulation Pump Skimmer/Filter Type Floating Weir Sanitisers UV + Ozone Electrical Info 32/45 Amps 230 - 240V AC 50hz IPX5 Cable No Cable - Hardwiring Required Hardwire Required: This spa pool requires direct hardwiring from the circuit board to the system controller with suitable electrical cable. BELOW DIAGRAMS ARE FOR 32A/45A CONNECTIONS.
- Page 31 Identify labeled parts on pages 38-41. Remove left side front panel to access controller FRONT OF SPA...
- Page 32 7. GETTING TO KNOW YOUR SPA POOL EDMONTON SPA POOL OVERVIEW Components: Spa Pool Controller SpaNet SV3 Topside Control Panel SpaNet SmartTouch Heater Element 5.25kW SpaNet Heater Pumps 3x 3HP Water Pump & 1x Circulation Pump Skimmer/Filter Type Floating Weir Sanitisers UV + Ozone Electrical Info 32/45 Amps 230 - 240V AC 50hz IPX5 Cable No Cable - Hardwiring Required Hardwire Required: This spa pool requires direct hardwiring from the circuit board to the system controller with suitable electrical cable. BELOW DIAGRAMS ARE FOR 32A/45A CONNECTIONS.
- Page 33 Identify labeled parts on pages 38-41. Remove left side front panel to access controller FRONT OF SPA...
- Page 34 7. GETTING TO KNOW YOUR SPA POOL ALBERTA SPA POOL OVERVIEW Components: Spa Pool Controller SpaNet SV3 Topside Control Panel SpaNet SmartTouch Heater Element 5.25kW SpaNet Heater Pumps 3x 3HP Water Pump & 1x Circulation Pump Skimmer/Filter Type Floating Weir Sanitisers UV + Ozone Electrical Info 32/45 Amps 230 - 240V AC 50hz IPX5 Cable No Cable - Hardwiring Required Hardwire Required: This spa pool requires direct hardwiring from the circuit board to the system controller with suitable electrical cable. BELOW DIAGRAMS ARE FOR 32A/45A CONNECTIONS.
- Page 35 Identify labeled parts on pages 38-41. Remove left side panels to access controller FRONT OF SPA...
-
Page 36: Spa Pool Parts Labeled
7. GETTING TO KNOW YOUR SPA POOL SPA POOL PARTS LABELED AIR VENTURI Turning this dial injects air into the jet-stream, boosting the pressure of the jets in a particular set of seats (usually the ones closest to the dial). Turn dial off when finished with the jets to avoid a continuous flow of cold air entering the water when you are not soaking. WATERFALL CONTROL DIAL This smaller three pin valve is used to adjust the flow rate of the waterfall and fountains (if equipped). To turn off - simply twist clockwise until fully closed and reverse this process to turn on. Be careful not to overturn the dial and force it past it’s natural stopping point. PRIMARY DIVERTER This dial gives you the ability to force maximum jet pressure into a certain group of seats. Turn it fully left or fully right to transfer water pressure between different seats in the spa pool. Position it halfway (50/50) to distribute an even pressure to all seats at once. MASSAGE JETS Stainless Steel bearing-less jets come in a variety of sizes and configurations in your spa pool to deliver a range of different massage pressures to those persons soaking. Activate by turning on the jet pump via the topside control panel. LED PERIMETER LIGHTING There is a perimeter of mini LED lights surrounding the top inner edge of the acrylic. These can be switched between various colour options and modes by using the topside control panel. The LED line... - Page 37 LED FLOODLIGHT A large LED floodlight sits below the waterline, tinting the water to the selected LED colour while syncing with the rest of the lighting package. FOUNTAIN JET The fountain jets create a spectacle of elegance by squirting water into the spa pool. These can be controlled manually but will only operate when the circulation pump is operating (Filtering or Heating). PUMP INTAKES Pump intakes sit in the foot-well of the spa pool. Water is sucked through these by the pumps and then expelled back out the jets. INTERNAL DRAIN / SEAT DRAIN The spa pool water drains out this port in the footwell when the external drain valve is released. Small Ozone bubbles may emit from this piece from time to time - this is a normal function. Individual seat drains also exist in the deeper bucket seats for draining convenience. EXTERNAL DRAIN VALVES The external drain valves sit along the bottom edge of the spa pool (one for the footwell and one for the seat drains). Attach a hose and twist and turn to release the flow of water when draining. Using the drain valves is explained on page 45. SKIMMER BOX The skimmer box houses your filter(s) which water is drawn through when the circulation pump is engaged. ICE BOX A wine-sized cooler pocket designed to be filled with ice, complete with its own drain valve. Insulated to prevent any heat loss or transfer.
- Page 38 7. GETTING TO KNOW YOUR SPA POOL SPA POOL PARTS LABELED - CONTINUED SYSTEM CONTROLLER The heart of the spa pool. A computer system and heater makes up the controller as a whole and controls all components in the spa pool including the topside control panel. HEADREST Select hydrotherapy seats have headrests as a comfort option to add to the relaxation experience. Some headrests have LED lights behind to illuminate the area. CABINET PANEL Multiple cabinet panels surround the outer edge of your spa pool which protect the components inside. Panels are held on to the frame of the spa pool with vertical slats which sit at each end of the cabinet side. VERTICAL SLAT The multiple vertical slats hold the cabinet panels to the framing of the spa pool. To remove the panels, undo the screws holding the slats. TOPSIDE CONTROL PANEL This is the touch screen topside control panel located on the top of the spa pool into which various commands, contro sequences and options for operating the spa pool can be entered. HYDROWAVE MASSAGE JET An extra large elongated massage jet designed for the ultimate hydrotherapy experience.
-
Page 39: Pressure Diverter & Air Venturi Valves
FOOT BLASTER The foot blaster is a specialised foot massage jet, usually located in the foot well of the spa. PRESSURE DIVERTER & AIR VENTURI VALVES Pressure Diverter Found on select models, turning this dial left/right will switch the jet pressure from one side of the spa pool to the other. For even jet pressure across all seats, leave the dial adjusted to the middle position (50/50). Air Venturi Valve Turning these dials on will inject air flow into selected jets to increase their pressure. You will notice the water stream becomes aerated when functioning. The seat located closest to the dial is usually the one to receive the boost. We recommend to turn off these valves when you exit the pool. WATERFALL CONTROL Waterfall Behaviour The waterfall will only flow when the circulation pump is running (heating or filtering) and when the dial is open. See your Spa pools model overview to help locate the dial. Turning ON/OFF Turn the waterfall dial anti-clockwise to open the flow of water, clockwise to shut it off. Be EXTREMELY careful not to over-twist and push the dial past the point of natural resistance. -
Page 40: Led Lights
7. GETTING TO KNOW YOUR SPA POOL LED LIGHTS Activating the Lights Activate the LED lights by pressing the ‘LIGHT’ button found on the top-side control panel. Adjust the way the light operates by pressing the one of the Light Mode buttons. Once you have selected your desired Mode, you can then adjust the Brightness, Colour or Speed depending on what Mode you have selected. JETS Activating the Jets To turn on a jet pump - press the jet button/s on the top-side control panel. Adjusting Jet Water Flow Each individual jet piece can have its water pressure adjusted by opening and closing the flow. For max pressure, simply turn the jet face gently in a anti- clockwise direction until you feel it stop. To reduce/stop the flow, turn in a clockwise direction. When closed, a small amount of water trickling through the jet piece is normal (this is protection for the pump in case all jets pieces are shut off). Twist jet anti-clockwise to open flow. Twist jet clockwise to close flow. - Page 41 Removing the Jets You will need to remove the jet pieces to clean behind them (It’s easier to remove a jet piece when the spa pool is empty, however it is possible to do when filled). Ensure the jet pump is off before attempting to remove any jets. Grip the jet piece tight and turn in When you feel the natural The jet piece should pop out and an anti-clockwise direction. stopping point, apply slightly more be able to be removed, exposing turning pressure while gently the jet body. pulling towards you. To replace the jet piece, reverse the steps above and turn in a clock-wise direction. Note: The HydroWave jet is not designed to be removed. Interchanging the Jets Jets of the same size mold can be swapped around to build custom seats. Choose the desired jet pieces to interchange and follow the removal and replacement steps above. Jet pieces of the same size can be interchanged ICE BUCKET To use the ice bucket, simply fill the bucket with ice and place in your favourite beverage to keep it cool. Melting will occur, which will be drained from the cavity slowly by a small drain hole at the bottom of the bucket, to the bottom of your spa and onto your concrete. Keep this in mind as not to mistake for a leak.
-
Page 42: Spa Pool Care & Maintenance
8. SPA POOL CARE & MAINTENANCE OPENING THE PANELS OPENING THE SPA POOL PANELS IS A WARRANTY REQUIREMENT. Your spa pool contains high performance parts that are regularly put under pressure and exposed to various water conditions controlled by the user. As part of your warranty requirements, your spa pool requires periodic checking of the components inside, just like how a car requires the bonnet opened to check oil. The inspection is rather simple and should take no longer than 10 minutes. See pages 52-54 to understand what to check for. Vertical Slat Left Panel Vertical Slat Right Panel Vertical Slat Each side of the spa pool consists of two cabinet panels, left and right. Holding these panels onto the frame of the spa pool are three vertical slats with 3 screws... -
Page 43: Draining The Spa Pool
DRAINING THE SPA POOL Operating the Drain Valve When it's time to drain the spa pool you can use the simple external drain valve mechanisms located on the bottom edge of your spa pool. Two are provided (one for the footwell, and one for the bucket seats). Water will not flow out of the drain as long as the cap is on tight and pressed in as per the 'flow locked position' - see photo. To use the drain Flow locked valve, follow the steps below. (Retracted position with cap screwed on tight) Draining Water Your spa pool needs to be drained and refilled every 3-4 months depending on usage. This is outlined in more detail in the ‘Spa Pool Water Care Handbook’ found in our water care startup kit. See your iPack for the hose attachment piece. NEED HELP? WATCH VIDEO ON TURN OFF POWER TO THE SPA DRAINING YOUR SPA AT: BEFORE DRAINING THE WATER! www.alpinespas.co.nz/support or... -
Page 44: Cleaning The Filters
CLEANING THE FILTERS We recommend having a second set of filters on hand to rotate while cleaning. Quick Clean (once per week) Once a week, remove your filters from the spa pool and wash them down with a hose. Maximize the water pressure of your hose and spray the cartridge thoroughly (put your thumb over the tip of the hose). Your aim is to remove any build up of filtered material stuck between the folds of the filter paper. Do not leave filters out of spa pool for prolonged periods of time. Soak Filters (once per month) Once a month, remove your filters from the spa pool and place them in a bucket of warm water. Add filter cleaning solution to the bucket (available from Alpine Spas) and leave to soak overnight. Once soaked, remove from bucket and wash thoroughly with a hose to remove loosened debris. Replacing Filters (as required) A filter cartridge should last up to 6 months when cleaned as per this guide. Filters that are discoloured and become difficult to clean are signs that a new set may be due. Only Alpine Spas approved cartridges are to be used in the spa pool. CLEANING THE ACRYLIC SHELL General Cleaning (as required) The acrylic surface is non-porous and most marks or dirt should come off quickly and easily. We recommend using a microfibre cloth to wipe the shell. For more resistant marks you can dissolve a small amount of baking soda into the cloth and apply it to the targeted area. -
Page 45: Cleaning & Maintaining The Cabinet
CLEANING & MAINTAINING THE CABINET The synthetic cabinet (composite wood) is virtually maintenance free, however you should hose it down once a month or as required to remove any cobwebs or dirt accumulating. A mild soap and microfibre cloth could be used to assist if required for stubborn marks, as long as it is thoroughly washed off. CARING FOR THE SPA POOL COVER The cover consists of a shrink-wrapped polystyrene block wrapped in a marine- grade UV treated outdoor vinyl. Although it's tough and made to withstand the elements, the cover is continually exposed to harsh sunlight and weather conditions plus whatever else is thrown at it during day-to-day usage. To maximize its life-span, please follow these guidelines: General Cleaning (as required) Keep your cover as clean as possible, and remove any debris that may build up on top of the vinyl. Wipe with a microfibre cloth or large towel and hose down if required. Wipe the underside of the cover regularly. Dedicated Clean (once per month) Once a month, completely remove the spa pool cover from the spa pool (you may want to cover the spa pool with a tarp or similar protector during this process). Thoroughly clean both the top vinyl and underside of the cover using warm water and mild dish-washing detergent (do not use harsh chemicals). Hose off and dry the cover with a towel. Ensure you clean the locks and straps so they are free of any mold or cobwebs. Unzip a portion of the zip and in a safe place, stand your cover up to form an ‘A-frame’ and leave to dry like this for 1-2 hours before placing back on top of your spa pool. Protecting the Vinyl (every 3-4 months) Every 3-4 months or each time you go to drain your spa pool, it’s a good chance to apply a vinyl protector to the topside of the cover. A spray on solution such as... -
Page 46: Cleaning The Jets
PERFORMING A PIPE CLEAN Consistent water balancing and general filter cleaning will keep your water clean and clear and protect your spa pool components. But unfortunately it’s almost impossible to avoid bacteria and organic material making a home inside the spa pool plumbing/pipes. Bacteria has a way of protecting itself by forming as ‘bio-film’ which sticks to the inside of the pipes. Although this rarely causes issues, excessive build up can make water balancing more difficult and you may find bits of bio-film floating in the spa pool if some of it manages to detach from the interior pipe wall. To destroy bio-film or any other nasties hidden in the pipes, we recommend that you do a ‘Pipe Clean’ by regularly adding Iluka Brilliance. This product can be purchased in NZ from an Alpine Spas showroom or www.spasupplies.co.nz, and in AUS from an Alpine Spas showroom. If you add Iluka Brilliance to your spa water every month it will help keep your pipes clean and clear of any bio-film. Once you have added Iluka Brilliance to your spa water, simply press the 'CLEAN' button on your spa to ensure that all of your pumps are activated at least once. This will ensure it can circulate and clean all of the pipes. If you haven't added Iluka Brilliance to your spa water for a while, you may find that a significant amount of bio-film is dislodged from your pipes. It's important to clean your filters after doing so - this will prevent the bio-film from sitting in your filters and circulating bacteria throughtout your spa. People who use Iluka Brilliance often report that they notice their spa water quality improves noticably. The great thing about this product too is that you can add it to the spa water and it's safe for you to get in the water straight away. -
Page 47: Leaving The Spa Pool Short Term
LEAVING THE SPA POOL SHORT TERM If you are heading away for a holiday or just know you won’t be using your spa pool for a short period of time (less than a month), it’s a good idea to take some steps to protect your spa pool and save you the heating costs! 1. Clean Filters Your spa pool operates best with a clean set of filters. Remove and wash thoroughly as per filter cleaning instructions on page 46. 2. Remove Headrests Unclip the headrests and dry off before putting them in a safe place. When the cover stays on the spa pool for an extended period of time, ozone gas can build up on top of the water and eat away at the headrest material. 3. Shock Dose Shock dose the water using a cap full of ‘Spa Chlorine’ and ensure the cover is left off for 1 hour while running the pumps before replacing it. 4. Turn Down Temperature Turn the temperature down to the low 20’s, or place in away mode and make sure the spa pool is set to operate its filter cycles automatically (this is the default). 5. Secure Cover Place the spa pool cover on securely and lock with the clips. By following those steps your spa pool will keep filtering and will not heat excessively while you are away. You will return to a healthy, clean spa pool. If possible, while you are away, have a neighbour or friend open the spa pool cover once every a week for a few minutes to air it out and shock dose the water if required. - Page 48 8. SPA POOL CARE & MAINTENANCE TURNING OFF LONG TERM There may come a time when you need to leave the spa pool for a period longer than a month and want to shut the spa pool off. Follow these steps to safely prepare the spa pool for hibernation: 1. See Previous Steps Perform steps 1 and 2 from ‘Leaving the Spa Pool Short Term’ before moving on. Turn OFF Spa Pool Completely turn off the spa pool at your isolation switch or mains board. 3. Drain the Water Drain the water out of the spa pool via the external drain valve. 4. Drain pipes via Barrel Unions Open up the cabinets surrounding the spa pool and locate the barrel unions at the controller unit / heater and the pumps. Loosen (strop wrench may be required) the barrel unions either side of the component to drain excess water from the surrounding pipes. Put down a towel if required, to soak up water. Tighten the unions back up once finished.
- Page 49 CLEANING & MAINTENANCE SCHEDULE Follow this easy cleaning & maintenance schedule (in addition to your regular water maintenance) to care for your Spa Pool and help protect your warranty. WEEKLY Test and balance the water Clean filters (quick clean process) Shock dose (if required e.g. water is not clear) Wipe down cover, cabinet and acrylic as required. MONTHLY Clean filters (soak process) Clean cover (dedicated clean process) Drain and refill process (pipe clean if required) Rinse headrests in fresh water EVERY 3-4 MONTHS Remove, inspect and clean jet pieces Wipe down acrylic shell while water is drained Protect cover (apply vinyl protectant) Open panels. Inspect components. Inspect pumps, check barrel unions and U. V Bulb...
- Page 50 Maintaining/balancing the spa pool water according to well established methods and following the guide provided will help to avoid such issues. ISSUES OUTLINED ABOVE ARE NOT COVERED BY WARRANTY. How to check your pump(s) We recommend checking the pump(s) every 3-4 months which should become part of your drain and refill process. The number of pumps will vary per spa pool, so check your spa pool overview page. Open up the cabinets around the spa pool to find the pump(s). Any signs of leaking, rust, calcium build-up or yellow/white powder type substance usually between the plastic wet end and metal parts of the pump may indicate an issue and service may be required. Please photograph and contact Alpine Spas. BARREL UNION MAINTENANCE Barrel unions are the connection piece used to join the plumbing to the pumps and the heater. Being able to easily remove the pumps or heater is important for servicing. Because barrel unions are a thread fitting, they may loosen slowly over time due to factors such as vibration (from the pump) and need to be checked periodically. Loose barrel unions will promote leaks. How to check your barrel unions. Open up the cabinets around the spa pool. Find the pump(s) and the system controller...
- Page 51 LED Indicator Contact Alpine Spas to purchase a new UV light bulb - the bulb carries a 12 month parts warranty. A replacement can be installed in a number of minutes without needing to drain the spa pool. Please follow our video or photo guide found on our support page (see link at the bottom of the page).
- Page 52 9. SERVICE INFORMATION TROUBLESHOOTING Water Troubleshooting Please see our ‘Spa Pool Water Care Handbook’ for a complete guide of troubleshooting water issues. See page 17 for more information. Download the handbook from the support page on our website: www.alpinespas.co.nz/support or www.alpinespas.com.au/support General Troubleshooting ISSUE POSSIBLE CAUSE SOLUTION Display is blank Data connection failed Switch Spa pool OFF and ON again No power Breaker or RCD OFF Check RCD is turned on Loose plug or wires Check plug & wire connections (electrician) RCD trips Mis-wired connections Check wiring is correct & matches diagram (electrician) Component failure Call for service Spa pool NOT heating Spa pool in rest/away/sleep mode Change mode to ready/normal mode Temp set low Increase set temperature Spa pool doesn’t reach Spa pool in rest/away/sleep mode...
- Page 53 Diagnostic Messages - Topside Control Panel MESSAGE CAUSE ACTION REQUIRED ER-2 HEATER PLUG Internal heater sensor communication Turn mains power OFF, wait 5 minutes (no heat sensor communication) error then restart spa pool. Contact tech if problem not resolved ER-3 WATER PRIME Air detected in heater tube Turn off power to spa for 30 seconds and (prime has failed) then turn it back on Low water level Check spa pool water level (refill if necessary) Dirty filter cartridges Remove and clean filter cartridges then press Pump A button to retry prime Airlock in pipe work Bleed air from pipes by loosening barrel unions on pumps...
- Page 54 Notes...
- Page 56 0800 99 33 88 (NZ) www.alpinespas.co.nz service@alpinespas.co.nz 1800 99 33 88 (AUS) www.alpinespas.com.au service@alpinespas.com.au Copyright Alpine Spas - 2023 v1...
Need help?
Do you have a question about the ELITE CALGARY and is the answer not in the manual?
Questions and answers