Table of Contents
Advertisement
Available languages
Available languages
Quick Links
INSTRUCTION MANUAL
OUTDOOR STEEL
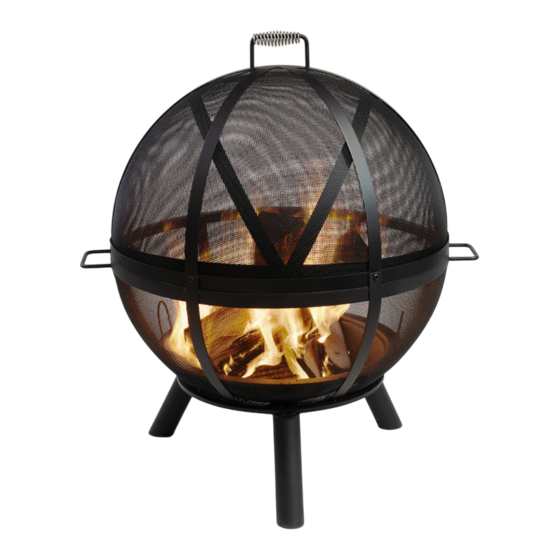
WOOD BURNER FIRE PIT
MODEL NUMBER: COB10508
Thank you for purchasing your new
Outdoor Steel Wood Burner Fire Pit.
DO NOT RETURN THIS ITEM TO THE STORE
Should you encounter problems after following all the steps herein contained please contact our Customer Support: Call 1-888-227-
3340 or email: customerservice@dekoliving.com. Kindly provide the model number, place and date of purchase and a shortdescription
of the problem.
LIMITED WARRANTY This product has a 1 year Limited Warranty. This warranty is limited to the replacement of defective parts only.
Labor charges and/or damage incurred during installation, repair, replacement as well as incidental and consequential damages
connected with the above are excluded. Any damage to this product as a result of neglect, misuse, accident, improper installation or
use other than the purpose SHALL VOID THIS WARRANTY
IMPORTANT, RETAIN FOR FUTURE REFERENCE: READ CAREFULLY
011/2023
Advertisement
Table of Contents

Related Manuals for DEKO LIVING COB10508


Summary of Contents for DEKO LIVING COB10508
- Page 1 INSTRUCTION MANUAL OUTDOOR STEEL WOOD BURNER FIRE PIT MODEL NUMBER: COB10508 Thank you for purchasing your new Outdoor Steel Wood Burner Fire Pit. DO NOT RETURN THIS ITEM TO THE STORE Should you encounter problems after following all the steps herein contained please contact our Customer Support: Call 1-888-227- 3340 or email: customerservice@dekoliving.com.
-
Page 2: Limited Warranty
WARNING WARNING FOR YOUR SAFETY FOR YOUR SAFETY 1) Improper installation, adjustment, alteration, For Outdoor Use Only service or maintenance can cause injury or (outside any enclosure) property damage. 2) Read the installation, operation, and maintenance instructions thoroughly before installing or servicing this equipment. Installer: Leave these instructions with the 3) Failure to follow these instructions could consumer. - Page 3 List Of Parts LETTERS PARTS QUANTITY LETTERS PARTS QUANTITY Front Handle Side Handle Top front screen Bottom hemisphere Top Rear Screen Log grate Poker Handle Cover Fire Bowl...
-
Page 4: Hardware List
Hardware List M6x 16 M6x 25 Washer Wrench Screw Screw Flange Nut Qty. 8 Qty. 2 Qty. 6 Qty. 12 Qty. 4 Qty. 1 SAFETY INFORMATION Please read and understand this entire manual before attempting to assemble, operate or install. WARNINGS •... - Page 5 ASSEMBLY INSTRUCTIONS Step 1: Flip the bottom hemisphere (H) upside down. Attach 3 legs (I) to the bottom hemisphere (H) using 6 M6x16 screws (AA) and 6 washers (CC). Secure with a Philip screwdriver. M6x 16 Screw x6 Washer x6 Step 2: Attach the 2 side handles (G) to the bottom hemisphere (H) using 4 M6 nuts (DD).
- Page 6 ASSEMBLY INSTRUCTIONS Step 4: Attach the front handle (A) to the top front screen (B) using 2 M6 nuts (DD). Tighten the nuts with the 4 with the included wrench (FF). M6 x2 Step 5: Install 2 M6x25 screws (BB) through the holes on the side of the bottom hemisphere (H) and top rear screen (C).
- Page 7 ASSEMBLY INSTRUCTIONS Step 7: Place the log grate (D) into the fire bowl (F), then place the fire bowl (F) into the bottom (H). Step 8: Your fire pit is now ready for use. Keep the 8 poker (J) near the fire pit for use. WARNINGS Always use poker open and close the top front screen during use.
-
Page 8: Care And Maintenance
Care and Maintenance • Allow the fire pit to cool completely before moving it. • To extend the life of your fire pit, clean it after each use. • To protect the fire pit finish, use a soft cloth to wipe the fire pit and poker. •... -
Page 10: Manuel D'instructions
Français MANUEL D'INSTRUCTIONS ACIER D'EXTÉRIEUR BRÛLEUR À BOIS FOYER NUMÉRO DE MODÈLE : COB10508 Nous vous remercions d'avoir acheté votre nouveau foyer d'extérieur en acier avec brûleur à bois. NE PAS RETOURNER CET ARTICLE AU MAGASIN Si vous rencontrez des problèmes après avoir suivi toutes les étapes décrites dans le présent document, veuillez contacter notre service d'assistance à... -
Page 11: Pour Votre Sécurité
AVERTISSEMENT AVERTISSEMENT POUR VOTRE SÉCURITÉ POUR VOTRE SÉCURITÉ 1) Une installation, un réglage, une modification, un Utilisation à l'extérieur uniquement entretien ou une maintenance incorrects peuvent entraîner des blessures ou des dommages matériels. (en dehors de toute enceinte) 2) Lisez attentivement les instructions d'installation, d'utilisation et d'entretien avant d'installer ou de réparer cet appareil. -
Page 12: Liste Des Pièces
Liste des pièces LETTRES PIÈCES QUANTITÉ LETTRES PIÈCES QUANTITÉ Poignée latérale Poignée avant Hémisphère Écran supérieur inférieur avant Jambes Écran supérieur arrière Poker Grille à bûches Couverture Poignée Bol à feu... -
Page 13: Liste Du Matériel
Liste du matériel M6x 16 M6x 25 Lave-linge Clé à molette Écrou à bride Qté. 8 Qté. 2 Qté. 6 Qté. 12 Qté. 4 Qté. 1 INFORMATIONS SUR LA SÉCURITÉ Veuillez lire et comprendre l'intégralité de ce manuel avant d'essayer d'assembler, de faire fonctionner ou d'installer l'appareil. -
Page 14: Instructions D'assemblage
INSTRUCTIONS D'ASSEMBLAGE Étape 1 : Retourner l'hémisphère inférieur (H). Fixer 3 pieds (I) à l'hémisphère inférieur (H) à l'aide de 6 vis M6x16 (AA) et de 6 rondelles (CC). Fixer à l'aide d'un tournevis Philip. Vis M6x 16 x6 Rondelle x6 Étape 2 : Fixer les 2 poignées latérales (G) à... - Page 15 INSTRUCTIONS D'ASSEMBLAGE Étape 4 : Fixer la poignée avant (A) à l'écran avant supérieur (B) à l'aide de 2 écrous M6 (DD). Serrer les écrous avec les 4 à l'aide de la clé fournie (FF). M6 x2 Étape 5 : Installer 2 vis M6x25 (BB) dans les trous situés sur le côté...
- Page 16 INSTRUCTIONS D'ASSEMBLAGE Étape 7 : Placez la grille à bûches (D) dans le foyer (F), puis placez le foyer (F) dans le fond (H). Étape 8 : Votre foyer est maintenant prêt à l'emploi. Gardez le tisonnier 8 (J) près du foyer pour pouvoir l'utiliser.
-
Page 17: Entretien Et Maintenance
Entretien et maintenance • Laissez le foyer refroidir complètement avant de le déplacer. • Pour prolonger la durée de vie de votre foyer, nettoyez-le après chaque utilisation. • Pour protéger la finition du foyer, utilisez un chiffon doux pour essuyer le foyer et le tisonnier. •... - Page 20 W W . D E K O L I V I N G . C O M...
Need help?
Do you have a question about the COB10508 and is the answer not in the manual?
Questions and answers