Table of Contents
Advertisement
Quick Links
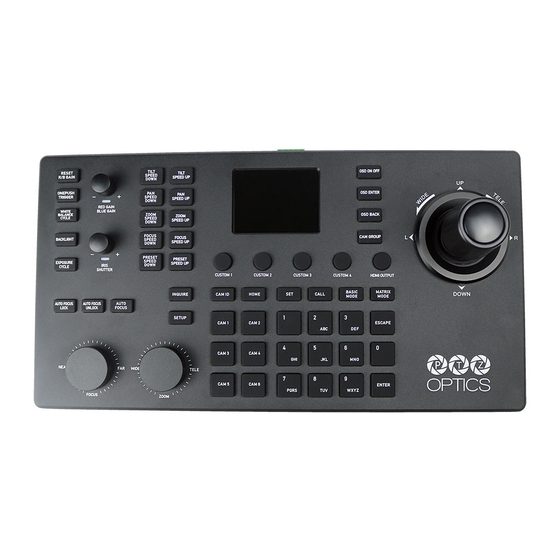
Figure 1: PTZ Optics SUPERJOY-G-1 Camera Controller.
➢ To select a camera: press camera button (12). Current selected camera number will
appear in the OSD (see Figure 3) and on the V800 Channel 5..
➢ Use the Joy Stick (7) to pan; left, right, up, down.
➢ Turn the Joy Stick knob (7) to zoom in and out.
➢ Use the Wide-Tele knob (11) to zoom in and out.
➢ You can pan with the Joy Stick and at the same time zoom with the Wide-Tele knob.
➢ To select a preset, press number button 1 through 0 (11).
➢ To change or set a preset, first adjust the camera to the desired position. Then press and
hold the desired preset button until the preset note in the on screen display window
disappears. Observe that presets 1 through 8 are reserved for most applications (see
Figure2). Please use presets 9 and 0 for temporary presets.
Observe that the
Custom
The
Camera Presets
Press the
HDMI Output button
PT-SUPERJOY-G1-User-Manual
PT-SUPERJOY-G1-User-Manual
buttons can be set to automatically adjust all four cameras with one button press.
sheet shows typical startup settings for each Control button.
to show the selected camera on the
.
V800 CH5
Page 1
Advertisement
Table of Contents

Related Manuals for PTZ Optics PT-SUPERJOY-G1

Summary of Contents for PTZ Optics PT-SUPERJOY-G1
- Page 1 PT-SUPERJOY-G1-User-Manual PT-SUPERJOY-G1-User-Manual Figure 1: PTZ Optics SUPERJOY-G-1 Camera Controller. ➢ To select a camera: press camera button (12). Current selected camera number will appear in the OSD (see Figure 3) and on the V800 Channel 5.. ➢ Use the Joy Stick (7) to pan; left, right, up, down.
- Page 2 PT-SUPERJOY-G1 - Instructions Figure 3: On Screen Display. Figure 2: Camera Presets. NOTE: The OSD shows the IP address of the controller. As of 2-23-2023, the IP address was set to 192.168.1.12 as a static address. Camera IP Camera IP...
- Page 3 Camera IP Addresses Custom Control Buttons Custom Control Buttons The PT-Superjoy controller has 4 cus- tom control buttons (4 in Figure 1). These custom buttons recall Super When a custom button is Presets. pressed, all cameras will move to the Super Preset locations.
- Page 4 PT-SUPERJOY-G1 - Instructions The following comes from the official User Manual Operating the Camera To begin remotely operating a camera, you will first need to use the Camera Select buttons to begin using controller. Once selected, you will have full remote operation of the camera from the controller.
- Page 5 Camera IP Addresses Knob. When the camera is in One Push White Balance, you can press the [ONEPUSH TRIGGER] button from the White Balance Control section of the controller to calibrate the white balance. ● Exposure Control: Use the [EXPOSURE MODE] button to cycle through the camera’s Exposure modes.
- Page 6 PT-SUPERJOY-G1 - Instructions Joystick Web Interface Device Management The Device Management page, available from the controllers web interface, allows you to define new cameras and adjust already configured cameras. Group 1-4: Camera groups 1 - 4. Each group includes 7 channels / cameras.
Need help?
Do you have a question about the PT-SUPERJOY-G1 and is the answer not in the manual?
Questions and answers