Table of Contents
Advertisement
Quick Links
Advertisement
Table of Contents

Related Manuals for bluelab IntelliDose


Summary of Contents for bluelab IntelliDose
- Page 1 IntelliDose Controller User Manual English...
-
Page 2: Table Of Contents
4.0 Installation ........11 9.1 Bluelab pH Probe care ....30 4.1 Mounting ........11 9.2 Cleaning the Bluelab pH Probe .. 31 4.2 Configure Outputs ......11 9.3 Hydrating the pH probe ....32 4.3 Wiring probes ....... 11 9.4 Peristaltic Pumps ...... -
Page 3: Introduction & Overview
Remote monitoring and control. *Requires Bluelab IntelliLink and internet access What are Dosing Lockouts for? They are a built-in safety feature that stops Acid or Nutrient dosing if an error is detected in the system. 1.2 What’s in the box? -
Page 4: Key Functionality
Install the IntelliDose controller to one side of the mixing tank where it will not be exposed to splashes and vapours. Remember, the sensor leads (5m) must be able to reach the sample pot which should be mounted just above the top of the mixing tank. -
Page 5: Edenic Software
filter. 1.4 Edenic Software If your IntelliDose is connected to an IntelliLink then it can send and receive data from Edenic. Edenic by Bluelab is a cloud-based software solution that can be accessed on your mobile device or computer. -
Page 6: Understanding Your Device
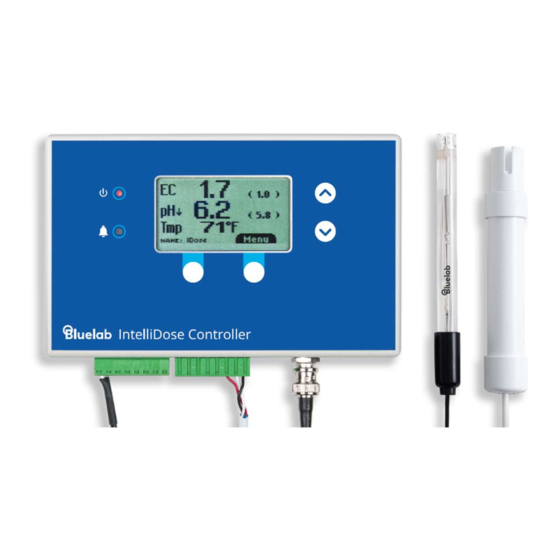
2.0 Understanding your device 2.1 The controller Up and Down Menu / Enter / Save / Exit / Cancel soft Power status buttons Edit soft button button Alarm status 24 VDC pH Probe Terminal Block Input Power Conductivity and temperature Probe 2.2 The display Parent menu Parameter and... -
Page 7: Terminal Block
The IntelliDose output voltages for dosing and irrigation are dependent on the power supply adapter used. The IntelliDose is supplied with a 24VDC power supply, but can be run from a 12-24 V DC or AC power supply with a maximum of 2.5 A. -
Page 8: Menu
2.4 Menu The two keys at the bottom of the display are “soft keys”. This means their function, is shown on the screen above them. After switching on, you will see the right-hand key has the label “menu” on the LCD above it and the left-hand key is unused at this point. To the right of the LCD screen are two arrow keys. -
Page 9: Initial Configuration
Screen Contrast Adjust screen contrast to help with visibility Backlight Adjust screen brightness to suit the environment Info Version information for IntelliDose and connected probe. Advanced Dosing type - Simple (default) or Propotional Dosing mode - Sequential (default) or... -
Page 10: Powered Outputs
Advanced > Outputs menu to enable functions you require. Note there are 9 outputs, the IntelliDose will block settings if all 9 are allocated. Nutrient Parts Adjustable from 1 through to 9 (default is 2 parts). Set this for how many nutrient parts you will be mixing. -
Page 11: Installation
4.0 Installation 4.1 Mounting The IntelliDose controller should be installed in a cool, dry place out of direct sunlight. Remove the screws holding the back, fit the mounting feet, then screw to the wall. If using the dry wall (plaster board) anchors, use the longer screws supplied. If fixing to a plywood board, use the shorter screws. -
Page 12: Connecting Pumps And Solenoids
4.4 Connecting pumps and solenoids The wiring diagram for pumps and solenoids depends on your configuration of the IntelliDose. The outputs from 1 to 9 change depending on the options selected. Example wiring diagram for dosing 3 nutrient parts and pH lower. -
Page 13: Typical Installation Diagrams
4.5 Typical installation diagrams The following diagrams are illustrative of typical installations. All of these are using two nutrient parts and pH Lower. Reservoir control using submersible pump Nutrient film technique (NFT) - Page 14 NFT with valve to add water to dilute conductivity Drip to waste with solenoid valves and irrigation pump controlled via a contactor panel...
-
Page 15: Controlling 110/240 Vac
4.6 Controlling 110/240 VAC The IntelliDose outputs are 24 VDC from the supplied plug pack. If you need to drive larger devices that are 110/240 VAC powered (i.e an Irrigation pump) you can use a Bluelab Power Relay R4. Please refer to the Bluelab Power Relay R4 Manual for complete details of the product. -
Page 16: Peristaltic Pumps
4.7 Peristaltic Pumps Bluelab Peristaltic pumps are rated for 12 - 24 VDC. You can run up to 9 peristaltic pumps from an IntelliDose Controller. Peristaltic pumps should be installed above the stock tanks and the reservoir. Place stock tanks on the ground, next to the reservoir. -
Page 17: Placement Of The Probes
4.8 Placement of the probes The tip of the Bluelab pH Probe must be submerged in the liquid. Do not pour concentrated nutrient solution or pH adjuster directly onto probes when in the reservoir. Strong acids, alkali and nutrients damage the probes, trigger the alarms (if on) or cause the pump to accidentally dose or stop dosing. -
Page 18: Dosing Setup
5.0 Dosing setup Mixing nutrients - IMPORTANT - PLEASE READ THIS CAREFULLY! When using any automatic doser, it is important the nutrients and acid/alkali are diluted to 2%. The instructions on many dry powdered nutrients tell you to prepare the stock solutions to quite a concentrated level (100:1 or more). Liquid nutrients are also very concentrated. -
Page 19: Set Point
find you need to use pH Raise at certain growth stages. The IntelliDose can be configured to run no pH adjuster, pH raise, pH lower or both. If you choose to run both, you will be able to wire up separate peristaltic pumps to the raise and lower outputs, but the system will only be able to dose in one direction at a time. -
Page 20: Multi-Part Dosing
5.6 Multi-part dosing For 1-part dosing, only one dosing pump is used to add nutrient to the mixing tank. When 2-part dosing is selected then two dosing pumps will be used to add part A and part B stock solutions. If the part A and part B do not dose at exactly the same rate (one tank empties quicker than the other) there are a number of reasons why this may occur. -
Page 21: Advanced Dosing
By installing a mixing tank with two water level ball valves, one at a low level and other at a high level, it is possible for the IntelliDose controller to dilute the nutrient tank by adding water. This is done by operating a solenoid valve in line with the high-level valve. -
Page 22: Day/Night Ec
5.7.4 Day/Night EC Different Conductivity for day and night is useful for crops needing a weaker solution during the heat of the day and a stronger mix when it cools at night time (e.g. to help prevent tip burn in lettuce). The user can define when “day”... -
Page 23: Irrigation
6.0 Irrigation IntelliDose provides the ability to control up to 4 irrigation stations with an optional master pump. If a master pump is selected, this output will run each time any of the station outputs is set to run, to accommodate having a single irrigation pump with each station being watered by opening a solenoid valve. -
Page 24: Station Settings
6.2 Station settings Irrigation settings for each station are the following options, each station’s settings can be accessed in a similar manner. Menu setting Description Irrig Run Time Specify how many hours/minutes/seconds the station will run each irrigation event. Irrigate every If ‘Irrigate at same time each day’... -
Page 25: Alarms
7.0 Alarms Setting alarms on your IntelliDose Controller will help warn you when one of your parameters is outside your target range. 7.1 Alarm Menu Alarm Hold off time Delay before the system goes into alarm after a trigger has occurred. -
Page 26: Calibration
8.0 Calibration pH calibration is important before first use. It ensures pH measurements and/or pH stock solution dosing is accurate. For accurate pH readings the pH probe should be cleaned, and calibration carried out when: The device is using factory defaults (the calibration indicators are not lit). ... - Page 27 pH 7.0 calibration Rinse and place both clean pH and Temperature probe tips in the pH 7.0 calibration solution. Wait a few minutes for the probes to clean the pH probe come to the same temperature as the solution. Use the menu and Enter keys to navigate to the Calibrate pH 7 screen.
-
Page 28: Conductivity Calibration
The solution supplied has an EC of 2.77mS/cm. To Calibration solution ensure the IntelliDose calibrates properly, you will need to use 2.77mS/cm solution to calibrate. Allow about 5 minutes for the temperature compensation to fully stabilize, press the menu button to reach the Calibration screen, press “Enter”... -
Page 29: Calibration Tips
8.3 Calibration Tips For best pH calibration pH reading accuracy is dependent on the accuracy and age of the calibration solutions used and the use and cleanliness of the pH probe tip. Ensure the pH probe has been cleaned and rinse with clean water between ... -
Page 30: Cleaning & Maintenance
Storing the pH probe The pH probe tip must be kept moist. To prepare the pH probe for storage, add enough Bluelab pH Probe KCl Storage Solution to the cap so the probe tip is covered. DO NOT use RO (Reverse Osmosis), Distilled or De-ionized water. -
Page 31: Cleaning The Bluelab Ph Probe
After cleaning, use the probe straight away, or place the storage cap on the probe tip. Always ensure the cap contains enough Bluelab pH Probe KCl Storage Solution to cover the probe tip. -
Page 32: Hydrating The Ph Probe
9.3 Hydrating the pH probe Hydrate the pH probe in Bluelab pH Probe KCl Storage Solution when: the probe tip has not always been stored in KCl storage solution, to improve the reading response speed. the probe tip has been accidentally allowed to dry out. -
Page 33: Troubleshooting & Faq
10.0 Troubleshooting & FAQ 10.1 Troubleshooting guide Trouble Correction Check the power pack is functioning, (by measuring with a voltmeter if possible), is plugged in, switched on and properly Unit is connected to the controller. completely If unit still fails to function, the probability is the internal 4A fuse dead (20mm x 5mm miniature glass fuse) may have blown, likely i.e. -
Page 34: Frequently Asked Questions
Returning IntelliDose to factory settings: Remove the power supply from the unit Count to 10 Hold down the up and the down arrows to the right of the screen Plug the power supply back into the unit (still holding the arrows) Continue to hold the two buttons until the ‘Defaults are loading’... -
Page 35: Controller Menu
Adjust screen contrast to help with visibility Backlight Adjust screen brightness to suit the environment Info Version information for IntelliDose and connected probe. Advanced Dosing type - Simple (default) or Propotional Dosing mode - Sequential (default) or simultaneous Lockouts - Stop the device from dosing if in alarm Configure Outputs •... -
Page 36: Specifications
11.0 Specifications 11.1 Technical specifications Control parameter Conductivity Temperature EC, CF, or TDS (500 Units °C or °F ppm) 0.1 to 9.9 EC. 0-50 °C / 32-125 Measure range 2 to 12 pH 1 to 99 CF, °F 50 to 4,900 ppm 0.1 EC to 5.9 EC, Control range 4.5 to 8.0 pH... - Page 37 24VDC, 2.5* A Power *Current draw depends on number of outputs used, rated at 2.5 A maximum Screen display languages English User Manual languages English FCC Part 15 Class A, EN55022 Class A, EN61000-4-2/3 Certifications (IEC801-2/3), EN55024 and RoHS directive. Radio Signals Not Applicable Requires Android (8.0 or later) or iOS (12 or later)
-
Page 38: Ph Adjuster Compatibility For Tubing¹
11.2 pH adjuster compatibility for tubing¹ Bluelab does not recommend the use of highly concentrated acid or alkaline with this product as it is likely to cause damage to the pump tubing. Many leading brands of pH Up and pH Down are appropriate for use without dilution. -
Page 39: Accessories & Warranty
Dosing tube comes with barbs included to make replacement easy. 12.5 pH Probe KCl Storage Solution The best solution to store and hydrate your Bluelab pH products. Bluelab pH Probe KCl Storage Solution increases response time and maximizes the life of Bluelab pH... -
Page 40: Bluelab Limited Warranty
This warranty does not apply to equipment, component or part that was not manufactured or sold by Bluelab and shall be void if any such item is installed on a Product. Further, this warranty does not apply to replacement of items subject to normal use, wear and tear and expressly excludes: •... -
Page 41: Get In Touch
This warranty is governed by the laws of the state of country where Product is purchased, without regard to its choice of law principles. Except as allowed by law, Bluelab does not limit or exclude other rights a consumer may have with regard to the Product. No Bluelab distributor, employee or agent is authorized to modify, extend, or otherwise change the terms of this warranty.
Need help?
Do you have a question about the IntelliDose and is the answer not in the manual?
Questions and answers