
Related Manuals for Cleveland Controls A-08740 0 Series

Summary of Contents for Cleveland Controls A-08740 0 Series
- Page 1 • OPACITY MONITOR MANUAL IM-A-08740-05 • Series A-08740-*0 Universal Opacity Monitorwith LED Light Source Instruction Manual A-08740.05...
-
Page 2: Revision Control
• OPACITY MONITOR MANUAL IM-A-08740-05 • Revision Control Documentation Number and Revision Log This manual is UniControl Inc. document number IM-A-08740-05 dated February 1, 2022. Manual Revision Date IM-A-08740-05 12/27/2021 IM-A-08740-04 11/01/2011 Hardware Revision Number Electronics Unit LED light source P/N 31180 Light Source Assembly LED light source P/N 31181 Receiver Assembly... -
Page 3: Safety Warnings
• OPACITY MONITOR MANUAL IM-A-08740-05 • Safety Warnings Failure to comply in full with the following safety requirements can result in equipment damage and personal injury/death. Read the entire manual to become familiar with the use and operation of this device. Only qualified personnel should attempt to install, wire, commission, startup, service or operate this device. - Page 4 • OPACITY MONITOR MANUAL IM-A-08740-05 •...
-
Page 5: Table Of Contents
• OPACITY MONITOR MANUAL IM-A-08740-05 • Table of Contents Revision Control ................................... 2 Symbols Used in This Manual .............................. 2 Safety Warnings ..................................3 Wiring Tips .................................... 3 Storage, Handling & Unpacking ............................3 1.0 Introduction 1.1 Description of Operation ..............................7 1.2 Specifications ................................ - Page 6 • OPACITY MONITOR MANUAL IM-A-08740-05 •...
-
Page 7: Introduction
SPDT contacts are provided for a remote alarm (which can be purchased separately: Cleveland Controls L-05500-00). The operator can select manual or automatic alarm reset. Modbus communications for interface with a SCADA system (Supervisory Control and Data Acquisition system) or other controls is standard. -
Page 8: Specifications
• OPACITY MONITOR MANUAL IM-A-08740-05 • 1.2 Specifications Power requirements:120 V ac ± 10%, 50/60 Hz. Ambient temperature ranges: 32–130 ºF (0-54 ºC) for electronics unit. 32–160 ºF (0-70 ºC) for light source and receiver units. Fuse: One, @ 1 Amp. Measurement range: 0 to 100% opacity. -
Page 9: Nomenclature
However, the Cleveland Controls P/N 20458 Series L-05500-00 Audible/Visual Alarm can be purchased separately. Also available separately, the Cleveland Controls P/N 31726 Purge Air Blower Kit is used in positive flue gas pressure applications. -
Page 10: Installation
• OPACITY MONITOR MANUAL IM-A-08740-05 • 2.0 INSTALLATION 2.1 Mounting Mount the electronics/display unit in a dry location where the ambient temperature is within the specified temperature range, 32-160 ºF (0-70 ºC). • Mount the unit away from excessive vibration. •... -
Page 11: Wiring
• OPACITY MONITOR MANUAL IM-A-08740-05 • 2.2 Wiring The following information on wiring is generally applicable to all models. Refer also to the wiring diagrams in this manual (Figure 6 - Figure 9). Field wiring consists of 120 V ac control wiring, dc signal wiring, and Modbus wiring. -
Page 12: Operation & Maintenance
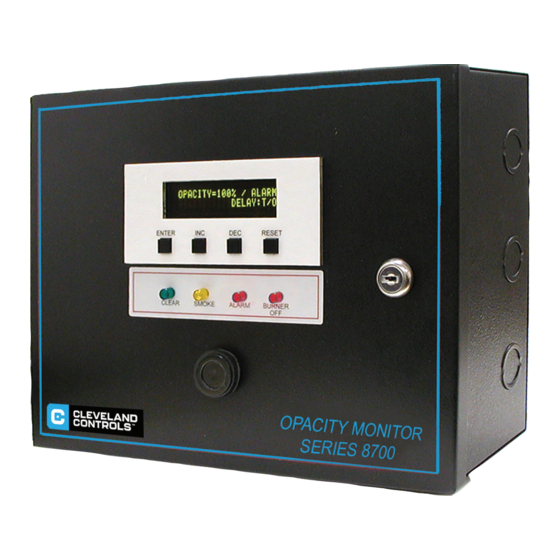
• OPACITY MONITOR MANUAL IM-A-08740-05 • 3.0 Operation & Maintenance 3.1 Displays and Indicators 3.1.1 Continuous Display Screen When power is applied to the unit, the continuous display screen lights. It provides a continuous display of particulate density from 000% Opacity (no particulates detected) to 100% Opacity (particulates are dense enough to block all light), in 1% increments. -
Page 13: Calibration On Continuous Display Screen
• OPACITY MONITOR MANUAL IM-A-08740-05 • 3.3 Calibration on Continuous Display Screen For a summary of the calibration information below, refer to Figures 10 through 13. 3.3.1 AUTO CALIBRATION MODE To calibrate the LED light source and receiver units, press the “Enter” button until the “Enter Cal Menu?” message appears. -
Page 14: Miscellaneous
• OPACITY MONITOR MANUAL IM-A-08740-05 • 4.0 Miscellaneous 4.1 Retransmission of Process Variable Refer to the overall wiring diagrams (Figures 6-9). The terminals for the retransmission of the process variable are located on the printed circuit board. They are marked “4-20 ma.” 4.2 Modbus Communications Refer to the overall wiring diagrams (Figures 6-9). -
Page 15: Customer Service Information
(address above in Paragraph 5.1) 5.3 Service A Maintenance and Service Contract can ensure trouble-free, economical operation of Cleveland Controls equipment for many years. One-time on site service by a factory-trained service engineer can also be provided as needed. Contact... -
Page 16: Standard Terms And Conditions Of Sale
• OPACITY MONITOR MANUAL IM-A-08740-05 • 5.4 Standard Terms and Conditions of Sale TERMS OF SALE: 1% discount if paid in ten (10) days, net amount due and payable in thirty (30) days. AGREEMENT OF SALE: Acceptance by Seller of any order placed for goods whether submitted on Buyer’s purchase order form or on seller’s Sales Order Acknowledgment form, shall be subject to Seller’s Standard Terms and Conditions of Sale and is conditioned upon the Buyer’s acceptance of these Standard Terms and Conditions. -
Page 17: Appendices: Drawings & Tables
• OPACITY MONITOR MANUAL IM-A-08740-05 • 6.0 APPENDICES: DRAWINGS & TABLES... - Page 18 • OPACITY MONITOR MANUAL IM-A-08740-05 • Figure 1: Printed Circuit Board Assembly for A-08740 Universal Opacity Monitor.
- Page 19 • OPACITY MONITOR MANUAL IM-A-08740-05 • Figure 2: Housing Dimensions for A-08740 Universal Opacity Monitor.
- Page 20 • OPACITY MONITOR MANUAL IM-A-08740-05 • Figure 3: Mounting the Breeching Units (A-08740 Universal Opacity Monitor).
- Page 21 • OPACITY MONITOR MANUAL IM-A-08740-05 • Figure 4: Typical Air Supply Arrangement for Sight Glass Purge...
- Page 22 • OPACITY MONITOR MANUAL IM-A-08740-05 • Figure 5: Typical Air Supply Arrangement for Sight Glass Purge with Blower (P/N 31726).
- Page 23 • OPACITY MONITOR MANUAL IM-A-08740-05 • *Note: Relay is failsafe: on power up, the relay is energized. The contacts change state from NO to NC and NC to NO. • The LED light source and receiver operate at less than 24 V dc. LED light source wiring: two 14 AWG stranded wires. Light receiver wiring: one shielded 16 AWG pair.
- Page 24 • OPACITY MONITOR MANUAL IM-A-08740-05 • Figure 7: Field Wiring for Universal Opacity Monitor Equipped with NYC Burner Cutoff Module.
- Page 25 • OPACITY MONITOR MANUAL IM-A-08740-05 • Figure 8: Field Wiring for Universal Opacity Monitor Equipped with Overfire Air Timer Module for Stoker Applications.
- Page 26 • OPACITY MONITOR MANUAL IM-A-08740-05 • Figure 9: Field Wiring for Universal Opacity Monitor Equipped with Purge Air Blower System.
- Page 27 • OPACITY MONITOR MANUAL IM-A-08740-05 • Display Name Function Opacity Opacity Displays opacity level as 000-100%. Cal% Calibration Unit is in opacity calibration mode. Clear Clear Opacity is within permissible limits. Smoke Smoke Flashes when opacity has exceeded the trip point. Flashes when opacity has exceeded the trip point for longer than the delay Alarm Alarm...
- Page 28 • OPACITY MONITOR MANUAL IM-A-08740-05 • Scrolling Display Screen: press “Enter” key to scroll through the following screens which display status messages and permit adjustment of parameters. Screen Function Adjustment Procedure Line 1: OPACITY = XXX% / Displays on Line 1 in operating mode when opacity is below CLEAR Default the alarm trip point.
- Page 29 • OPACITY MONITOR MANUAL IM-A-08740-05 • Continuation of Scrolling Display Screen for Opacity Models A-08740-A0-0X Screen Function Adjustment Procedure Modbus Adjust while the unit is powered. Press “Inc” or “Dec” key Displays the modbus address. Addr to adjust the setting. Set from 001 to 247. Adjust while the unit is powered.
- Page 30 • OPACITY MONITOR MANUAL IM-A-08740-05 • Continuation of Scrolling Display Screen for Opacity Models A-08740-A0-0X Screen Function Adjustment Procedure Prompts user to begin Press “Enter” to return to default screen. To proceed with Calibrate calibration of the 4-20 ma DC calibration, connect a 4-20 ma meter to the retransmit Retrans? retransmitted output or return...
- Page 31 • OPACITY MONITOR MANUAL IM-A-08740-05 • Figure 12a: Scrolling Display Screens for Standard Models A-08740-A0-1X (1a through 5)
- Page 32 • OPACITY MONITOR MANUAL IM-A-08740-05 • Continuation of Scrolling Display Screen for Opacity Models A-08740-1X Screen Function Adjustment Procedure Adjust while the unit is powered. Press “Inc” or Modbus Addr Displays the modbus address. “Dec” key to adjust the setting. Set from 001 to 247.
- Page 33 • OPACITY MONITOR MANUAL IM-A-08740-05 • Continuation of Scrolling Display Screen for Opacity Models A-08740-1X Screen Function Adjustment Procedure Prompts user to begin Press “Enter” to return to default screen. To proceed Calibrate calibration of the 4-20 ma DC with calibration, connect a 4-20 ma meter to the Retrans? retransmitted output or return retransmit terminals.
- Page 34 • OPACITY MONITOR MANUAL IM-A-08740-05 • Scrolling Display Screen: press “”Enter”” key to scroll through the following screens which display status messages and permit adjustment of parameters. Screen Function Adjustment Procedure Line 1: OPACITY = XXX% / Displays on Line 1 in operating mode when opacity is below CLEAR Default the alarm trip point.
- Page 35 • OPACITY MONITOR MANUAL IM-A-08740-05 • Continuation of Scrolling Display Screen for Opacity Monitor Models A-08740-2X Screen Function Adjustment Procedure Modbus Adjust while the unit is powered. Press “Inc” or “Dec” key Displays the modbus address. Addr to adjust the setting. Set from 001 to 247. Adjust while the unit is powered.
- Page 36 • OPACITY MONITOR MANUAL IM-A-08740-05 • Continuation of Scrolling Display Screen for Opacity Models A-08740-A0-2X Screen Function Adjustment Procedure Prompts user to begin Press “Enter” to return to default screen. To proceed Calibrate calibration of the 4-20 ma DC with calibration, connect a 4-20 ma meter to the Retrans? retransmitted output or return retransmit terminals.
- Page 37 If it does not, contact Cleveland Controls. WATCH DOG TIMER RESET: AN ERROR HAS OCCURRED IN THE 0.05 SECOND MICROPROCESSOR. Turning the power off and then back on may clear up this fault. If it does not, contact Cleveland Controls. Figure 15: “Processor Running” LED...
- Page 38 • OPACITY MONITOR MANUAL IM-A-08740-05 • Troubleshooting Component Symptom Possible Problem Main Pc. Board is faulty: replace. Alarm or Opacity section of the control unit is not operating properly. One of the alarm or opacity controls is faulty: %, Set 100%, Delay, or Trip Point Control. Control Unit 4-20 ma field wiring is faulty.
- Page 39 • OPACITY MONITOR MANUAL IM-A-08740-05 • Intentionally Intentionally Blank Blank...
- Page 40 • OPACITY MONITOR MANUAL IM-A-08740-05 • Intentionally Intentionally Blank Blank...
Need help?
Do you have a question about the A-08740 0 Series and is the answer not in the manual?
Questions and answers