SunFounder Pironman Manual
Hide thumbs
Also See for Pironman:
- Manual (79 pages) ,
- Manual (67 pages) ,
- Assembly instructions manual (119 pages)
Table of Contents
Advertisement
Advertisement
Table of Contents

Subscribe to Our Youtube Channel
Related Manuals for SunFounder Pironman


Summary of Contents for SunFounder Pironman
- Page 1 SunFounder Pironman www.sunfounder.com Jan 31, 2024...
-
Page 3: Table Of Contents
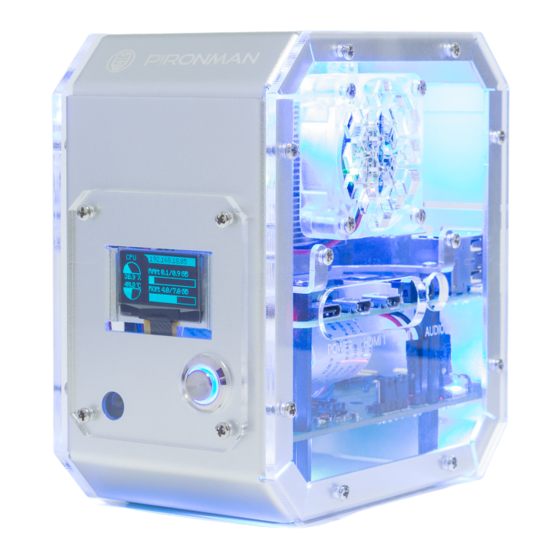
CONTENTS 1 1. What Else Should We Prepare? 2 2. Assembly Instructions 3 3. Installing the OS 4 4. Setting Up Your Raspberry Pi Setting Up with a Screen ......... Setting Up Without a Screen . - Page 5 Thanks for choosing our Pironman U1. img/pironman_u1.jpg Meet the Pironman U1, the essential UPS case for Raspberry Pi, designed for seamless performance and sophisticated style. It features Advanced Hardware Power Path Switching for stable power, Triple Current Sensors for efficient power management, and Intelligent Charging to enhance battery life.
- Page 6 SunFounder Pironman CONTENTS...
-
Page 7: 1. What Else Should We Prepare
Optional Components • M.2 NVMe SSD The Pironman U1 features an NVMe PIP with an M.2 SSD connector, accommodating four NVMe M.2 SSD sizes: 2230, 2242, 2260, and 2280. It supports both PCIE2.0 and PCIE 3.0 NVMe M.2 SSDs. • Screen To access the Raspberry Pi’s desktop environment, a screen such as a TV or a computer monitor is required. - Page 8 SunFounder Pironman Chapter 1. 1. What Else Should We Prepare?
-
Page 9: 2. Assembly Instructions
CHAPTER 2. ASSEMBLY INSTRUCTIONS Before assembling the Pironman, please first verify that all parts and components have been included. If there are any missing or damaged components, please contact SunFounder immediately at service@sunfounder.com to resolve the issue as soon as possible. - Page 10 SunFounder Pironman Chapter 2. 2. Assembly Instructions...
-
Page 11: 3. Installing The Os
CHAPTER THREE 3. INSTALLING THE OS Required Components • Raspberry Pi 5B • A Personal Computer • A Micro SD card Installation Steps 1. Visit the Raspberry Pi software download page at Raspberry Pi Imager. Choose the Imager version compatible with your operating system. - Page 12 SunFounder Pironman 5. Within the Imager, click CHOOSE DEVICE and select the Raspberry Pi 5 model from the dropdown list. 6. Select CHOOSE OS and opt for the recommended operating system version. Chapter 3. 3. Installing the OS...
- Page 13 SunFounder Pironman 7. Click Choose Storage and select the appropriate storage device for the installation. Note: Ensure you select the correct storage device. To avoid confusion, disconnect any additional storage devices if multiple ones are connected.
- Page 14 SunFounder Pironman 8. Click NEXT and then EDIT SETTINGS to tailor your OS settings. If you have a monitor for your Raspberry Pi, you can skip the next steps and click ‘Yes’ to begin the installation. Adjust other settings later on the monitor.
- Page 15 SunFounder Pironman lacks a default password. 11. Configure the wireless LAN by providing your network’s SSID and Password. Note: Set the Wireless LAN country to the two-letter ISO/IEC alpha2 code corresponding to your location. 12. Click SERVICES and activate SSH for secure, password-based remote access. Remember to save your settings.
- Page 16 SunFounder Pironman 13. Confirm your selected settings by clicking Yes. Chapter 3. 3. Installing the OS...
- Page 17 SunFounder Pironman 14. If the SD card contains existing data, ensure you back it up to prevent data loss. Proceed by clicking Yes if no backup is needed. 15. The OS installation process will commence on the SD card. A confirmation dialog will appear upon completion.
- Page 18 SunFounder Pironman Chapter 3. 3. Installing the OS...
-
Page 19: 4. Setting Up Your Raspberry Pi
1. Insert the Micro SD card with Raspberry Pi OS installed into the Pironman U1. 2. Connect the Mouse and Keyboard to the Pironman U1. 3. Use the HDMI cable to connect the screen to the Pironman U1’s HDMI port. Ensure the screen is plugged into a power source and turned on. -
Page 20: Setting Up Without A Screen
SunFounder Pironman 4.2 Setting Up Without a Screen If you don’t have a monitor, remote login is a viable option. Required Components • Raspberry Pi 5/4 Model B • Power Adapter • Micro SD card Using SSH, you can access the Raspberry Pi’s Bash shell, which is the default Linux shell. Bash offers a command-line interface for performing various tasks. - Page 21 SunFounder Pironman 2. A security message will appear during your first login. Respond with yes to proceed. The authenticity of host raspberrypi.local␣ (2400:2410:2101:5800:635b:f0b6:2662:8cba) can t be established. ED25519 key fingerprint is SHA256:oo7x3ZSgAo032wD1tE8eW0fFM/ kmewIvRwkBys6XRwg. Are you sure you want to continue connecting (yes/no/[fingerprint])? 3.
- Page 22 SunFounder Pironman 4.2.2 For Windows Users For Windows 10 or higher users, remote login to a Raspberry Pi can be achieved through the following steps: 1. Search for powershell in your Windows search box. Right-click on Windows PowerShell and select Run as administrator.
- Page 23 SunFounder Pironman 4. A security message will appear on your first login. Enter yes to proceed. The authenticity of host raspberrypi.local␣ (2400:2410:2101:5800:635b:f0b6:2662:8cba) can t be established. ED25519 key fingerprint is SHA256:oo7x3ZSgAo032wD1tE8eW0fFM/ kmewIvRwkBys6XRwg. Are you sure you want to continue connecting (yes/no/[fingerprint])? 5.
- Page 24 SunFounder Pironman The authenticity of host raspberrypi.local␣ (2400:2410:2101:5800:635b:f0b6:2662:8cba) can t be established. ED25519 key fingerprint is SHA256:oo7x3ZSgAo032wD1tE8eW0fFM/ kmewIvRwkBys6XRwg. Are you sure you want to continue connecting (yes/no/[fingerprint])? 5. Enter the password you previously set. Note that for security reasons, the password won’t be visible as you type.
- Page 25 SunFounder Pironman 4. Use the arrow keys to choose <Yes> -> <OK> -> <Finish> and finalize the VNC service activation. Logging in via VNC Viewer 1. Download and install VNC Viewer on your personal computer. 2. Once installed, launch VNC Viewer. Enter the hostname or IP address of your Raspberry Pi and press Enter.
- Page 26 SunFounder Pironman 3. When prompted, enter your Raspberry Pi’s username and password, then click OK. 4. You’ll now have access to your Raspberry Pi’s desktop interface. Chapter 4. 4. Setting Up Your Raspberry Pi...
- Page 27 SunFounder Pironman 4.2. Setting Up Without a Screen...
- Page 28 SunFounder Pironman Chapter 4. 4. Setting Up Your Raspberry Pi...
-
Page 29: 5. Quick User Guide
FIVE 5. QUICK USER GUIDE To effectively utilize the Pironman U1, we’ll be employing the SunFounder Power Control Core (SPC). This is a tool for power management and control of hardware devices. Its primary functions are to monitor battery voltage, current, capacity, and percentage, and to manage fan speed and modes. The SPC connects with devices via I2C communication, ensuring stable data transfer. -
Page 30: View Data From Spc Dashboard
SunFounder Pironman 5.2 2. View Data from SPC Dashboard Now, you can visit the SPC Dashboard to view various data. • Enter <your pi ip>:34001 in your browser to open the SPC Dashboard designed by us. • The Dashboard will include the following: –... - Page 31 SunFounder Pironman – Fan: Shows the fan status, mode, speed, and the current temperature of the Raspberry Pi. ∗ You can manually turn the fan on or off and select different rotation modes for it. 5.2. 2. View Data from SPC Dashboard...
- Page 32 SunFounder Pironman – Battery: Displays the battery’s percentage, charging status, voltage, current, and power. ∗ When an external USB power source is plugged in, the battery is in charging mode, showing its voltage, charging current, and power. ∗ When the external USB is not plugged in, the current and power are negative, indicating the battery’s output current and power.
- Page 33 SunFounder Pironman – Raspberry Pi Power: Displays the power supply to the Raspberry Pi (External or battery), its voltage, current, and power. 5.2. 2. View Data from SPC Dashboard...
- Page 34 SunFounder Pironman – Storage: Displays the storage capacity of a Raspberry Pi, showing various disk partitions with their used and available space. Chapter 5. 5. Quick User Guide...
- Page 35 SunFounder Pironman – Memory: Shows the Raspberry Pi’s RAM usage and percentage. 5.2. 2. View Data from SPC Dashboard...
- Page 36 SunFounder Pironman – Processor: Illustrates the Raspberry Pi’s CPU performance, including the status of its four cores, operating frequencies, and CPU usage percentage. Chapter 5. 5. Quick User Guide...
- Page 37 SunFounder Pironman – Network: Displays the current network connection type, upload, and download speeds. 5.2. 2. View Data from SPC Dashboard...
- Page 38 SunFounder Pironman • You can also switch this page to a white mode. Chapter 5. 5. Quick User Guide...
-
Page 39: Modify Configuration From Terminal
SunFounder Pironman 5.3 3. Modify Configuration from Terminal You can also view data related to the battery, fan, etc., from the Terminal. 1. The spc program runs in a python3 virtual environment. Use the following command to enter the virtual envi-... - Page 40 SunFounder Pironman /opt/spc/log • To see what log files are available, use the ls command. config.log ha_api.log spc.log system_status.log • To view the contents of a log file, such as spc.log, use the cat command. cat spc.log 4. To view the logs generated by systemctl, press Q to exit the current page.
-
Page 41: 6. About Hardware
CHAPTER 6. ABOUT HARDWARE This chapter is a detailed description of all the components in Pironman U1, as well as the associated software config- uration. 6.1 Features Functions • Raspberry Pi 5/4 Model B UPS Case • Hardware power path switching to ensure power supply to the Raspberry Pi •... - Page 42 SunFounder Pironman • Interfaces – Raspberry Pi standard 40-Pin GPIO – micro SD – USB Type C power input – 2 x USB 2.0 – 2 x USB 3.0 – Gigabit LAN port – 2 x 4Kp60 HDMI Type A •...
-
Page 43: Main Board
Pi5 dedicated USB PD protocol 5V/5A power sources. Battery Equipped with a custom battery pack made by SunFounder, consisting of two 18650 batteries with a capacity of 2000mAh. The connector is XH2.54, 3P, which can be directly charged after being inserted into the board. - Page 44 SunFounder Pironman The Pironman U1 features an integrated power path function, which can automatically switch power paths to reduce battery wear and ensure uninterrupted power supply to the Raspberry Pi. • When an external USB power source is connected, it directly supplies power to the Raspberry Pi and can also charge the battery if needed.
- Page 45 SunFounder Pironman 6.2.3 Raspberry Pi Status Monitoring To turn off the Pironman U1, you need to press and hold the power button for 2 seconds until the button light turns purple, then release. At this point, Pironman U1 will send a shutdown signal to the Raspberry Pi via I2C. If you have followed the SPC, the Raspberry Pi will then proceed with a safe shutdown.
- Page 46 SunFounder Pironman 6.2.4 Infrared Receiver • Model: IRM-56384, operating at 38KHz. • Two pins for enabling the infrared function. By default, a jumper cap is inserted for immediate functionality. Remove the cap to free GPIO13 if the IR receiver is not in use.
- Page 47 SunFounder Pironman • Test the connection: sudo ls /dev |grep lirc • Install the lirc module: sudo apt-get install lirc -y • Now, test the IR Receiver by running the following command. After running the command, press a button on the remote control, and the code of that button will be printed.
- Page 48 For Raspberry Pi 4 When the Pironman U1 is powered off or shut down, the microcontroller is powered by the button cell battery, recording the time, with a standby current of about 2uA. The board does not support charging the RTC battery, so there is no need to use a rechargeable battery.
- Page 49 SunFounder Pironman • And use a SH1.0 2Pin reverse cable to connect the RTC socket to the Raspberry Pi’s BAT power socket. This way, the onboard RTC battery is completely disconnected from the board and only serves as a battery holder.
- Page 50 SunFounder Pironman Enable Trickle Charging • The Raspberry Pi 5 supports charging the RTC battery. By default, the trickle charging feature for the battery is disabled. The sysfs files indicate the current trickle charging voltage and limits: Warning: – A rechargeable ML1220 battery can be used here.
- Page 51 6.2.7 Pin Headers The Pironman U1 extends the GPIO of the Raspberry Pi, but note that the Pironman U1 utilizes some of these pins. You can choose to disable certain features according to your needs to free up these pins.
-
Page 52: Pi5 Nvme Pip
SunFounder Pironman 6.3 Pi5 NVMe PIP The Pi5 NVMe PIP (PCIe Peripheral Board), as defined by the Raspberry Pi Foundation, is a PCIe adapter board designed specifically for NVMe solid-state drives. It supports four different sizes of NVMe SSDs: 2230, 2242, 2260, and 2280, all fitting into an M.2 M key slot. - Page 53 SunFounder Pironman dtparam=nvme Note: Enumeration of PCIe devices behind a switch is not currently supported. PCIe Gen 3.0 • The connection is certified for Gen 2.0 speeds (5 GT/sec), but you can force it to Gen 3.0 (10 GT/sec) if you add the following lines to your /boot/firmware/config.txt.
- Page 54 SunFounder Pironman In general, M.2 SATA SSDs are B+M-keyed (can fit in sockets for B-keyed and M-keyed modules), while M.2 NVMe SSDs for PCIe 3.0 x4 lane are M-keyed. Chapter 6. 6. About Hardware...
- Page 55 M.2 modules come in different sizes and can also be utilized for Wi-Fi, WWAN, Bluetooth, GPS, and NFC. Pironman 5 supports four (PCIE2.0 / PCIE 3.0) NVME M.2 SSD sizes based on their names: 2230, 2242, 2260, and 2280. The “22” is the width in millimeters (mm), and the two following numbers are the length. The longer the drive, the more NAND flash chips can be mounted;...
- Page 56 6.3.4 Booting from the SSD After you install the SSD into the Pironman 5 and reboot, an NVMe disk connected through the PCIe should be visible. If you want to boot your Raspberry Pi from the SSD, you need to do some configurations and install an operating system on the SSD.
- Page 57 SunFounder Pironman 2. Make sure to select the correct Copy From and Copy To devices. Be careful not to mix them up. 3. After selection, click Start. 6.3. Pi5 NVMe PIP...
- Page 58 SunFounder Pironman 4. You will be prompted that the content on the SSD will be erased. Make sure to back up your data before clicking Yes. 5. Wait for some time, and the copying will be completed. Installing the System with Raspberry Pi Imager 1.
- Page 59 SunFounder Pironman 2. Select Pi 5. 3. Choose an operating system. 6.3. Pi5 NVMe PIP...
- Page 60 SunFounder Pironman 4. Select the NVMe SSD card. 5. After configuration, click Yes. 3. Restart Pironman 5 After restarting the Raspberry Pi, it will boot from the SSD. sudo reboot Note: If you are using the Raspberry Pi Imager to install the system on the SSD, you will need to reconfigure the setup after the Raspberry Pi boots up by following the steps to 5.
-
Page 61: 18650 Battery
• GND: Negative battery terminal. This is a custom battery pack made by SunFounder consisting of two 18650 batteries with a capacity of 2000mAh. The connector is XH2.54, 3P, which can be charged directly after being inserted into the board. -
Page 62: Fan
When the power button’s light begins to flash purple, the Raspberry Pi will receive a shutdown signal and proceed to shut down. After the shutdown is complete, the Pironman U1 will turn off. If the RTCEN is connected, the Pironman U1 will enter RTC standby mode. If not connected, the Pironman U1 will power off completely. The power button’s light will turn off once the shutdown process is complete. - Page 63 Long Press 5 Seconds, Hardware Shutdown Sleep/Not Powered Wiring The button interface is MX1.25 5P. Use the MX1.25 5P reverse cable to connect the button to the Pironman U1 HAT. The button pin definitions are: Button Signal Blue Positive Signal...
- Page 64 SunFounder Pironman Chapter 6. 6. About Hardware...
-
Page 65: Home Assistant(Pi 4)
CHAPTER SEVEN HOME ASSISTANT(PI 4) This section will guide you in installing the Home Assistant operating system on your Raspberry Pi. Please note that this process will result in the loss of all existing content on your Raspberry Pi system. It is important to backup your data before proceeding. - Page 66 SunFounder Pironman 3. Insert your SD card into your computer or laptop’s SD card slot. 4. Launch the Raspberry Pi Imager application by clicking its icon or typing rpi-imager in your terminal. 5. Within the Imager, click CHOOSE DEVICE and select the Raspberry Pi model from the dropdown list.
- Page 67 SunFounder Pironman 6. Click on CHOOSE OS, and finish select Home Assistant OS xx(xxxx) as shown in the images below. 7.1. 1. Install the Home Assistant OS...
- Page 68 SunFounder Pironman Chapter 7. Home Assistant(Pi 4)
- Page 69 SunFounder Pironman 7. Click Choose Storage and select the appropriate storage device for the installation. Note: Ensure you select the correct storage device. To avoid confusion, disconnect any additional storage devices if multiple ones are connected. 8. Click Next. If your SD card currently has any files on it, you may wish to back up these files first to prevent you from permanently losing them.
- Page 70 SunFounder Pironman 9. After waiting for a period of time, the following window will appear to represent the completion of writing. Chapter 7. Home Assistant(Pi 4)
-
Page 71: Configuring Your Home Assistant
SunFounder Pironman 7.2 2. Configuring Your Home Assistant 1. Enable the I2C Interface This involves activating the I2C interface on your device. 1. Remove and then reinsert the SD card into your computer. Open the File Explorer and locate the SD card named hassos-boot. - Page 72 SunFounder Pironman 6. Edit rpi-i2c.conf to include the following line: i2c-dev 7. Save and exit the file. 2. Setting Up WiFi Now, let’s set up the WiFi connection. Note: Skip this step if you prefer using a wired network connection.
- Page 73 SunFounder Pironman 3. Enter the following configuration in the my-network file, substituting MY_SSID and MY_WLAN_SECRET_KEY with your WiFi network’s details: [connection] id=my-network uuid=72111c67-4a5d-4d5c-925e-f8ee26efb3c3 type=802-11-wireless [802-11-wireless] mode=infrastructure ssid=MY_SSID # Uncomment if your SSID is hidden #hidden=true [802-11-wireless-security] auth-alg=open key-mgmt=wpa-psk psk=MY_WLAN_SECRET_KEY [ipv4]...
- Page 74 SunFounder Pironman 2. Append the following settings at the end of the file: dtparam=i2c_vc=on dtparam=i2c_arm=on dtoverlay=gpio-poweroff,gpio_pin=26,active_low=0 dtoverlay=gpio-ir,gpio_pin=13 3. Save and close the file. 4. Accessing Home Assistant Eject the microSD card from your computer and insert it into your Raspberry Pi. Connect the power supply (and Ethernet cable, if applicable).
- Page 75 SunFounder Pironman 5. Creating Your Account 1. Follow the on-screen instructions to create your user account. This is the account you’ll use to access the Home Assistant interface. 7.2. 2. Configuring Your Home Assistant...
- Page 76 SunFounder Pironman 2. Proceed through the prompts to set your location and other preferences. You may be asked to install detected devices; you can choose to skip this for now by selecting FINISH. Chapter 7. Home Assistant(Pi 4)
-
Page 77: Home Assistant Addon
1. Download and Install SPC. Now we will install the Pironman U1 addon for Home Assistant. Choose one of the following two methods to add it. 7.3.1 1. Automatic Addition 1. Please click the button below to quickly add it. - Page 78 SunFounder Pironman 3. Then, you will be prompted to add the Addon. Choose ADD. 4. After a few seconds, the Pironman U1 addon will appear. Chapter 7. Home Assistant(Pi 4)
- Page 79 SunFounder Pironman 5. Then, start (or restart) the addon. 7.3. 3. Home Assistant Addon...
- Page 80 SunFounder Pironman 6. Now you can select these options, such as Start on boot to enable Pironman U1 to start when the system boots up. Or Show in sidebar to show the dashboard specially designed for Pironman U1 in the sidebar.
- Page 81 2. Navigate to the ADD-ON STORE tab. 3. In the top right corner, find and click on the Repositories button. 4. Type the repository URL: https://github.com/sunfounder/home-assistant-addon-dev, and click ADD. After adding the SunFounder repository, close the popup window. 7.3. 3. Home Assistant Addon...
- Page 82 SunFounder Pironman 5. Click the menu button again, and click Check for updates. 6. After a few seconds, the Pironman U1 addon will appear at the end of the addon store. If not, try refreshing the page. 7. Enter the Pironman U1 addon and click INSTALL. This process may take a few minutes.
- Page 83 SunFounder Pironman 8. Then, start (or restart) the addon. 7.3. 3. Home Assistant Addon...
-
Page 84: View Data From Spc Dashboard
7.4 4. View Data from SPC Dashboard If you select the Show in sidebar option in the Pironman U1 add-on and then refresh the webpage, you will be able to open the Pironman U1 dashboard from the sidebar. - Page 85 SunFounder Pironman • The Dashboard will include the following: – External: Displays the status of the external USB power (Plugged in or Unplugged), its voltage, current, and power. – Fan: Shows the fan status, mode, speed, and the current temperature of the Raspberry Pi.
- Page 86 SunFounder Pironman – Battery: Displays the battery’s percentage, charging status, voltage, current, and power. ∗ When an external USB power source is plugged in, the battery is in charging mode, showing its voltage, charging current, and power. ∗ When the external USB is not plugged in, the current and power are negative, indicating the battery’s output current and power.
- Page 87 SunFounder Pironman – Raspberry Pi Power: Displays the power supply to the Raspberry Pi (External or battery), its voltage, current, and power. 7.4. 4. View Data from SPC Dashboard...
- Page 88 SunFounder Pironman – Storage: Displays the storage capacity of a Raspberry Pi, showing various disk partitions with their used and available space. Chapter 7. Home Assistant(Pi 4)
- Page 89 SunFounder Pironman – Memory: Shows the Raspberry Pi’s RAM usage and percentage. 7.4. 4. View Data from SPC Dashboard...
- Page 90 SunFounder Pironman – Processor: Illustrates the Raspberry Pi’s CPU performance, including the status of its four cores, operating frequencies, and CPU usage percentage. Chapter 7. Home Assistant(Pi 4)
- Page 91 SunFounder Pironman – Network: Displays the current network connection type, upload, and download speeds. 7.4. 4. View Data from SPC Dashboard...
- Page 92 SunFounder Pironman • You can also switch this page to a white mode. Chapter 7. Home Assistant(Pi 4)
-
Page 93: Home Assistant Mqtt Integration
Since MQTT operates within your local network, it’s not limited to running Home Assistant on the same Raspberry Pi as the Pironman U1. If you have a separate Home Assistant server or Pironman U1 is running on a different system, you can still configure Home Assistant to monitor Pironman U1. - Page 94 SunFounder Pironman 4. Wait for it to start up, then check the log tab for errors. Logs do not auto-refresh, so you need to manually refresh. Successful startup logs should look like this: 2. Adding a Dedicated User for MQTT Create a separate account specifically for MQTT access.
- Page 95 SunFounder Pironman 2. Click ADD PERSON. 3. Enter a Name, and make sure to check Allow person to login. Note: • The name cannot be homeassistant or addons, as these are reserved usernames. • If you can’t see the option to create a new user, ensure that Advanced Mode is enabled in your Home Assistant profile.
- Page 96 SunFounder Pironman 4. In the popup, enter a password, confirm it, and then click CREATE. Chapter 7. Home Assistant(Pi 4)
- Page 97 SunFounder Pironman 5. Finally, click CREATE again to finish adding the user. 7.5. 5. Home Assistant MQTT Integration...
- Page 98 SunFounder Pironman 3. Adding MQTT Integration 1. Navigate to Settings -> Devices & Services. 2. On the Integrations page, you should see the MQTT integration. Chapter 7. Home Assistant(Pi 4)
- Page 99 We recommend using the dashboard for ease of use. 1. If you select the Show in sidebar option in the Pironman U1 add-on and then refresh the webpage, you will be able to open the Pironman U1 dashboard from the sidebar.
- Page 100 SunFounder Pironman 2. Click on the settings icon located in the upper right corner. 3. Here are some MQTT parameters you need to configure: Chapter 7. Home Assistant(Pi 4)
- Page 101 SunFounder Pironman • The default value for host is core_mosquitto. If your Home Assistant is on Pironman U1, leave it as is; it points directly to the Home Assistant’s MQTT plugin. If it’s on another Home Assistant server, enter that server’s hostname or IP.
- Page 102 5. You can now view data for Pironman U1’s battery, fan, and other data in the Overview. Configuring MQTT via Command Line If your Home Assistant is not installed on Pironman U1, you can configure MQTT using the command line. Replace the placeholders in the following command with your desired values for host, username, and password.
-
Page 103: 7. Appendix
CHAPTER EIGHT 7. APPENDIX 8.1 Get the IP address There are many ways to know the IP address, and two of them are listed as follows. Checking via the router If you have permission to log in the router(such as a home network), you can check the addresses assigned to Raspberry Pi on the admin interface of router. - Page 104 SunFounder Pironman 2. Use the following command to install OpenSSH.Client. Add-WindowsCapability -Online -Name OpenSSH.Client~~~~0.0.1.0 3. After installation, the following output will be returned. Path True Online False RestartNeeded : 4. Verify the installation by using the following command. Get-WindowsCapability -Online...
-
Page 105: Putty
SunFounder Pironman 8.3 PuTTY If you are a Windows user, you can use some applications of SSH. Here, we recommend PuTTY. Step 1 Download PuTTY. Step 2 Open PuTTY and click Session on the left tree-alike structure. Enter the IP address of the RPi in the text box under Host Name (or IP address) and 22 under Port (by default it is 22). - Page 106 SunFounder Pironman Step 3 Click Open. Note that when you first log in to the Raspberry Pi with the IP address, there prompts a security reminder. Just click Yes. Step 4 When the PuTTY window prompts "login as:", type in "pi" (the user name of the RPi), and password: "raspberry"...
- Page 107 Here, we get the Raspberry Pi connected and it is time to conduct the next steps. Copyright Notice All contents including but not limited to texts, images, and code in this manual are owned by the SunFounder Company. You should only use it for personal study,investigation, enjoyment, or other non-commercial or nonprofit purposes, under therelated regulations and copyrights laws, without infringing the legal rights of the author and relevant right holders.
Need help?
Do you have a question about the Pironman and is the answer not in the manual?
Questions and answers